
本家のDarknetから分派したWindows&Linux版Darknet(AlexeyAB)というものがあります。
これを使ってNils Tijtgatという方がYOLOv2を使ったカスタム・オブジェクトのトレーニングレシピをPOSTされています。
How to train YOLOv2 to detect custom objects
この手順書を参考にすれば、だれでもWindows環境で、自分のデータを使ってYOLOをトレーニングして新しいオブジェクトのリアルタイム検出ができるそうです。
で、分かりやすい内容でしたので後々の参考用に翻訳してみました。
ただそれなりのGPUが要るのが難点ですが、WisteriaHillではJetsonでもできるのか検証してレポートする予定です。
目次
どのようにしてカスタム・オブジェクトを検出するためにYOLOv2を訓練するのか
How to train YOLOv2 to detect custom objects
In this article, we will be going over all the steps required to install and train Joseph Redmon’s YOLOv2 state of the art real-time object detection system. Its technological prowess is explained in detail in the paper YOLO9000: Better, Faster, Stronger and on the project website.
この記事では、最先端のリアルタイムオブジェクト検出システムであるJoseph RedmonのYOLOv2をインストールしてトレーニングするために必要なすべての手順を説明します。その技術的能力は、論文ではYOLO9000:より良く、より速く、より強く..と詳細に説明されています。
YOLOv2 is written for a Linux platform, but in this post we’ll be looking at the Windows port by AlexeyAB, which can be found on this Darknet GitHub repository. All commands and steps described here can easily be reproduced on a Linux machine. While it is true AlexeyAB’s GitHub page has a lot of documentation, I figured it would be worthwile to document a specific case study on how to train YOLOv2 to detect a custom object, and what tools I use to set up the entire environment.
YOLOv2はLinuxプラットフォーム用に作成されていますが、この投稿では、Darknet GitHubリポジトリにあるAlexeyABによるWindowsへの移植について見ていきます。ここで説明するすべてのコマンドと手順は、Linuxマシンで簡単に再現できます。確かに、AlexeyABのGitHubページには多くのドキュメントがありますが、カスタムオブジェクトを検出するためにYOLOv2をトレーニングする方法と、環境全体をセットアップするために使用するツールに関する特定のケーススタディをドキュメント化する価値があると考えました。
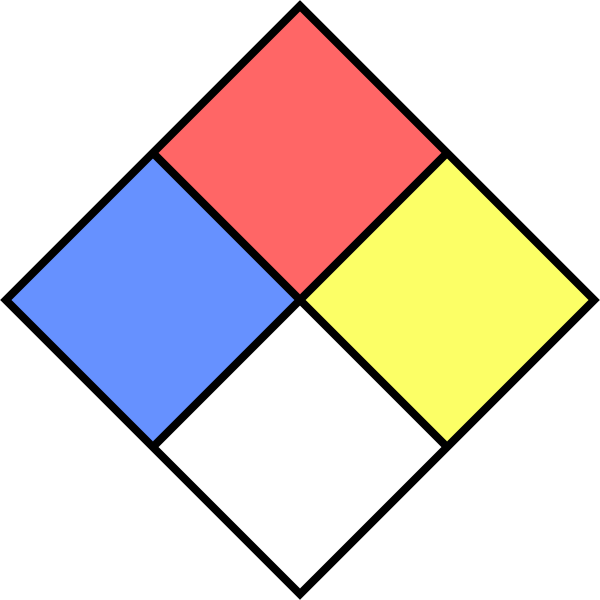
The custom object we want to detect in this article is the NFPA 704 ‘fire diamond’.
この記事で検出したいカスタムオブジェクトは、NFPA 704「fire diamond」です。
The data set I composed for this article can be found here (19.4Mb).
この記事のために作成したデータセットは、ここ(19.4Mb)にあります。
To be able to follow all steps in this article, you’ll need to have some software packages installed on your machine. I won’t redo AlexeyAB’s documentation, he lists the requirements very clearly.
この記事のすべての手順を実行するには、マシンにいくつかのソフトウェアパッケージをインストールする必要があります。AlexeyABのドキュメントをやり直すつもりはありません。彼(AlexeyAB)は要件を非常に明確にリストしています。
Getting Darknet
Maybe an obvious step, but included for completeness sake. Clone the Darknet GitHub repository for the platform of your choosing. As I explained, I will mainly focus on a Windows based approach, so open up a Git bash and clone AlexeyAB’s repository:
明らかなステップかもしれませんが、念のために書いておきます。選択したプラットフォームのDarknet GitHubリポジトリを複製します。説明したように、主にWindowsベースのアプローチに焦点を当てるので、Git bashを開き、AlexeyABのリポジトリを複製します。
git clone https://github.com/AlexeyAB/darknet.git
Data annotation
We are training a computer vision algorithm, so naturally we’ll need images that it can train on. Generally, about 300 different images per category are required to be able to train for a decent detection. These (19.4Mb) are the images I used, if you want to train for your own object you will have to compose your own training set.
コンピュータービジョンアルゴリズムをトレーニングしているので、当然、トレーニングできる画像が必要になります。一般的に、適切な検出のためのトレーニングを行うには、カテゴリごとに約300の異なる画像が必要です。これら(19.4Mb)は私が使用した画像です。自分のオブジェクトをトレーニングしたい場合は、独自のトレーニングセットを作成する必要があります。
I use the BBox Label Tool to annotate the training images. This Python 2.7 library allows us to easily generate the training data in the correct format YOLOv2 requires. So clone the GitHub repository and edit the main.py file to correctly reflect the folder where you have saved your training images. Line 128 is the one requiring our attention:
BBoxラベルツールを使用して、トレーニング画像に注釈を付けます。このPython 2.7ライブラリにより、YOLOv2が必要とする正しい形式でトレーニングデータを簡単に生成できます。GitHubリポジトリを複製し、main.pyファイルを編集して、トレーニング画像を保存したフォルダーを正しく反映させます。
128行目は注意が必要です。
128 s = r’D:\workspace\python\labelGUI’
129 ## if not os.path.isdir(s):
130 ## tkMessageBox.showerror(“Error!”, message = “The specified dir doesn’t exist!”)
131 ## return
It doesn’t really matter where you save your training images, just try to keep things organized because we’ll have a lot of data all over the place soon.
Next, let’s fire up the tool. Seeing as how I have both Python 3.6.0 and Python 2.7.13 installed on my machine, I have to specify we will be using using Python 2.7 in my terminal:
トレーニング画像を保存する場所は実際には関係ありません。すぐにすべてのデータが揃うので、整理するようにしてください。
次に、ツールを起動します。Python 3.6.0とPython 2.7.13の両方を自分のマシンにインストールする方法を見て、端末でPython 2.7を使用することを指定する必要があります
python27 .\main.py
The GUI of the BBox Label Tool will pop up, initially empty. Once we press the Load button, all images we have in our training data folder should be be loaded into the program, provided the script points to the correct folder. This is the first time you will probably notice we are not living in a perfect world: possibly a lot of images are missing. Spoiler: the BBox Label Tool only looks for .jpg images, and no: not even .jpeg files will do. All of your .png, .gif, … you name it files won’t be there. Disaster!
BBoxラベルツールのGUIがポップアップ表示されますが、最初は空です。[ロード]ボタンを押して、トレーニングデータフォルダーにあるすべての画像をプログラムにロードする必要があります。ただし、スクリプトが正しいフォルダーを指している必要があります。私たちが完璧な世界に住んでいないことにおそらく気付くのは、これが初めてです。多くの画像が欠落しています。
ネタバレ:BBoxラベルツールは.jpgイメージのみを検索し、.jpegファイルさえも検索しません。すべての.png、.gif、…あなたがそう名付けたファイルは存在しません。災難です!
Bulk Image Converter to the rescue! Just launch it from anywhere, pick the folder where your images are at and convert whatever extensions you may have to jpeg. It does say jpeg, but they will be saved as .jpg.
バルクイメージコンバーターを活用してください!どこからでも起動して、画像があるフォルダを選択し、jpegに必要な拡張子を変換します。jpegと表示されますが、.jpgとして保存されます。
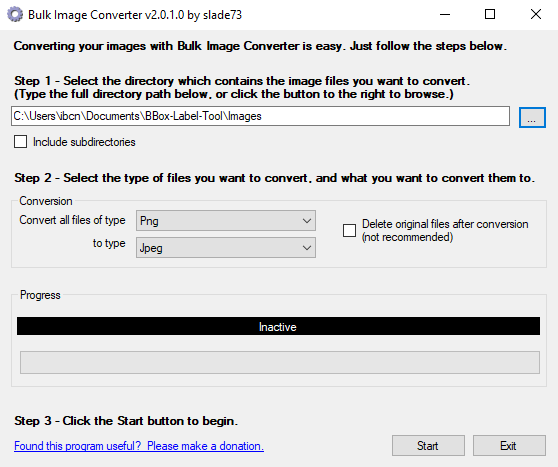
Since this is a Windows only tool, Linux users will have to find a different solution. A quick look around resulted in this solution, based on Imagemagick. I haven’t tested this out myself though.
これはWindows専用のツールであるため、Linuxユーザーは別の解決策を見つける必要があります。解決策をざっと見回すと、Imagemagickがあります。私はこれを自分でテストしていませんけど。
mogrify -format jpg *.png
Crisis averted! All of our images are ready for annotation. Relaunch the BBox Label Tool and check to see if all your training images have been correctly loaded.
危機は回避されました!すべての画像に注釈を付ける準備ができました。BBoxラベルツールを再起動し、すべてのトレーニングイメージが正しく読み込まれたかどうかを確認します。
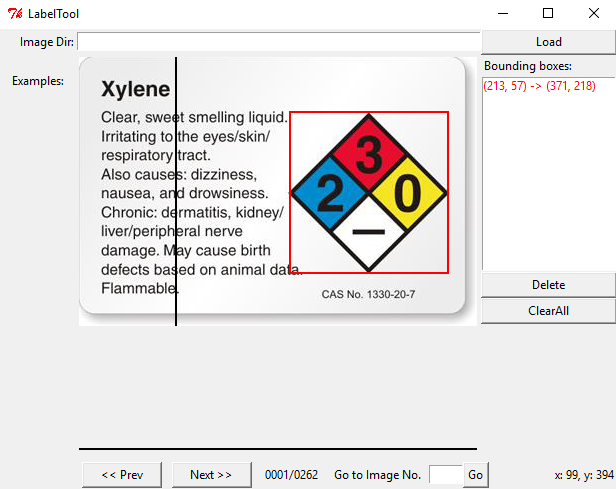
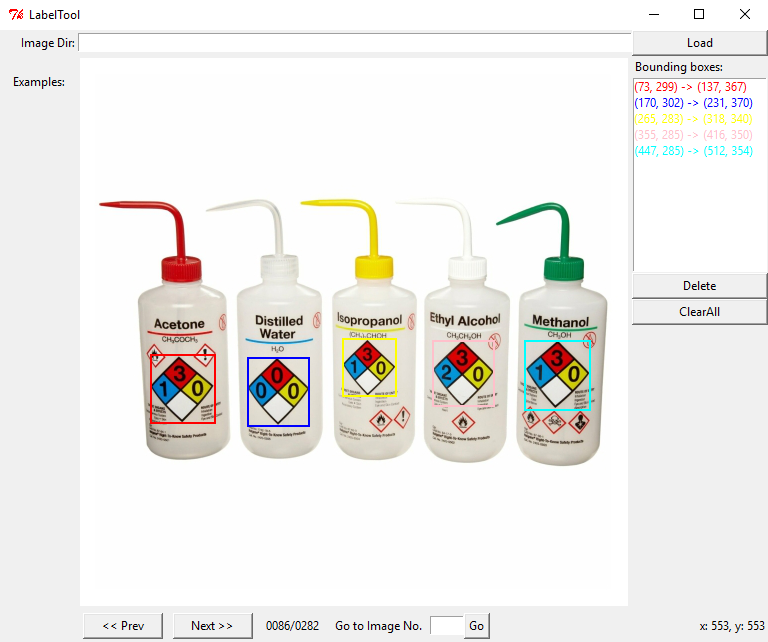
Now comes the hard and tedious work: labeling our entire training set. By clicking twice, we can create bounding boxes that should perfectly contain the object we want to detect. The above image illustrates this. Having multiple objects in the same image is no problem, just make sure you label them all correctly.
さて、ハードで退屈な作業になります。トレーニングセット全体にラベルを付けていきます。2回クリックすることで、検出するオブジェクトを完全に含む境界ボックスを作成できます。上の画像はこれを示しています。同じ画像に複数のオブジェクトが存在しても問題ありません。すべてのオブジェクトに正しくラベルを付けてください。
We will be repeating this step a lot of times, but remember that the quality of your object detection greatly depends on this step. If you go about it too carelessly and indicate the bounding boxes wrong a lot of times (too much margin around the object, cutting pieces off of the object), the detected bounding box will be of poor quality. Do bear in mind, if you want to be able to detect ‘partial’ objects (when a sign is half covered by something else for instance), you will have to include images in your set that represent this as well. In that case, cutting corners off of some images is a good idea.
このステップを何度も繰り返しますが、オブジェクト検出の品質はこのステップに大きく依存することを覚えておいてください。
不注意に行き過ぎて、バウンディングボックスが何度も間違っている(オブジェクトの周囲の余白が大きすぎる、オブジェクトの一部を切り取る)ことを示すと、検出されたバウンディングボックスの品質が低下します。「部分的な」オブジェクトを検出できるようにする場合(たとえば、記号が他の何かで半分覆われている場合)、これを表す画像もセットに含める必要があります。その場合、一部の画像の角を切り落とすことをお勧めします。
Time to put on some good music and start labeling! Once you’re done, the main.py script should have created the labels for your images in a folder Labels/000. If you are training multiple custom categories, every category will have its own folder.
いい音楽をかけてラベリングを始めましょう!完了したら、main.pyスクリプトによって、Labels / 000フォルダーに画像のラベルが作成されます。複数のカスタムカテゴリをトレーニングしている場合、すべてのカテゴリに独自のフォルダがあります。
![]()
We’re doing great, but again the non-perfect world is right around the corner. The content of the .txt files is not to the liking of YOLOv2. The left image displays what a .txt label generated by BBox Label Tool contains, the image to the right contains the data as expected by YOLOv2. The difference being that YOLOv2 wants every dimension relative to the dimensions of the image.
私たちは順調にやっていますが、完璧でない世界はすぐそこにあります。.txtファイルの内容は、YOLOv2の好みではありません。左の画像には、BBoxラベルツールによって生成された.txtラベルに含まれるものが表示され、右の画像にはYOLOv2によって期待されるデータが含まれています。違いは、YOLOv2は画像の寸法に関連するすべての情報を必要とすることです。
BBox Label Tool:
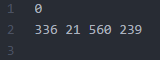
[category number]
[bounding box left X] [bounding box top Y] [bounding box right X] [bounding box bottom Y]
YOLOv2 format:

[category number] [object center in X] [object center in Y] [object width in X] [object width in Y]
The conversion between these two formats can be handled by this Python script, written by Guanghan Ning. Just edit Line 34 and Line 35 to configure both in- and output path and we’re good to go.
これらの2つの形式間の変換は、Guanghan Ningによって記述されたこのPythonスクリプトで処理できます。行34と行35を編集して、入力パスと出力パスの両方を設定するだけで、準備完了です。
python .\convert.py
Great! We now have a .txt file per image in the training set, telling YOLOv2 where the object we want to detect is at: our data set is completely annotated. Make sure both file types are in the same folder. The below image illustrates how the folder should look like by now:
すばらしい! これで、トレーニングセットの画像ごとに.txtファイルが作成され、YOLOv2に検出するオブジェクトの場所がわかります。データセットには完全に注釈が付けられています。 両方のファイルタイプが同じフォルダーにあることを確認してください。
下の画像は、今までのフォルダの様子を示しています。
Ok, we’re getting close to the point where our powerhouse GPU can start doing some serious number crunching. Next, we need to tell YOLOv2 what images form our actual training set, and what will serve as test set: the test.txt and train.txt files. I wrote a small process.py Python script that will create these files from the images found in the directory where it is run. The percentage of images to be used for test can be defined by changing the variable percentage_test. I don’t have a GitHub repository up for my YOLOv2 experiments yet, so I’ll just post the script here for now. The path_data variable indicates where images are located, relative to the darknet.exe executable, edit this as required.
OK、私達は強力なGPUがいくつかのすごい数の計算を始めることができるポイントに近づいています。次に、YOLOv2に、実際のトレーニングセットを構成する画像と、テストセットとして機能するもの(test.txtおよびtrain.txtファイル)を指定する必要があります。実行するディレクトリにある画像からこれらのファイルを作成する小さなprocess.py Pythonスクリプトを作成しました。
テストに使用される画像の割合は、変数percent_testを変更することで定義できます。YOLOv2の実験用のGitHubリポジトリがまだないので、今のところここにスクリプトを投稿します。path_data変数は、darknet.exe実行可能ファイルに対するイメージの場所を示し、必要に応じて編集します。
【process.py】
|
1 2 3 4 5 6 7 8 9 10 11 12 13 14 15 16 17 18 19 20 21 22 23 24 25 26 27 |
import glob, os # Current directory current_dir = os.path.dirname(os.path.abspath(__file__)) # Directory where the data will reside, relative to 'darknet.exe' path_data = 'data/obj/' # Percentage of images to be used for the test set percentage_test = 10; # Create and/or truncate train.txt and test.txt file_train = open('train.txt', 'w') file_test = open('test.txt', 'w') # Populate train.txt and test.txt counter = 1 index_test = round(100 / percentage_test) for pathAndFilename in glob.iglob(os.path.join(current_dir, "*.jpg")): title, ext = os.path.splitext(os.path.basename(pathAndFilename)) if counter == index_test: counter = 1 file_test.write(path_data + title + '.jpg' + "\n") else: file_train.write(path_data + title + '.jpg' + "\n") counter = counter + 1 |
Time to run this script!
このスクリプトを実行する時です!
python .\process.py
A small excerpt from the train.txt (left) and test.txt (right) files:
train.txt(左)およびtest.txt(右)ファイルからの小さな抜粋:
Preparing YOLOv2 configuration files
YOLOv2 needs certain specific files to know how and what to train. We’ll be creating these three files:
YOLOv2では、トレーニングの方法と対象を知るために特定のファイルが必要です、3つのファイルを作成します。
cfg/obj.data
cfg/obj.names
cfg/yolo-obj.cfg
First let’s prepare the YOLOv2 .data and .names file. Let’s start by creating obj.data and filling it with this content. This basically says that we are training one class, what the train and validation set files are and what file contains the names for the categories we want to detect.
まず、YOLOv2の.dataおよび.namesファイルを準備しましょう。obj.dataを作成して、このコンテンツを入力することから始めましょう。これは基本的に、1つのクラスをトレーニングしていること、トレインおよび検証セットファイルとは何か、検出したいカテゴリの名前が含まれているファイルを示しています。
【obj.data】
classes= 1
train = train.txt
valid = test.txt
names = obj.names
backup = backup/
The obj.names looks like this, plain and simple. Every new category should be on a new line, its line number should match the category number in the .txt label files we created earlier.
obj.namesは、こんな感じ、簡潔でシンプルです。新しいカテゴリはすべて新しい行に配置する必要があり、その行番号は前に作成した.txtラベルファイルのカテゴリ番号と一致する必要があります。
【obj.names】
NFPA
A final file we have to prepare (I know, powerful GPU eagerly waiting to start crunching!), is the .cfg file. I just duplicated the yolo-voc.cfg file, and made the following edits:
準備が必要な最後のファイル(私は知っています、強力なGPUがクランチを開始するのを待ち望んでいます!)は.cfgファイルです。
yolo-voc.cfgファイルを複製し、次の編集を行いました。
Line 3: batch=64, これは、すべてのトレーニングステップで64枚の画像を使用することを意味します
Line 4: subdivisions=8, バッチを8で割って、GPU VRAM要件を減らします。
VRAMを搭載した強力なGPUを使用している場合、この数を減らすか、バッチを増やすことができます。
トレーニング手順ではCUDAのメモリ不足エラーがスローされるため、それに応じて調整できます。
Line 244: classes=1, 検出したいカテゴリーの数で置き換えます。
Line 237: filters=30、この算定式で置き換えます、filters=(classes + 5)*5
To start training, YOLOv2 requires a set of convolutional weights. To make things a little easier, Joseph offers a set that was pre-trained on Imagenet. This conv.23 file can be downloaded (76Mb) from the official YOLOv2 website and provides an excellent starting point. We’ll need this file for the next step.
トレーニングを開始するには、YOLOv2に畳み込み重みのセットが必要です。物事を少し簡単にするために、ジョセフはImagenetで事前に訓練されたセットを提供しています。このconv.23ファイルは、YOLOv2の公式Webサイトからダウンロード(76Mb)でき、優れた出発点を提供します。次のステップでこのファイルが必要になります。
Training
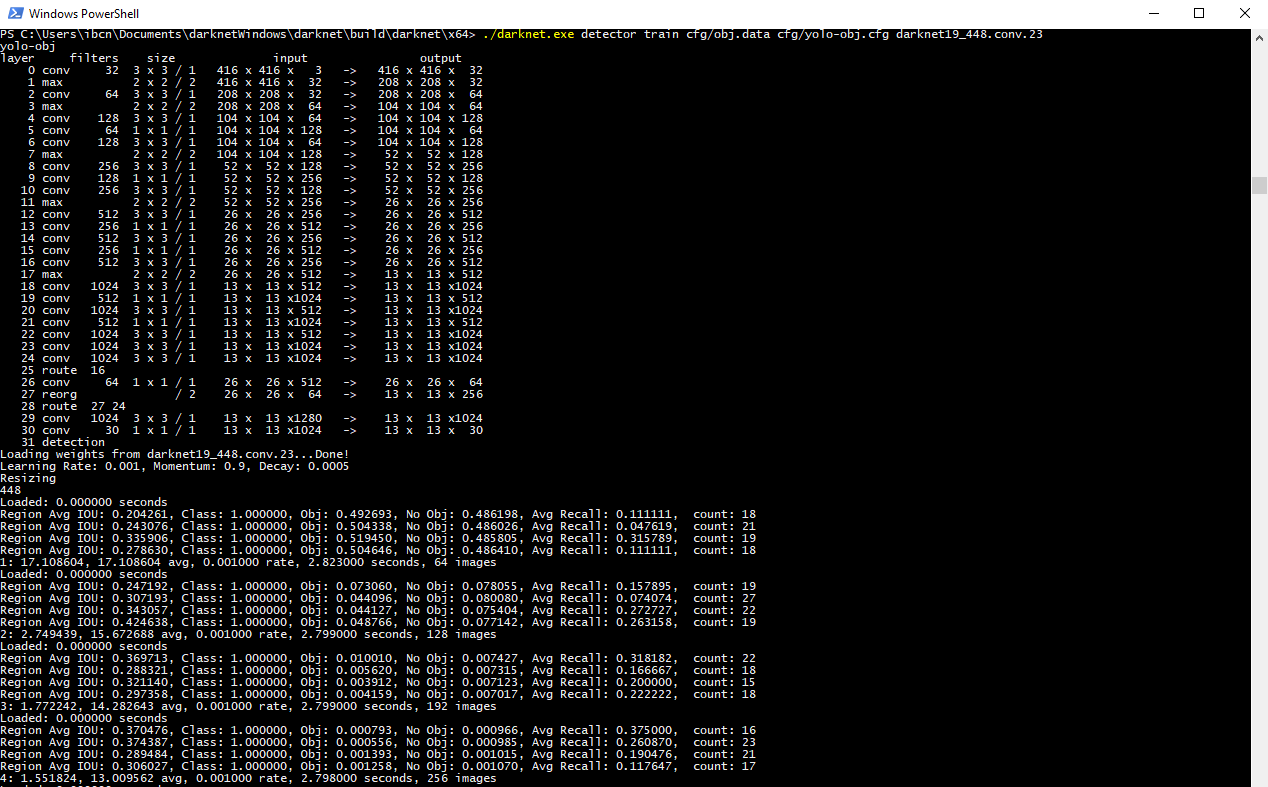
Time for the fun part! Enter the following command into your terminal and watch your GPU do what it does best:
楽しい時間です! 端末に次のコマンドを入力し、GPUが最適な動作をするのを確認します。
darknet.exe detector train cfg/obj.data cfg/yolo-obj.cfg darknet19_448.conv.23
As you see, we put the yolo-obj.cfg and obj.data files in the cfg folder, to keep things organized. Your terminal should look something like this.
ご覧のとおり、yolo-obj.cfgファイルとobj.dataファイルをcfgフォルダーに入れて、整理します。
Note: since I am running this on an NVIDIA GTX1080 Ti, I have changed the subdivisions to 4, because …. I can? The GPU has 11GB GDDR5X of VRAM on board and can process big batches of images with ease. A really basic benchmark shows that the algorithm completes one training iteration in under 3 seconds when I have the subdivisions set to 4, as opposed to close to 3.5 seconds with the subidivision set to 8. Having the subdivision as low as your GPU allows will – judging from my very rudimental benchmark – reduce training time.
注:私はこれをNVIDIA GTX1080 Tiで実行しているため、subdivisionsを4に変更しました。
GPUにはボード上に11GB GDDR5XのVRAMが搭載されており、大量の画像を簡単に処理できます。
本当に基本的なベンチマークは、subdivisionsを8に設定して3.5秒近くではなく、subdivisionsを4に設定すると、アルゴリズムが3秒未満で1回のトレーニングイテレーションを完了することを示しています。
GPUで可能な限り細分化することで、基本的なベンチマークから判断して、トレーニング時間を短縮できます。
Edit: all of a sudden, I somehow got a CUDA out of memory error after 110 iterations. Weird … I changed the subdivisions back to 8 to make sure the training is never interrupted.
編集:突然、私は何らかの形で110回の反復後にCUDAメモリ不足エラーが発生しました。
奇妙な…トレーニングが中断されないように、subdivisionsを8に戻しました。
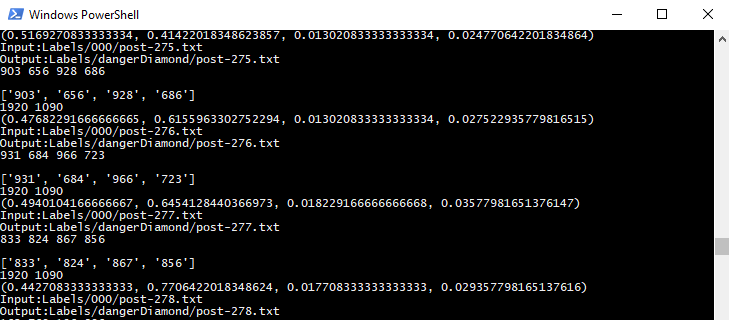
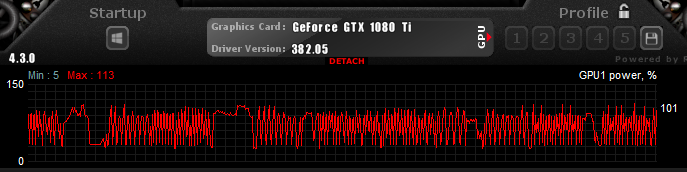
A screenshot from the MSI Afterburner tool, showing the GPU under load during training:
MSI Afterburnerツールのスクリーンショット。GPUにトレーニング中に負荷がかかっているのを示しています。
AlexeyAB has a very informative description explaining when you should stop training the model. The average loss (error) value (marked bold in the line below) that gets reported after every training iteration should be as low as possible.
AlexeyABには、モデルのトレーニングを停止するタイミングを説明する非常に有益な説明があります。すべてのトレーニングの反復後に報告される平均損失(エラー)値(下の行で太字で示されている)は、できるだけ低くする必要があります。
2: 2.950644, 15.939886 avg, 0.001000 rate, 2.813000 seconds, 128 images
The YOLOv2 training algorithm is configured this way, that weights are being saved into the backup folder every 100, 200, 300, 400, 500 and eventually every multiple of 1000 iterations. If training ever were to be interrupted, willingly or accidentally, you can continue training from the last saved .weights file like so:
YOLOv2トレーニングアルゴリズムはこのように構成されており、重みは100、200、300、400、500、最終的には1000の倍数ごとにバックアップフォルダーに保存されます。自発的または偶発的にトレーニングを中断した場合、次のように最後に保存した.weightsファイルからトレーニングを続行できます。
darknet.exe detector train cfg/obj.data cfg/yolo-obj.cfg yolo-obj_2000.weights
After about one hour of training, I reached 1000 iterations and the average loss (error) was found to be 0.082204. Pretty damn fast if you ask me, this is one mighty powerful GPU!
約1時間のトレーニングの後、1000回の反復に達し、平均損失(エラー)は0.082204であることがわかりました。
あなたが私に尋ねるならかなり速いです、これは強力なGPUの1つです!

I will definitely train the model for a longer time to achieve an even higher accuracy, but for now will use the yolo-obj_1000.weights file in the results section to see how our model currently performs.
私は間違いなくモデルをより長い時間トレーニングして、さらに高い精度を実現しますが、今のところ、結果セクションのyolo-obj_1000.weightsファイルを使用して、モデルの現在のパフォーマンスを確認します。
Results
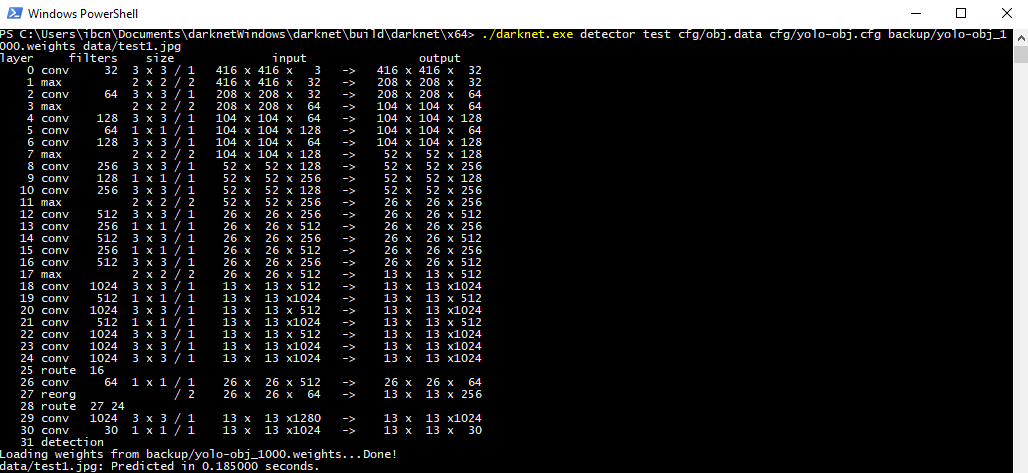
We should now have a .weights file that represents our trained model. Let’s use this on some images to see how well it can detect the NFPA 704 ‘fire diamond’ pictogram. This command unleashes YOLOv2 on an image of our choosing:
これで、トレーニング済みモデルに基づいた.weightsファイルが作成されました。これをいくつかの画像で使用して、NFPA 704の「ファイアダイアモンド」ピクトグラムをどの程度検出できるかを見てみましょう。このコマンドは、選択したイメージでYOLOv2を解放します。
darknet.exe detector test cfg/obj.data cfg/yolo-obj.cfg yolo-obj1000.weights data/testimage.jpg
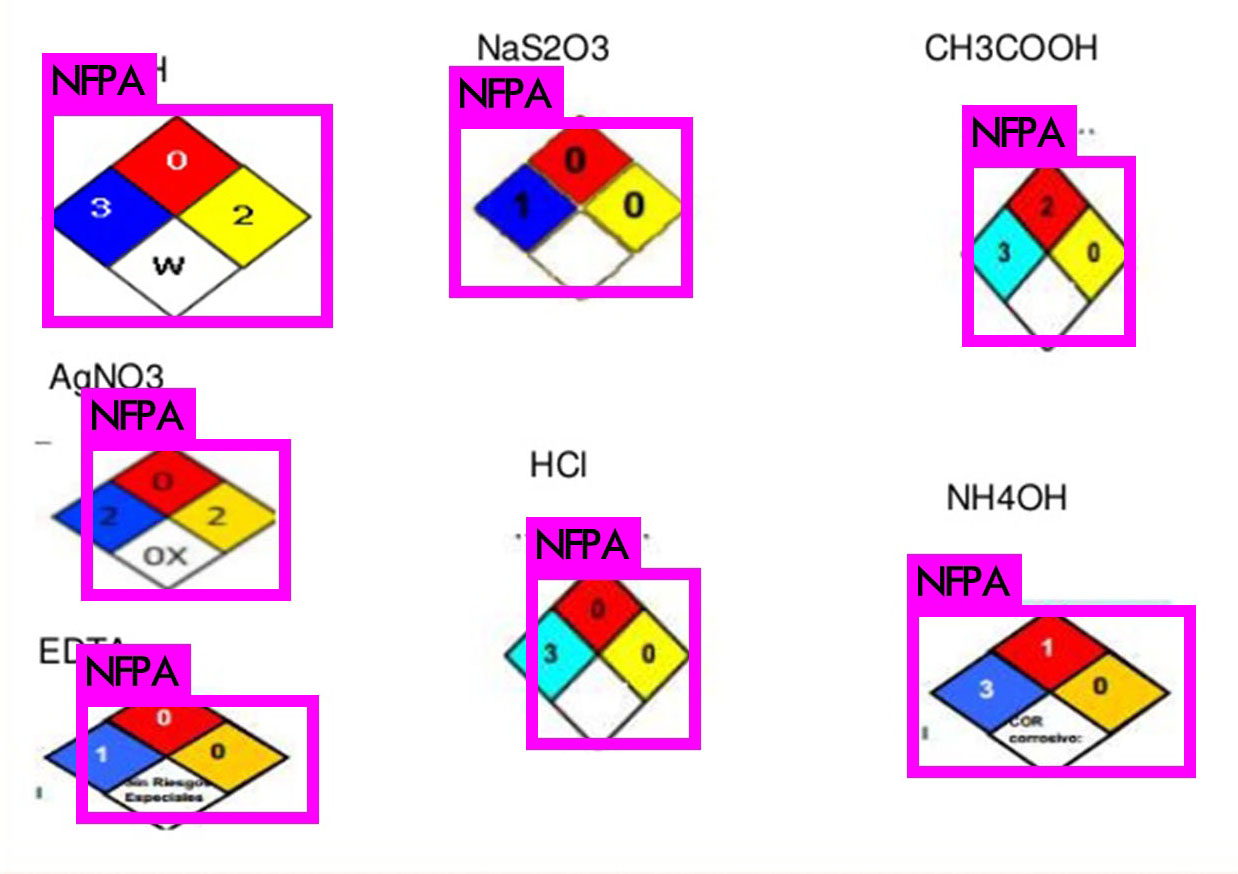
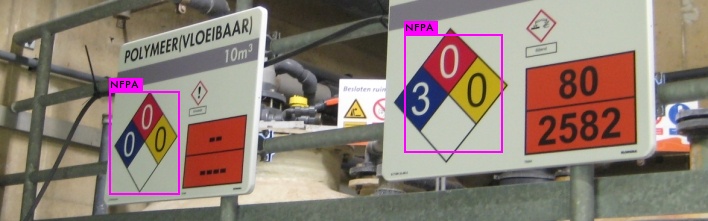
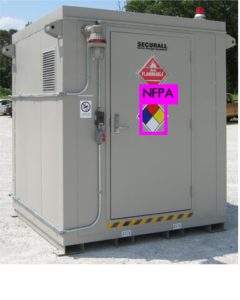
I picked some interesting images to showcase the performance of our detection setup. Images that haven’t been used in training, we’re not cheating here. As you can see, the results are very acceptable as every instance of the NFPA ‘fire diamond’ in the following images is correctly detected. Great succes!
検出セットアップのパフォーマンスを示すために、いくつかの興味深い画像を選びました。トレーニングで使用されていない画像は、ここではごまかしていません。 ご覧のとおり、次の画像にあるNFPAの「ファイアダイヤモンド」のすべてのインスタンスが正しく検出されているため、結果は非常に納得できるものになってます。 大成功!
Conclusion
In this article, we have extensively seen how we can train the very impressive YOLOv2 object detection algorithm to detect custom objects. Everything was tailored to one specific object, but it should be trivial to add more categories and retrain the model for them. The paper accompanying YOLOv2 proves the algorithm can handle over 9000 objects types, so you shouldn’t run into a bottleneck any time soon.
この記事では、非常に印象的なYOLOv2オブジェクト検出アルゴリズムをトレーニングして、カスタムオブジェクトを検出する方法を幅広く見てきました。すべてが特定の1つのオブジェクトに合わせて調整されましたが、さらにカテゴリを追加し、それらのモデルを再トレーニングするのは簡単です。YOLOv2に付属の論文は、アルゴリズムが9000を超えるオブジェクトタイプを処理できることを証明しているため、すぐにボトルネックに陥らないようにしてください。
There, that’s it for today. I will continue to update this article as required, feel free to post any question you may have below. Have fun training!
さて、これで今日は終わりです。必要に応じてこの記事を更新し続けます。質問がある場合は、お気軽に投稿してください。
楽しいトレーニングを!
Leave a Reply