
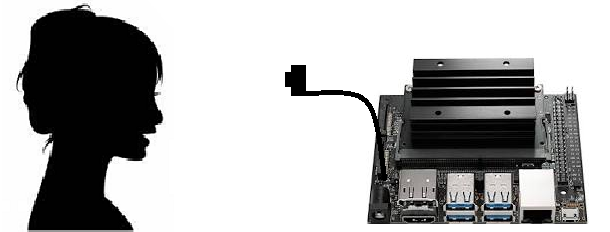
face_recognitionのGithubで紹介されているように、機械学習・ディープラーニング方面で使うにはCPUのみのラズパイは非力です。GPUを積んでいるJetson Nano を使ってみましょう。
ライブラリにdlibが使われています(Dlib wi-ki)。
ご参考までに、Dlibチート・シート
ちなみにラズパイの場合はラズベリーパイ3で顔認識 をご覧ください。
demo用コードはこういうDoorbell Cameraです。
まずは以下のサイトを参考にDlibをコンパイルして、face_recognitionをJetcardに構築してみます。
Build a Hardware-based Face Recognition System for $150 with the Nvidia Jetson Nano and Python
(Using Python 3.6, OpenCV, Dlib and the face_recognition module)
Jetcardのセットアップはこのページ参照
注:Jetcardにはpip(19.1.1)、numpy(1.16.4)は既に実装されていますので、その部分は端折っています。
また原文中で「Jetson Nano board」という表現がありますが、これがJetson Nano の一般名称のようです。
Installing Required Python Libraries
必要なPythonライブラリのインストール
First, we are updating apt, which is the standard Linux software installation tool that we’ll use to install everything else. Next, we are installing some basic libraries with apt that we will need later to compile dlib.
まず、aptを更新します。これは、他のすべてをインストールするために使用する標準のLinuxソフトウェアインストールツールです。 次に、後でdlibをコンパイルするために必要になるaptを使用していくつかの基本的なライブラリをインストールします。
|
1 2 |
sudo apt-get update sudo apt-get install cmake libopenblas-dev liblapack-dev libjpeg-dev |
Before we go any further, we need to create a swapfile. The Jetson Nano only has 4GB of RAM which won’t be enough to compile dlib. To work around this, we’ll set up a swapfile which lets us use disk space as extra RAM. Luckily, there is an easy way to set up a swapfile on the Jetson Nano. Just run these two commands:
先に進む前に、スワップファイルを作成する必要があります。 Jetson Nanoには4GBのRAMしかないため、dlibをコンパイルするのに十分ではありません。 これを回避するために、ディスクスペースを追加のRAMとして使用できるようにするスワップファイルを設定します。 幸い、JetsonNanoにスワップファイルを設定する簡単な方法があります。 次の2つのコマンドを実行するだけです。
以下のコマンドのデフォルトは6GBです。-s オプションでサイズは指定できます。
|
1 2 |
git clone https://github.com/JetsonHacksNano/installSwapfile ./installSwapfile/installSwapfile.sh |
At this point, you need to reboot the system to make sure the swapfile is running. If you skip this, the next step will fail. You can reboot from the menu at the top right of the desktop.
When you are logged back in, open up a fresh Terminal window and we can continue.
この時点で、システムを再起動して、スワップファイルが実行されていることを確認する必要があります。 これをスキップすると、次のステップは失敗します。 デスクトップの右上にあるメニューから再起動できます。
再度ログインしたら、新しいターミナルウィンドウを開いてください。続行できます。
Now we are ready to install dlib, a deep learning library created by Davis King that does the heavy lifting for the face_recognition library.
However, there is currently a bug in Nvidia’s own CUDA libraries for the Jetson Nano that keeps it from working correctly. To work around the bug, we’ll have to download dlib, edit a line of code, and re-compile it. But don’t worry, it’s no big deal.
In Terminal, run these commands:
これで、Davis Kingによって作成されたdlibをインストールする準備が整いました。これは、face_recognitionライブラリの手間のかかる作業を行います。
ただし、現在、Jetson Nano用のNvidia独自のCUDAライブラリには、正しく機能しないというバグがあります。 バグを回避するには、dlibをダウンロードし、コード行を編集して、再コンパイルする必要があります。 でも心配しないでください、大したことではありません。
ターミナルで、次のコマンドを実行します。
|
1 2 3 |
wget http://dlib.net/files/dlib-19.17.tar.bz2 tar jxvf dlib-19.17.tar.bz2 cd dlib-19.17 |
That will download and uncompress the source code for dlib. Before we compile it, we need to comment out a line. Run this command:
これにより、dlibのソースコードがダウンロードおよび解凍されます。 コンパイルする前に、1行コメントアウトする必要があります。 次のコマンドを実行します。
|
1 |
sudo nano dlib/cuda/cudnn_dlibapi.cpp |
This will open up the file that we need to edit in a text editor. Search the file for the following line of code (which should be line 854):
これにより、テキストエディタで編集する必要のあるファイルが開きます。 次のコード行(854行目)をファイルで検索します。
forward_algo = forward_best_algo;
And comment it out by adding two slashes in front of it, so it looks like this:
そして、その前に2つのスラッシュを追加してコメントアウトすると、次のようになります。
//forward_algo = forward_best_algo;
Now save the file, close the editor, and go back to the Terminal window. Next, run these commands to compile and install dlib:
次に、ファイルを保存し、エディターを閉じて、ターミナルウィンドウに戻ります。 次に、次のコマンドを実行して、dlibをコンパイルしてインストールします。
|
1 |
sudo python3 setup.py install |
Finally, we need to install the face_recognition Python library. Do that with this command:
最後に、face_recognitionPythonライブラリをインストールする必要があります。 このコマンドでそれを行います:
|
1 |
sudo pip3 install face_recognition |
30分弱かかりました。
Running the Face Recognition Doorbell Camera Demo App
face_recognitionPythonライブラリを使ったDoorbell Camera Demo Appを使ってみます。
It lets you detect faces, turn each detected face into a unique face encoding that represents the face, and then compare face encodings to see if they are likely the same person — all with just a couple of lines of code.
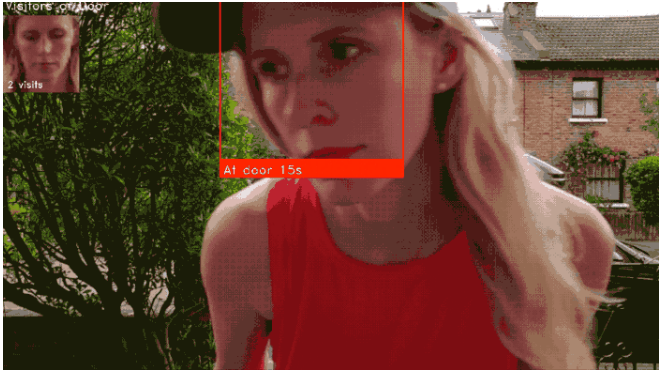
Using that library, I put together a doorbell camera application that can recognize people who walk up to your front door and track each time the person comes back. Here’s it looks like when you run it:
これを使って、顔を検出し、検出された各顔を顔を表す一意の顔エンコーディングに変換し、顔エンコーディングを比較して、同じ人物である可能性が高いかどうかを確認できます。すべて、わずか数行のコードで実行できます。
そのライブラリを使用して、玄関まで歩いてきた人を認識し、戻ってくるたびに追跡できるドアベルカメラアプリケーションを作成しました。
コードは以下でダウンロードできます。
|
1 |
wget -O doorcam.py tiny.cc/doorcam |
Then you can run the code and try it out:
次に、コードを実行して試してみることができます。
|
1 |
python3 doorcam.py |
注:キャリブレーションに失敗する場合は、1280 と720 を検索して解像度を修正してください(2か所あります)。
Raspi 用のカメラ(V2)を使ってみます。こんな感じで動くそうです。
左上の小窓に何回目の訪問なのか、回数がカウントされています。
You’ll see a video window pop up on your desktop. Whenever a new person steps in front of the camera, it will register their face and start tracking how long they have been near your door. If the same person leaves and comes back more than 5 minutes later, it will register a new visit and track them again. You can hit ‘q’ on your keyboard at any time to exit.
The app will automatically save information about everyone it sees to a file called known_faces.dat. When you run the program again, it will use that data to remember previous visitors. If you want to clear out the list of known faces, just quit the program and delete that file.
デスクトップにビデオウィンドウがポップアップ表示されます。 新しい人がカメラの前に足を踏み入れると、顔が登録され、ドアの近くにいる時間を追跡し始めます。 同じ人が5分以上後に離れて戻ってきた場合、新しい訪問を登録し、再度追跡します。 キーボードの「q」を押すと、いつでも終了できます。
アプリは、表示されたすべての人に関する情報をknown_faces.datというファイルに自動的に保存します。 プログラムを再度実行すると、そのデータを使用して以前の訪問者を記憶します。 既知の顔のリストをクリアしたい場合は、プログラムを終了してそのファイルを削除してください。
つまり、何回訪問したかを知らせてくれる……ってことのようです。複数人数登録可能です。
.datファイルはバイナリなので直接のぞけませんが、ソースコードを見て解析ツールを作ってみましょう。
データファイルは顔エンコーディングデータと回数などのメタデータのリストがpickle化されたものだそうです。
python3 -m pickle known_faces.dat で見ることはできますね。
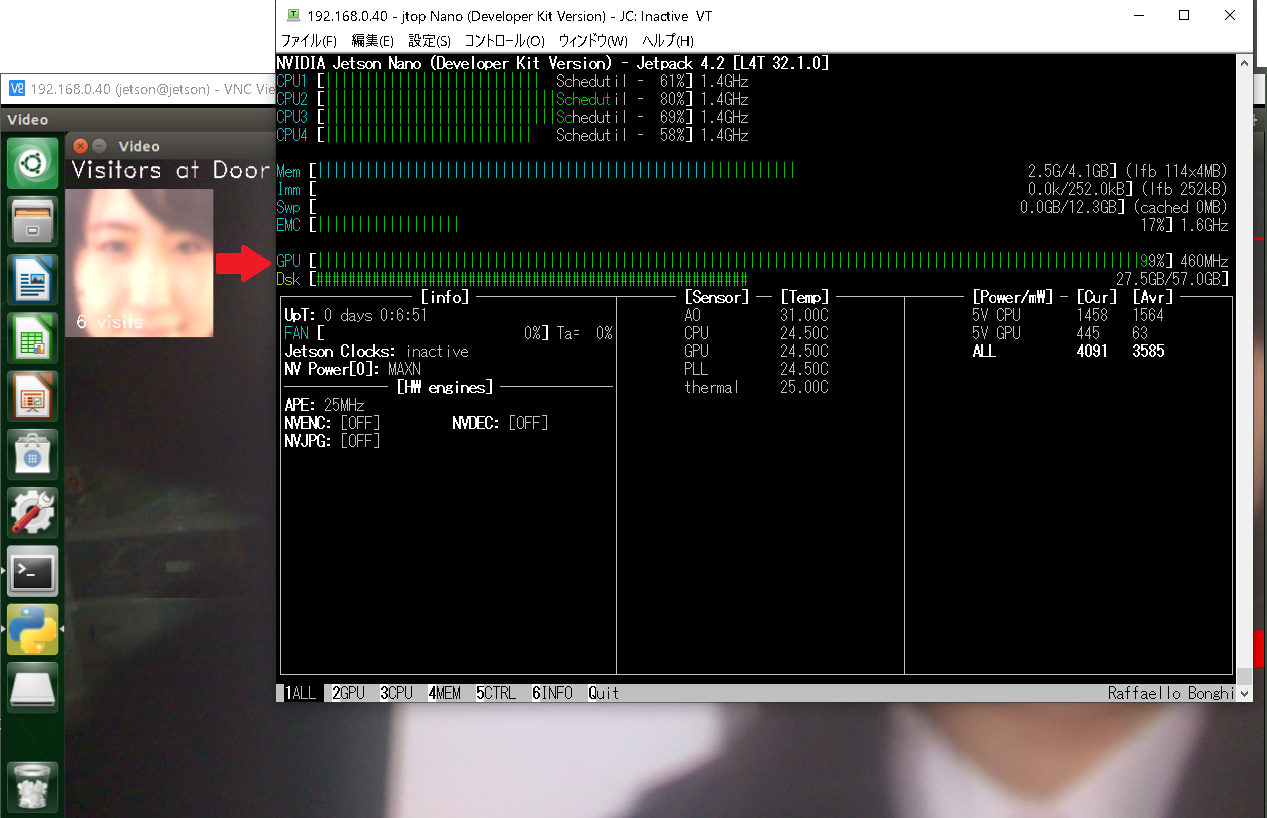
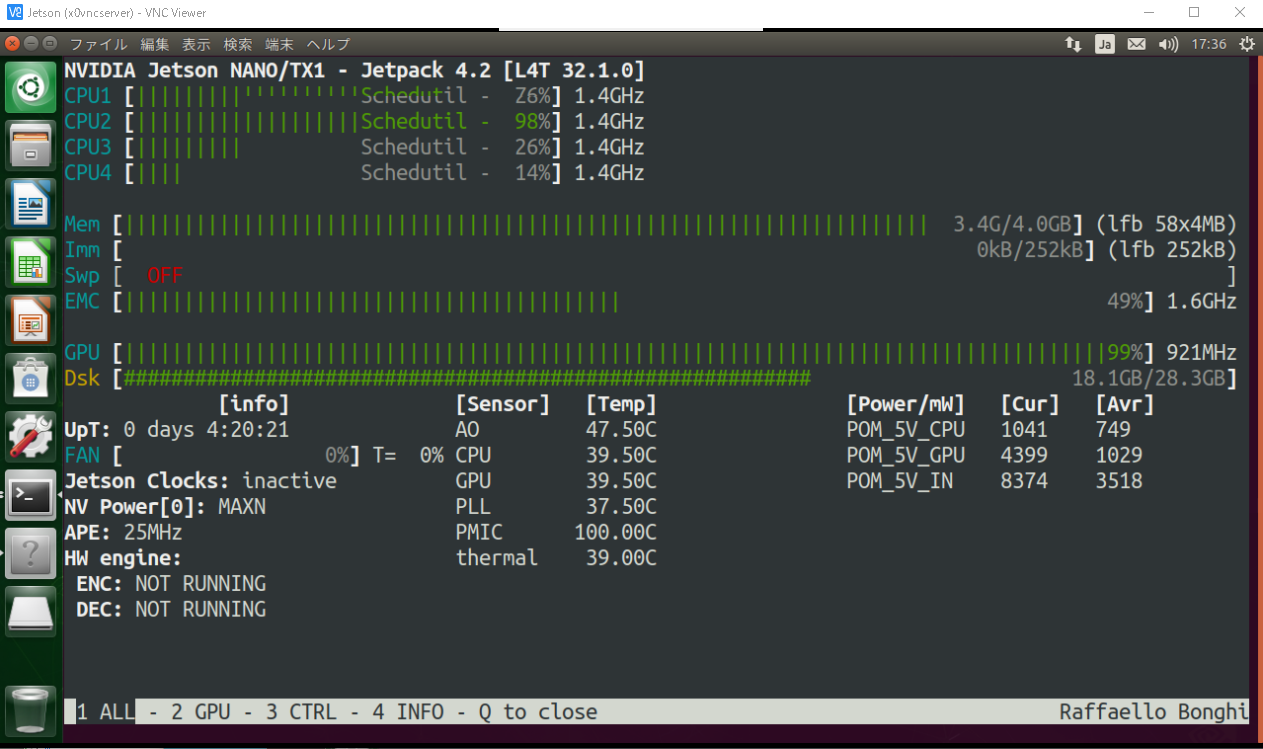
動作中をjetson-statsで確認してみます。
GPUがフルで稼働しています(赤い矢印)。
jetson-statsのインストール
$sudo -H pip3 install jetson-stats
実行
$sudo jtop
こんな感じ、温度もモニターできます。
キーボード、1:ALL、2:GPU、3:CTRL、4:INFO Q:終了
ALLの画面
【doorcam.py】
|
1 2 3 4 5 6 7 8 9 10 11 12 13 14 15 16 17 18 19 20 21 22 23 24 25 26 27 28 29 30 31 32 33 34 35 36 37 38 39 40 41 42 43 44 45 46 47 48 49 50 51 52 53 54 55 56 57 58 59 60 61 62 63 64 65 66 67 68 69 70 71 72 73 74 75 76 77 78 79 80 81 82 83 84 85 86 87 88 89 90 91 92 93 94 95 96 97 98 99 100 101 102 103 104 105 106 107 108 109 110 111 112 113 114 115 116 117 118 119 120 121 122 123 124 125 126 127 128 129 130 131 132 133 134 135 136 137 138 139 140 141 142 143 144 145 146 147 148 149 150 151 152 153 154 155 156 157 158 159 160 161 162 163 164 165 166 167 168 169 170 171 172 173 174 175 176 177 178 179 180 181 182 183 184 185 186 187 188 189 190 191 192 193 194 195 196 197 198 199 200 201 202 203 204 205 206 207 208 209 210 211 212 213 214 215 216 217 218 219 220 221 222 223 224 |
import face_recognition import cv2 from datetime import datetime, timedelta import numpy as np import platform import pickle # 既知の顔エンコーディングのリストと、各々の顔に関するメタデータのマッチングリスト known_face_encodings = [] known_face_metadata = [] def save_known_faces(): with open("known_faces.dat", "wb") as face_data_file: face_data = [known_face_encodings, known_face_metadata] pickle.dump(face_data, face_data_file) print("Known faces backed up to disk.") def load_known_faces(): global known_face_encodings, known_face_metadata try: with open("known_faces.dat", "rb") as face_data_file: known_face_encodings, known_face_metadata = pickle.load(face_data_file) print("Known faces loaded from disk.") except FileNotFoundError as e: print("No previous face data found - starting with a blank known face list.") pass def running_on_jetson_nano(): # ラップトップまたはJetsonNanoで同じコードを機能させるために、Nanoで実行していることを検出します。 # その場合にカメラに正しくアクセスできるようにします。 # 通常のIntelラップトップでは、platform.machine()は「aarch64」ではなく「x86_64」になります return platform.machine() == "aarch64" def get_jetson_gstreamer_source(capture_width=1280, capture_height=720, display_width=1280, display_height=720, framerate=60, flip_method=0): """ gstreamerを使用してJetsonNanoのカメラからビデオをキャプチャするOpenCV互換のビデオソースのデスクリプションを返します """ return ( f'nvarguscamerasrc ! video/x-raw(memory:NVMM), ' + f'width=(int){capture_width}, height=(int){capture_height}, ' + f'format=(string)NV12, framerate=(fraction){framerate}/1 ! ' + f'nvvidconv flip-method={flip_method} ! ' + f'video/x-raw, width=(int){display_width}, height=(int){display_height}, format=(string)BGRx ! ' + 'videoconvert ! video/x-raw, format=(string)BGR ! appsink' ) def register_new_face(face_encoding, face_image): """ 既知の顔のリストに新しい人物を追加します """ # 既知の顔のリストに顔のエンコーディングを追加します # 一致する辞書エントリをメタデータリストに追加します。 # これを使用して、人が何回訪問したか、最後に見たのはいつかなどを追跡できます。 known_face_metadata.append({ "first_seen": datetime.now(), "first_seen_this_interaction": datetime.now(), "last_seen": datetime.now(), "seen_count": 1, "seen_frames": 1, "face_image": face_image, }) def lookup_known_face(face_encoding): """ これがすでに顔リストにある顔かどうかを確認します """ metadata = None # 既知の顔リストが空の場合は、この顔を見ることができない可能性があるため、何も返しません。 if len(known_face_encodings) == 0: return metadata # 未知の顔と既知の顔リストにあるすべての顔の間の距離を計算します # これにより、既知の顔ごとに0.0〜1.0の浮動小数点数が返されます。 # 数字が小さいほど、その顔は未知の顔ということになります。 face_distances = face_recognition.face_distance(known_face_encodings, face_encoding) # 未知の顔からの距離が最も短い(つまり、最も類似している)既知の顔を取得します。 best_match_index = np.argmin(face_distances) # # 距離が最も短い顔の距離が0.6未満の場合、それは顔の一致と見なされます。 # 0.6は、顔認識モデルがどのようにトレーニングされたかに由来します。 # 同じ人物の写真が常に0.6未満離れていることを確認するように訓練されました。 # ここでは、2人の非常に類似した人物が同時にドアに来る可能性が低いため、 # しきい値を0.65に少し緩めています。 if face_distances[best_match_index] < 0.65: # 一致するものがある場合は、保存したメタデータを検索します(最初に見たときなど) metadata = known_face_metadata[best_match_index] # 顔のメタデータを更新して、この顔が最近どのくらい見られたかを追跡できるようにします。 metadata["last_seen"] = datetime.now() metadata["seen_frames"] += 1 # また、この人がドアに来た回数を追跡する合計「見たカウント」を保持します。 # しかし、過去5分以内にこの人に会った場合でも、それは同じ訪問であり、新しい訪問ではないと言えます。 # しかし、彼らがしばらく離れて戻ってきた場合、それは新しい訪問です。 if datetime.now() - metadata["first_seen_this_interaction"] > timedelta(minutes=5): metadata["first_seen_this_interaction"] = datetime.now() metadata["seen_count"] += 1 return metadata def main_loop(): # ウェブカメラにアクセスします。 これがラップトップで実行されているか、Jetson Nanoで実行されているかによって、方法は異なります。 if running_on_jetson_nano(): # Jetson NanoでOpenCVを使用してカメラにアクセスするには、カスタムgstreamerソース文字列を備えたgstreamerが必要です video_capture = cv2.VideoCapture(get_jetson_gstreamer_source(), cv2.CAP_GSTREAMER) else: # ラップトップでOpenCVを使用してカメラにアクセスするには、Webカメラの番号(通常は0)を渡すだけです。 # 注:ライブカメラストリームの代わりにビデオファイルを処理する場合は、代わりにファイル名を渡すことができます video_capture = cv2.VideoCapture(0) # 既知の顔のコピーをバックアップとしてディスクに最後に保存してからの期間を追跡します。 number_of_faces_since_save = 0 while True: # ビデオの単一フレームをつかむ ret, frame = video_capture.read() # ビデオのフレームのサイズを1/4サイズに変更して、顔認識処理を高速化します small_frame = cv2.resize(frame, (0, 0), fx=0.25, fy=0.25) # 画像をBGRカラー(OpenCVが使用)からRGBカラー(face_recognitionが使用)に変換します rgb_small_frame = small_frame[:, :, ::-1] # ビデオの現在のフレーム内のすべての顔の位置と顔のエンコーディングを検索します face_locations = face_recognition.face_locations(rgb_small_frame) face_encodings = face_recognition.face_encodings(rgb_small_frame, face_locations) # 検出された各顔をループして、それが以前に見た顔かどうかを確認します # その場合は、動画の上に描画するラベルを付けます。 face_labels = [] for face_location, face_encoding in zip(face_locations, face_encodings): # この顔が既知の顔のリストに含まれているかどうかを確認します。 metadata = lookup_known_face(face_encoding) # 顔が見つかったら、役立つ情報を顔にラベル付けします。 if metadata is not None: time_at_door = datetime.now() - metadata['first_seen_this_interaction'] face_label = f"At door {int(time_at_door.total_seconds())}s" # これがまったく新しい顔の場合は、既知の顔のリストに追加します else: face_label = "New visitor!" # ビデオの現在のフレームから顔の画像を取得します top, right, bottom, left = face_location face_image = small_frame[top:bottom, left:right] face_image = cv2.resize(face_image, (150, 150)) # 既知の顔データに新しい顔を追加します register_new_face(face_encoding, face_image) face_labels.append(face_label) # 各顔の周りにボックスを描き、各顔にラベルを付けます for (top, right, bottom, left), face_label in zip(face_locations, face_labels): # 検出したフレームが1/4サイズに縮小されたため、顔の位置を拡大します top *= 4 right *= 4 bottom *= 4 left *= 4 # 顔の周りにボックスを描きます cv2.rectangle(frame, (left, top), (right, bottom), (0, 0, 255), 2) # 顔の下に名前の付いたラベルを描きます cv2.rectangle(frame, (left, bottom - 35), (right, bottom), (0, 0, 255), cv2.FILLED) cv2.putText(frame, face_label, (left + 6, bottom - 6), cv2.FONT_HERSHEY_DUPLEX, 0.8, (255, 255, 255), 1) # 最近の訪問者の画像を表示する number_of_recent_visitors = 0 for metadata in known_face_metadata: # If we have seen this person in the last minute, draw their image if datetime.now() - metadata["last_seen"] < timedelta(seconds=10) and metadata["seen_frames"] > 5: # 既知の顔画像を描画します x_position = number_of_recent_visitors * 150 frame[30:180, x_position:x_position + 150] = metadata["face_image"] number_of_recent_visitors += 1 # 訪問した回数を画像にラベル付けします visits = metadata['seen_count'] visit_label = f"{visits} visits" if visits == 1: visit_label = "First visit" cv2.putText(frame, visit_label, (x_position + 10, 170), cv2.FONT_HERSHEY_DUPLEX, 0.6, (255, 255, 255), 1) if number_of_recent_visitors > 0: cv2.putText(frame, "Visitors at Door", (5, 18), cv2.FONT_HERSHEY_DUPLEX, 0.8, (255, 255, 255), 1) # 検出された各フレームの周りにボックスが描かれたビデオの最終フレームを表示します cv2.imshow('Video', frame) # キーボードの「q」を押して終了します。 if cv2.waitKey(1) & 0xFF == ord('q'): save_known_faces() break # 何かがクラッシュした場合に備えて、既知の顔をディスクに保存する必要があります。 if len(face_locations) > 0 and number_of_faces_since_save > 100: save_known_faces() number_of_faces_since_save = 0 else: number_of_faces_since_save += 1 # ウェブカメラへのハンドルをリリースします video_capture.release() cv2.destroyAllWindows() if __name__ == "__main__": load_known_faces() main_loop() |
$150と謳ってますが、104円/$として、4GBモデルでは予算オーバーしますが、Jetson Nano 2GBモデルならカメラモジュールも含めてギリこの価格でいけますね(KB・マウス・HDMI高解像度モニターは既存のものを流用するとする、なおHDMI変換コネクターはJetsonでは使えませんー>使えないのは初期モデルのA02でした)。
ちなみにJetsonの場合、でかいヒートシンクが乗っていますが、冷却ファンも必須のようです。
NVIDIA Jetson Nano 2GB 開発者キット JETSON NANO 2GB DEV:6820円
Official Site(2GBメモリに最適化されたOSイメージもここからダウンロードできます)
NVIDIA Jetson Nanoケース、冷却ファン付き:1399円
USB Type-C 電源アダプター 5V /3A:1390円
64GB MicroSD Card(Class 10、UHS-I、正規品):1500円
Raspberry Pi Camera Module V2 カメラモジュール:3200円
[Amazon調べ]
Next
Doorbell Camera Python Code Walkthrough
Want to know how the code works? Let’s step through it.
Doorbell Cameraがどんなふうに動くのかPythonコードを一歩づつ追いかけてみましょう。
ついでに、ラズベリーパイ3で顔認識で使っている顔識別コードをJetson用に修正する方法も追加しています。
Doorbell Camera の顔認識コードを一歩づつ理解する
Leave a Reply