
Jetson Nanoで学習済みモデルを使って、いろいろやってみる(8-1)ROS2(DDS)や
Jetsonからラズパイにメッセージを届けてみる(ROS2/DDS)などではテキストをメッセージとしてpublish / subscribe していました。
ここでは、カメラ画像(イメージ)をpublish / subscribe してみます。
Jetson NanoのOSイメージは、ともにJetpack 4.5.1
まずROS2(Eloquent)のドッカーイメージを作成します。
|
1 2 3 4 5 |
git clone https://github.com/dusty-nv/jetson-containers cd jetson-containers ./scripts/docker_build_ros.sh eloquent |
イメージが作成されているか確認
|
1 |
sudo docker images |
ros:eloquent-ros-base-l4t-r32.4.4
ビルドスクリプトの作成時期によっては、ros:eloquent-ros-base-l4t-r32.5.1になっている場合もあります。要確認!
Nano(4GB)
my_ros2_camという名前でコンテナを作成
カメラを使うのでdeviceオプションを使います。
補助的にXも使います。
sudo docker create -it --name my_ros2_cam --gpus all --network host -e DISPLAY=$DISPLAY --device /dev/video0:/dev/video0 -v /tmp/.X11-unix/:/tmp/.X11-unix ros:eloquent-ros-base-l4t-r32.4.4
コンテナ起動
|
1 |
sudo docker start -i my_ros2_cam |
アップデート&アップグレード、 パッケージのインストール
|
1 2 3 4 5 6 7 |
apt update apt upgrade -y apt install nano apt install python3-pip -y python3 -m pip install --upgrade pip |
ROS2環境をアンダーレイに指定
|
1 2 3 |
nano ~/.bashrc source /opt/ros/eloquent/setup.bash |
NVIDIAのイメージにはimage_toolsパッケージが入っていません。インストールしておきます。
|
1 |
apt install ros-eloquent-image-tools -y |
Nano(2GB)
ドッカーイメージは4GBと同様に、作成したros:eloquent-ros-base-l4t-r32.4.4を使います。
my_ros2_camという名前でコンテナを作成。
カメラは使わないのでdeviceオプションは不要です。
sudo docker create -it --name my_ros2_cam --gpus all --network host -e DISPLAY=$DISPLAY -v /tmp/.X11-unix/:/tmp/.X11-unix ros:eloquent-ros-base-l4t-r32.4.4
コンテナ起動
|
1 |
sudo docker start -i my_ros2_cam |
アップデート&アップグレード、 パッケージのインストール
|
1 2 3 4 5 6 7 |
apt update apt upgrade -y apt install nano apt install python3-pip -y python3 -m pip install --upgrade pip |
ROS2環境をアンダーレイに指定
|
1 2 3 |
nano ~/.bashrc source /opt/ros/eloquent/setup.bash |
同じく image_toolsパッケージをインストールしておきます。
|
1 |
apt install ros-eloquent-image-tools -y |
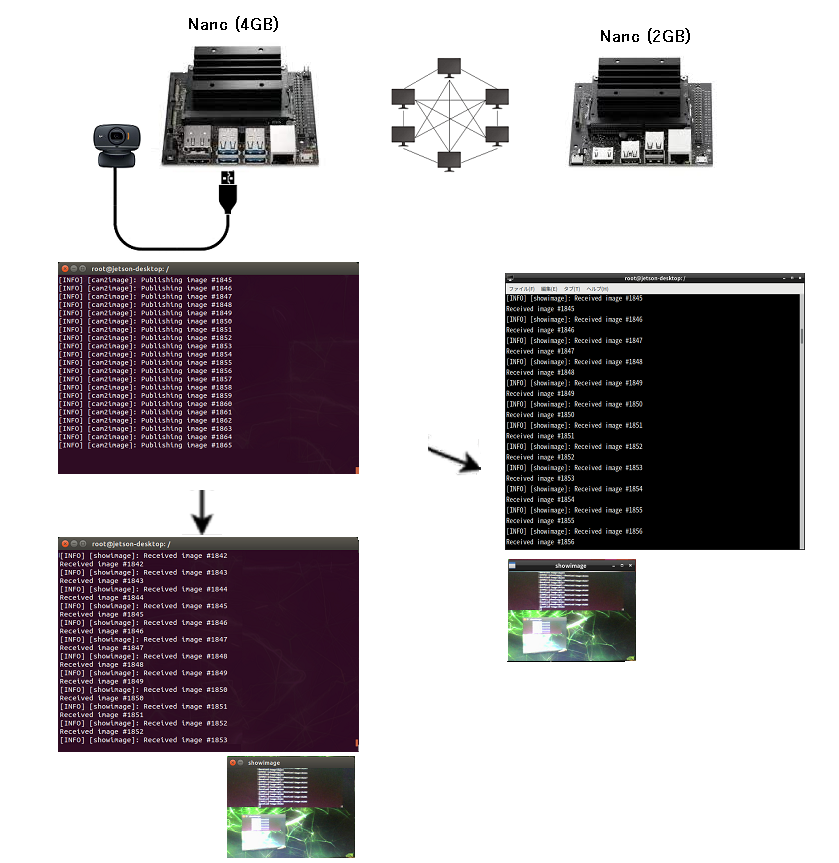
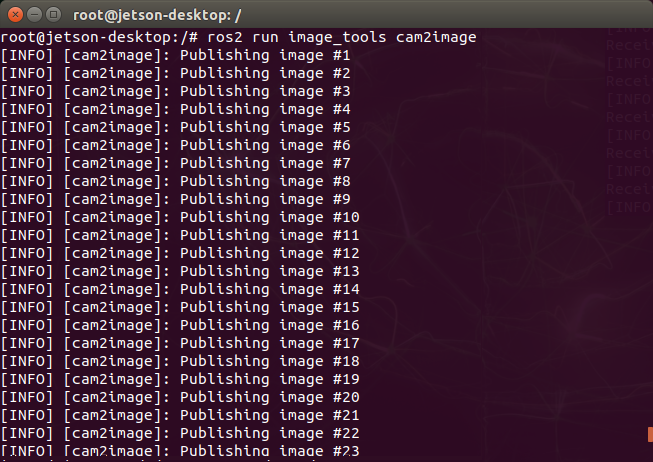
Nano(4GB)からカメラ画像をpublishしてみます。
|
1 |
ros2 run image_tools cam2image |
同じコンテナでターミナルをもう一つ開いて、subscribeしてみます。
XWindowを使うので、ホストでXを設定しておきます。
|
1 2 3 4 5 |
sudo xhost si:localuser:root sudo docker exec -it my_ros2_cam bash ros2 run image_tools showimage |
こんな感じ。
左がPublisherのターミナル、右がSubscriberのターミナル。
Nano(2GB)でpublishされている画像をsubscribeします。
|
1 2 3 4 5 |
sudo xhost si:localuser:root sudo docker start -i my_ros2_cam ros2 run image_tools showimage |
こんな感じで受信しています。
/cam2image , /showimage がノード名、 /image がtopic名です。
ros2コマンドを使ってtopic名でsubscribeすれば、画像のヘッダとデータを取得できます。
|
1 |
ros2 topic echo /image |

こんな感じ。
オプション(QoS)
以下のオプション設定だと、デフォルトの倍のサイズの画像でも比較的安定にpublish / subscribe できるようです。
カメラデバイスの番号:0:デフォルト:0
Reliability QoS:best_effort:デフォルト reliable
横サイズ:640(px):デフォルト 320
縦サイズ:480(px):デフォルト 240
frequency:30.0(Hz):デフォルト 30
Publish
ros2 run image_tools cam2image --ros-args -p device_id:=0 -p reliability:=best_effort -p width:=640 -p height:=480 -p frequency:=30.0
Subscribe
|
1 |
ros2 run image_tools showimage --ros-args -p reliability:=best_effort |
Usage: cam2image
Options:
-h, –help Display this help message and exit
Parameters:
reliability Reliability QoS setting. Either ‘reliable’ (default) or ‘best_effort’
history History QoS setting. Either ‘keep_last’ (default) or ‘keep_all’.
If ‘keep_last’, then up to N samples are stored where N is the depth
depth Depth of the publisher queue. Only honored if history QoS is ‘keep_last’. Default value is 10
frequency Publish frequency in Hz. Default value is 30
burger_mode Produce images of burgers rather than connecting to a camera
show_camera Show camera stream. Either ‘true’ or ‘false’ (default)
width Width component of the camera stream resolution. Default value is 320
height Height component of the camera stream resolution. Default value is 240
Note: try running v4l2-ctl –list-formats-ext to obtain a list of valid values.
burger_mode はOpenCVを使ってキャプチャするかどうかに関するオプションのようですが、よく分かりません。USBカメラを使うかCSIカメラを使うかってこと?参考ページ
Usage: showimage
Options:
-h, –help Display this help message and exit
Parameters:
reliability Reliability QoS setting. Either ‘reliable’ (default) or ‘best_effort’
history History QoS setting. Either ‘keep_last’ (default) or ‘keep_all’.
If ‘keep_last’, then up to N samples are stored where N is the depth
depth Depth of the publisher queue. Only honored if history QoS is ‘keep_last’. Default value is 10
show_image Show the image. Either ‘true’ (default) or ‘false’
Appendix
ラズパイでpublish。ここが参考になるかも….。
ラズパイでsubscribeしてみました。
ラズパイ4のコンテナーにROS2をインストール、Pub/Subもやってみる
Appendix2
Leave a Reply