Google VR Viewに情報ウィンドウをOverlayで表示してみましたでは、embed.jsのRotateInstructiosをベースにしましたが、ここではViewerSelectorのOverlayを参考にさせてもらいます。
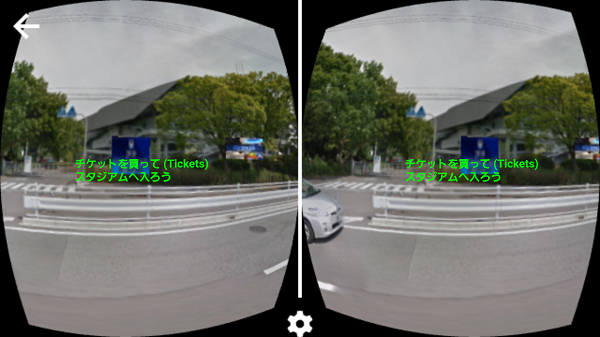
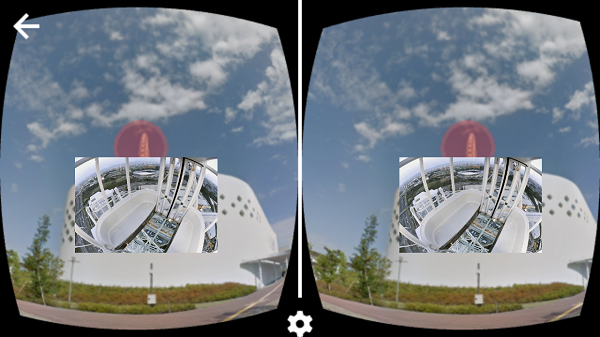
Cardboard装着時にheadupdisplayのように目前に文字や画像を表示します。
Cardboardでホットスポットをクリックできるのはフォーカスが当たった時です。
フォーカスが当たったかどうかの判断は、ホットスポットがポチっと大きくなるかどうかですが、ここではこういう文字を表示させてみました。当たったら表示、外れたら消えます。
左右両眼用に文字や画像を並べています。視差の補正もしてますので、見やすいです。
文字などがずれて見えるようなら、下のギアボタンをタップしてカードボードの型が合っているか確認してください。
HotSpotをクリックしたら画像表示
実装したページ(ブラウザーはChromeをお使いください)
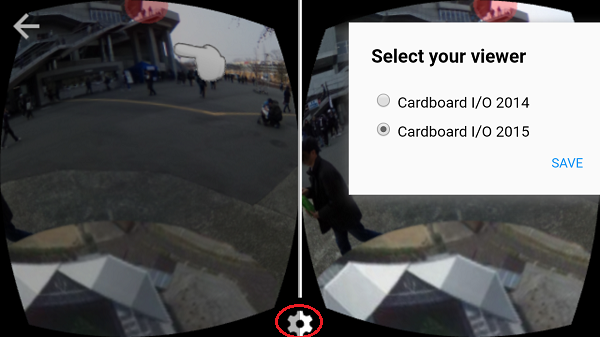
Google VR Viewのembed.jsにあるViewerSelectorはこういう表示をさせるものです。
下にあるギアボタンをタップすると出ます。Cardboardの型を指定します。キャリブレーションするためだと思います。
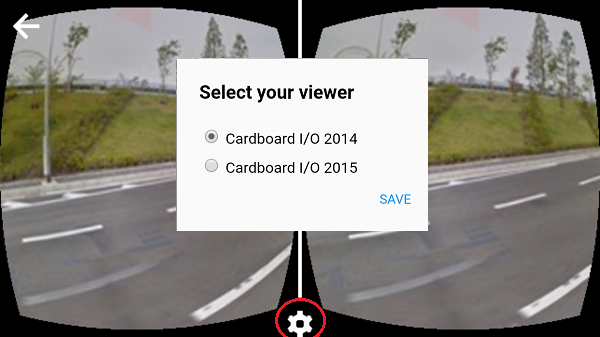
で、このダイアログを使わせてもらおうと思います。
参考にする関数がこれ。
ViewerSelector.prototype.createDialog_ = function(options)
この関数をちょっと改造して、こんな関数を追加してみます(DialogLeftとDialogRightです)。
|
1 2 3 4 5 6 7 8 9 10 11 12 13 14 15 16 17 18 19 20 21 22 23 24 25 26 27 28 29 30 31 32 33 34 35 36 37 38 39 40 41 42 43 44 45 46 47 48 49 50 51 52 53 54 55 56 57 58 59 60 61 62 63 64 65 66 67 68 69 70 71 72 73 74 75 76 77 78 79 80 81 82 83 84 85 86 87 88 89 90 91 92 93 94 95 96 97 98 99 100 101 102 103 104 105 106 107 108 109 110 111 112 113 114 115 116 117 118 119 120 121 122 123 124 125 126 127 128 129 130 131 132 133 134 135 136 137 138 139 140 141 142 143 144 145 146 147 |
//左目 ViewerSelector.prototype.createDialogLeft_ = function(options) { var container = document.createElement('div'); container.classList.add(CLASS_NAME); container.style.display = 'none'; // Create an overlay that dims the background, and which goes away when you // tap it. var overlay = document.createElement('div'); var s = overlay.style; s.position = 'fixed'; s.left = 0; s.top = 0; s.width = '50%'; s.height = '50%'; s.background = 'rgba(0, 0, 0, 0)'; s.pointerEvents = 'none'; //文字 var width = 400; var dialog = document.createElement('div'); var s = dialog.style; s.boxSizing = 'border-box'; s.position = 'fixed'; s.top = '40%'; s.left = '40%'; s.verticalAlign = "middle"; s.marginLeft = (-width/2) + 'px'; s.width = width/2 + 'px'; s.height = width/2 + 'px'; s.padding = '24px'; s.overflow = 'hidden'; s.background = '#fafafa'; s.backgroundColor = 'transparent'; s.fontFamily = "'Roboto', sans-serif"; //s.boxShadow = '0px 5px 20px #666'; // var text = document.createElement('h1'); text.id = "info_panel21"; var s = text.style; s.color = '#00ff00'; s.fontSize = '12px'; s.fontWeight = 'bold'; s.marginTop = 0; s.marginBottom = '24px'; s.display = 'block'; s.border = "0px solid blue"; text.innerHTML = ""; //画像 var image = document.createElement('img'); image.src = ""; image.id = "image_panel21"; var s = image.style; s.width = width*2 + 'px'; s.marginTop = 0; s.marginBottom = '24px'; s.display = 'none'; // container.appendChild(overlay); container.appendChild(dialog); dialog.appendChild(text); dialog.appendChild(image); return container; }; //右目 ViewerSelector.prototype.createDialogRight_ = function(options) { var container = document.createElement('div'); container.classList.add(CLASS_NAME); container.style.display = 'block'; // Create an overlay that dims the background, and which goes away when you // tap it. var overlay = document.createElement('div'); var s = overlay.style; s.position = 'fixed'; s.left = 0; s.top = 0; s.width = '50%'; s.height = '50%'; s.background = 'rgba(0, 0, 0, 0)'; s.pointerEvents = 'none'; var width = 400; var dialog = document.createElement('div'); var s = dialog.style; s.boxSizing = 'border-box'; s.position = 'fixed'; s.top = '40%'; s.left = '94%'; s.verticalAlign = "middle"; s.marginLeft = (-width/2) + 'px'; s.width = width/2 + 'px'; s.height = width/2 + 'px'; s.padding = '24px'; s.overflow = 'hidden'; s.background = '#fafafa'; s.backgroundColor = 'transparent'; s.fontFamily = "'Roboto', sans-serif"; //s.boxShadow = '0px 5px 20px #666'; // var text = document.createElement('h1'); text.id = "info_panel22"; var s = text.style; s.color = '#00ff00'; s.fontSize = '12px'; s.fontWeight = 'bold'; s.marginTop = 0; s.marginBottom = '24px'; s.display = 'block'; s.border = "0px solid white";//補正用、s.leftの%を調整して左右でこの線がぴったり重なったらOK text.innerHTML = ""; // var image = document.createElement('img'); image.src = ""; image.id = "image_panel22"; var s = image.style; s.width = width*2 + 'px'; s.marginTop = 0; s.marginBottom = '24px'; s.display = 'none'; // container.appendChild(overlay); container.appendChild(dialog); dialog.appendChild(text); dialog.appendChild(image); return container; }; |
function ViewerSelector()の中では、DialogLeftとDialogRightの実装は本家のDialogと同様なコードにします。
|
1 2 |
this.dialogLeft = this.createDialogLeft_();//A this.dialogRight = this.createDialogRight_();//B |
|
1 2 3 4 5 6 |
root.appendChild(this.dialogLeft); root.appendChild(this.dialogRight); this.dialogLeft.style.display = 'block'; this.dialogRight.style.display = 'block'; |
唯一、ViewerSelector.prototype.hide = function()では何もしません。
このDialogLeftとDialogRightを出しっぱなしにしておきたいからです。
で、出しっぱなし用にもう一箇所。
CardboardVRDisplay.prototype.beginPresent_ = function() の中で、以下を追加。
ギアボタンを押さないでも初期段階で表示しておく用
|
1 |
this.viewerSelector_.show(this.layer_.source.parentElement); |
これで文字や画像表示用のオーバーレイが使えます。
|
1 |
Leave a Reply