ラズパイで顔認識の続編(インストール等はこのページを参照してください、Linux版のdlibはここ参照)
exampleにあるweb_service_example.pyをカスタマイズしてみます。
オリジナルはオバマさん認識の一択でしたが、複数認識にしてみました。
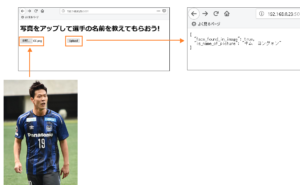
登録しておいた複数の顔画像をもとにして、写真の人は誰でしょう?ということをやっています。
web_service_example.pyをカスタマイズ
facerec_from_webcam_faster.pyのロジックを拝借しています。
要は、顔画像を読み込んでエンコーディングして(10~ 16行)、配列を作成して(19 ~36行)、ユーザーの画像をdetect_faces_in_image()で判断するという流れです。
最終行のIPアドレスはご自分の環境で書き換えてください。
|
1 2 3 4 5 6 7 8 9 10 11 12 13 14 15 16 17 18 19 20 21 22 23 24 25 26 27 28 29 30 31 32 33 34 35 36 37 38 39 40 41 42 43 44 45 46 47 48 49 50 51 52 53 54 55 56 57 58 59 60 61 62 63 64 65 66 67 68 69 70 71 72 73 74 75 76 77 78 79 80 81 82 83 84 85 86 87 88 89 90 91 92 93 94 95 96 97 98 99 100 |
import face_recognition from flask import Flask, jsonify, request, redirect import numpy as np ALLOWED_EXTENSIONS = {'png', 'jpg', 'jpeg', 'gif'} ade3_image = face_recognition.load_image_file("./photo/ade3.png") ade3_face_encoding = face_recognition.face_encodings(ade3_image)[0] aoyama3_image = face_recognition.load_image_file("./photo/aoyama3.png") aoyama3_face_encoding = face_recognition.face_encodings(aoyama3_image)[0] ・ ・ ・ concha3_image = face_recognition.load_image_file("./photo/concha3.png") concha3_face_encoding = face_recognition.face_encodings(concha3_image)[0] known_face_encodings = [ ade3_face_encoding, aoyama3_face_encoding, ・ ・ ・ concha3_face_encoding ] known_face_names = [ "アデミウソン", "青山 直晃", ・ ・ ・ "ダビド コンチャ" ] app = Flask(__name__) app.config['JSON_AS_ASCII'] = False def allowed_file(filename): return '.' in filename and \ filename.rsplit('.', 1)[1].lower() in ALLOWED_EXTENSIONS @app.route('/', methods=['GET', 'POST']) def upload_image(): # Check if a valid image file was uploaded if request.method == 'POST': if 'file' not in request.files: return redirect(request.url) file = request.files['file'] if file.filename == '': return redirect(request.url) if file and allowed_file(file.filename): # The image file seems valid! Detect faces and return the result. return detect_faces_in_image(file) return ''' <!doctype html> <title>Which player is this photo within GAMBA?</title> <h1>写真をアップして選手の名前を教えてもらおう!</h1> <form method="POST" enctype="multipart/form-data"> <input type="file" name="file"> <input type="submit" value="Upload"> <br><br> 登録一覧 <br> <img src="/static/images/players.png"> </form> ''' def detect_faces_in_image(file_stream): img = face_recognition.load_image_file(file_stream) unknown_face_encodings = face_recognition.face_encodings(img)[0] matches = face_recognition.compare_faces(known_face_encodings, unknown_face_encodings) name = "Unknown" face_distances = face_recognition.face_distance(known_face_encodings, unknown_face_encodings) best_match_index = np.argmin(face_distances) if matches[best_match_index]: name = known_face_names[best_match_index] if(name == "Unknown"): face_found = False else: face_found = True result = { "face_found_in_image": face_found, "is_name_of_picture": name } return jsonify(result) if __name__ == "__main__": app.run(host='192.168.0.32', port=5001, debug=True) |
注:Exec format error が出る場合は、最終行の引数で debug=False に変えてみてください。
サンプル
顔画像はガンバ大阪の選手です(ファン以外の人には興味ないと思いますが)。
example (修正版)
このexampleではFlaskでWebサーバーを立てています。ページの外観をいろいろ変える場合はstaticフォルダーを変更してください。
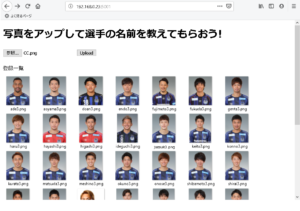
37選手の顔画像を認識します。
環境としてラズパイは非力過ぎるのでPCに設定(ラズパイ3 Model B+なら起動に5分20秒かかりました)
これは顔画像のエンコーディングに時間を要しているからです。事前にデータを用意しておけばもっと高速化されます。やり方。
データはこんな数値配列です。
[-0.09143438,0.13086095,0.01314379,…..,0.07552321,0.08523151,0.00671968]
Intel Core i3 3.1GHz/4GB RAM(二昔前くらいのモデル)、64bit、Ubuntu 16.04 LTS
30秒くらいで起動します
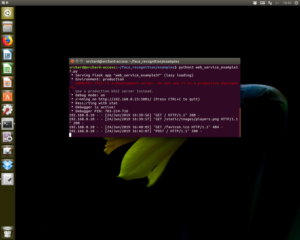
こんな感じ。
$python3 web_service_example.py
ブラウザー表示
自分の写真をアップすれば、自分がどの選手に似ているか教えてくれます(Unknownになったら誰とも似ていないということです、結果についてはたぶん異論が出るでしょうけど、当方は責任持ちません)
WisteriaHillはカマタマーレ讃岐のサポでもあります。
データをご用意しました。
Next
Web版をさくらインターネット(Arukas)の0円Dockerコンテナで公開してみる


Leave a Reply