ラズパイやArduinoで使用
4.4 x 1.4 x 0.5 cm; 40 g
通電した場合は赤のランプが点灯
検知した場合は緑のランプが点灯、ロストした場合は消灯
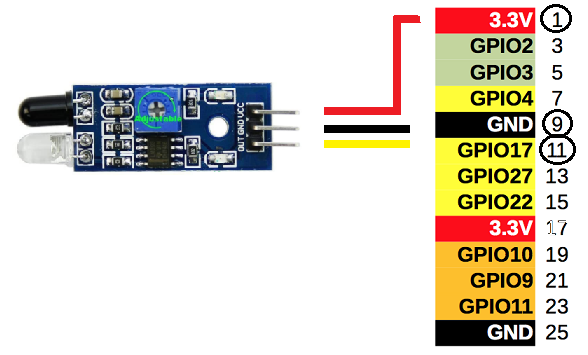
ラズパイに結線
Pythonコード
電源電圧は、5V でも3.3V でも可
|
1 2 3 4 5 6 7 8 9 10 11 12 13 14 15 16 17 18 19 20 21 22 23 24 25 26 27 28 29 30 31 32 33 34 35 36 37 |
import RPi.GPIO as GPIO import time #GPIO 17(pin->11)を使用 #複数の場合GPIO 18(pin->12)、27(pin->13),22(pin->15),24(pin->18)も使う assign_NUM = 17 def setup(): #GPIO設定 #GPIO番号を使う場合 GPIO.setmode(GPIO.BCM) #pin番号を使う場合 #GPIO.setmode(GPIO.BOARD) GPIO.setup(assign_NUM, GPIO.IN, pull_up_down=GPIO.PUD_UP) def loop(): while True: time.sleep(0.5) if (0 == GPIO.input(assign_NUM)): print("障害物を検知しました!!") else: print("Missing!") def destroy(): GPIO.cleanup() if __name__ == '__main__': setup() try: loop() except KeyboardInterrupt: destroy() |
複数を使う場合、マルチスレッド使用
例:2個のセンサーを使ってみる
|
1 2 3 4 5 6 7 8 9 10 11 12 13 14 15 16 17 18 19 20 21 22 23 24 25 26 27 28 29 30 31 32 33 34 35 36 37 38 39 40 41 42 43 44 45 46 |
import RPi.GPIO as GPIO import time import threading assign_NUM_A = 17 #GPIO-17 assign_NUM_B = 23 #GPIO-23 def setup(): #GPIO設定 GPIO.setmode(GPIO.BCM) GPIO.setup(assign_NUM_B, GPIO.IN, pull_up_down=GPIO.PUD_UP) GPIO.setup(assign_NUM_A, GPIO.IN, pull_up_down=GPIO.PUD_UP) def loop_A(): while True: time.sleep(0.5) if (0 == GPIO.input(assign_NUM_A)): print("A detect obstacle !!") else: print("A detect nothing ...") def loop_B(): while True: time.sleep(0.5) if (0 == GPIO.input(assign_NUM_B)): print("B detect obstacle !!") else: print("B detect nothing ...") def destroy(): GPIO.cleanup() if __name__ == '__main__': setup() try: thread_A = threading.Thread(target=loop_A) thread_B = threading.Thread(target=loop_B) thread_A.start() thread_B.start() except KeyboardInterrupt: destroy() |
Appendix
参考
画像処理ベースで障害物を避けて走る機能
Raspberry Piで自動運転やってみる
1.車体の準備
https://qiita.com/stnk20/items/f614ae1471b9e555708a
2.自動ブレーキ
https://qiita.com/stnk20/items/0def24cd4e2ebe78bbbf
3.障害物回避
https://qiita.com/stnk20/items/1c7771dde55ffec18896


Leave a Reply