New ラズベリーパイ3で顔認識 でやった顔識別コードの作成を追加しました。
face_recognitionで顔識別
Doorbell Camera の顔認識Python コードの解説です。Jetson Nano用に書かれています。
PythonでDlibライブラリを使った顔認識を実行するコードがどのように書かれているのか、書いた本人が解説しています。
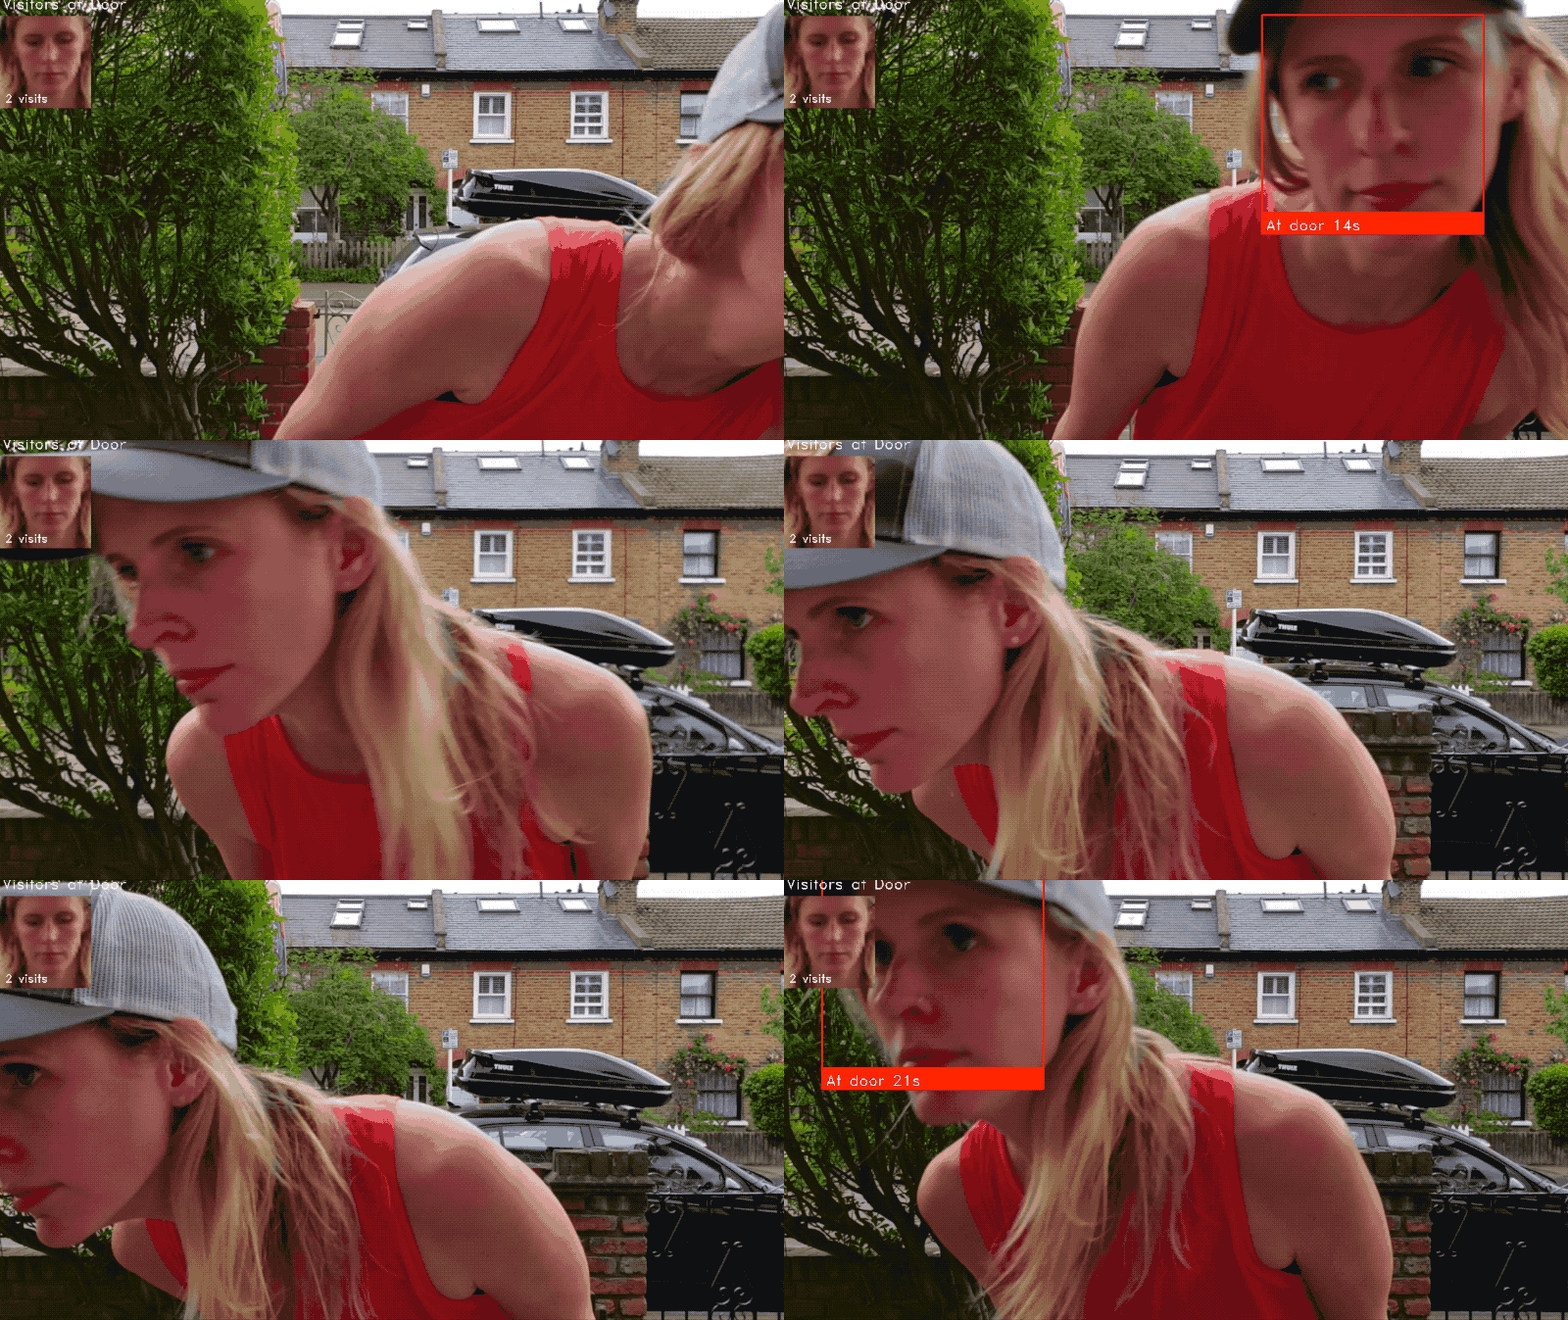
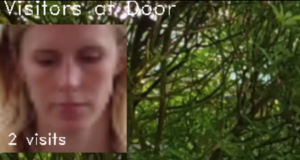
こんなことをするコードです。
The code starts off by importing the libraries we are going to be using. The most important ones are OpenCV (called cv2 in Python), which we’ll use to read images from the camera, and face_recognition, which we’ll use to detect and compare faces.
Pythonコードは、使用するライブラリをインポートすることから始まります。 最も重要なものは、カメラから画像を読み取るために使用するOpenCV(Pythonではcv2と呼ばれます)と、顔を検出して比較するために使用するface_recognitionです。
|
1 2 3 4 5 6 |
import face_recognition import cv2 from datetime import datetime, timedelta import numpy as np import platform import pickle |
Next, we are going to create some variables to store data about the people who walk in front of our camera. These variables will act as a simple database of known visitors.
次に、カメラの前を歩く人々に関するデータを格納するための変数をいくつか作成します。 これらの変数は、既知の訪問者の単純なデータベースとして機能します。
|
1 2 |
known_face_encodings = [] known_face_metadata = [] |
This application is just a demo, so we are storing our known faces in a normal Python list. In a real-world application that deals with more faces, you might want to use a real database instead, but I wanted to keep this demo simple.
このアプリケーションは単なるデモであるため、既知の顔を通常のPythonリストに保存しています。 より多くの顔を扱う実際のアプリケーションでは、代わりに実際のデータベースを使用することをお勧めしますが、このデモは単純にしておきたいと思いました。
Next, we have a function to save and load the known face data. Here’s the save function:
次に、既知の顔データを保存してロードする機能があります。 保存機能は次のとおりです。
(既知の顔といってますが、ここでは1回カメラが認識した顔というくらいの意味です)
|
1 2 3 4 5 |
def save_known_faces(): with open("known_faces.dat", "wb") as face_data_file: face_data = [known_face_encodings, known_face_metadata] pickle.dump(face_data, face_data_file) print("Known faces backed up to disk.") |
This writes the known faces to disk using Python’s built-in pickle functionality. The data is loaded back the same way, but I didn’t show that here.
I wanted this program to run on a desktop computer or on a Jetson Nano without any changes, so I added a simple function to detect which platform it is currently running on:
これにより、Pythonの組み込みのpickle機能を使用して、既知の顔がディスクに書き込まれます。 データは同じ方法で読み込まれますが、ここでは示しませんでした。
このプログラムをデスクトップコンピューターまたはJetsonNanoで変更せずに実行したかったので、現在実行されているプラットフォームを検出する簡単な関数を追加しました。
|
1 2 |
def running_on_jetson_nano(): return platform.machine() == "aarch64" |
This is needed because the way we access the camera is different on each platform. On a laptop, we can just pass in a camera number to OpenCV and it will pull images from the camera. But on the Jetson Nano, we have to use gstreamer to stream images from the camera which requires some custom code.
これが必要なのは、カメラへのアクセス方法がプラットフォームごとに異なるためです。 ラップトップでは、カメラ番号をOpenCVに渡すだけで、カメラから画像が取得されます。 ただし、Jetson Nanoでは、gstreamerを使用してカメラから画像をストリーミングする必要があり、カスタムコードが必要です。
By being able to detect the current platform, we’ll be able to use the correct method of accessing the camera on each platform. That’s the only customization needed to make this program run on the Jetson Nano instead of a normal computer!
現在のプラットフォームを検出できるようにすることで、各プラットフォームのカメラにアクセスする正しい方法を使用できるようになります。 このプログラムを通常のコンピューターではなくJetsonNanoで実行するために必要なカスタマイズは、これだけです。
Whenever our program detects a new face, we’ll call a function to add it to our known face database:
プログラムが新しい顔を検出するたびに、関数を呼び出して既知の顔データベースに追加します。
|
1 2 3 4 5 6 7 8 9 10 |
def register_new_face(face_encoding, face_image): known_face_encodings.append(face_encoding) known_face_metadata.append({ "first_seen": datetime.now(), "first_seen_this_interaction": datetime.now(), "last_seen": datetime.now(), "seen_count": 1, "seen_frames": 1, "face_image": face_image, }) |
First, we are storing the face encoding that represents the face in a list. Then, we are storing a matching dictionary of data about the face in a second list. We’ll use this to track the time we first saw the person, how long they’ve been hanging around the camera recently, how many times they have visited our house, and a small image of their face.
まず、顔を表す顔エンコーディングをリストに保存します。 次に、顔に関するデータの一致する辞書を2番目のリストに保存します。 これを使って、最初にその人を見た時間、最近どれくらいの期間カメラの周りをウロウロしていたか、家に何回来たか、や顔の小さな画像などを記録していきます。
We also need a helper function to check if an unknown face is already in our face database or not:
また、不明な顔がすでに顔データベースにあるかどうかを確認するためのヘルパー関数も必要です。
|
1 2 3 4 5 6 7 8 9 10 11 12 13 14 15 16 17 18 19 20 21 22 23 24 |
def lookup_known_face(face_encoding): metadata = None if len(known_face_encodings) == 0: return metadata face_distances = face_recognition.face_distance( known_face_encodings, face_encoding ) best_match_index = np.argmin(face_distances) if face_distances[best_match_index] < 0.65: metadata = known_face_metadata[best_match_index] metadata["last_seen"] = datetime.now() metadata["seen_frames"] += 1 if datetime.now() - metadata["first_seen_this_interaction"] > timedelta(minutes=5): metadata["first_seen_this_interaction"] = datetime.now() metadata["seen_count"] += 1 return metadata |
We are doing a few important things here:
ここではいくつかの重要なことを行っています。
1.
Using the face_recogntion library, we check how similar the unknown face is to all previous visitors. The face_distance() function gives us a numerical measurement of similarity between the unknown face and all known faces— the smaller the number, the more similar the faces.
face_recogntionライブラリを使用して、未知の顔が以前のすべての訪問者とどの程度類似しているかを確認します。 face_distance()関数は、未知の顔とすべての既知の顔の間の類似性の数値測定値を提供します。数値が小さいほど、顔の類似性が高くなります。
2.
If the face is very similar to one of our known visitors, we assume they are a repeat visitor. In that case, we update their “last seen” time and increment the number of times we have seen them in a frame of video.
顔が既知の訪問者の1人と非常に似ている場合、それらはリピーターであると見なされます。 その場合、私たちは彼らの「最後に見た」時間を更新し、ビデオのフレームで見た回数を増やします。
3.
Finally, if this person has been seen in front of the camera in the last five minutes, we assume they are still here as part of the same visit. Otherwise, we assume that this is a new visit to our house, so we’ll reset the time stamp tracking their most recent visit.
最後に、この人物が過去5分間にカメラの前で見られた場合、同じ訪問の一部としてまだここにいると見なされます。 それ以外の場合は、これが私たちの家への新しい訪問であると想定するため、直近の訪問を追跡するタイムスタンプをリセットします。
The rest of the program is the main loop — an endless loop where we fetch a frame of video, look for faces in the image, and process each face we see. It is the main heart of the program. Let’s check it out:
プログラムの残りの部分はメインループです。ビデオのフレームを取ってきて、画像内の顔を探し、表示された各顔を処理する無限ループです。 それがプログラムの中心です。 それをチェックしましよう:
|
1 2 3 4 5 6 7 8 9 |
def main_loop(): if running_on_jetson_nano(): video_capture = cv2.VideoCapture( get_jetson_gstreamer_source(), cv2.CAP_GSTREAMER ) else: video_capture = cv2.VideoCapture(0) |
The first step is to get access to the camera using whichever method is appropriate for our computer hardware. But whether we are running on a normal computer or a Jetson Nano, the video_capture object will let us grab frames of video from our computer’s camera.
最初のステップは、コンピューターのハードウェアに適した方法を使用してカメラにアクセスすることです。 ただし、通常のコンピューターで実行している場合でも、Jetson Nanoで実行している場合でも、video_captureオブジェクトを使用すると、コンピューターのカメラからビデオのフレームを取得できます。
So let’s start grabbing frames of video:
それでは、ビデオのフレームを取得し始めましょう。
カメラ画像を回転させるコードを追加しました。Jetsonやラズパイのカメラは接続してまっすぐに立てると画像が上下さかさまになるので、使いようによっては画像を回転させる必要があります。
|
1 2 3 4 5 6 7 8 9 10 11 |
while True: # Grab a single frame of video ret, frame = video_capture.read() //カメラを回転させたい場合以下を追加 //パラメータは90度の場合cv2.ROTATE_90_CLOCKWISE、180度の場合はcv2.ROTATE_180 //frame = cv2.rotate(frame,cv2.ROTATE_90_CLOCKWISE) # Resize frame of video to 1/4 size small_frame = cv2.resize(frame, (0, 0), fx=0.25, fy=0.25) # Convert the image from BGR color rgb_small_frame = small_frame[:, :, ::-1] |
Each time we grab a frame of video, we’ll also shrink it to 1/4 size. This will make the face recognition process run faster at the expense of only detecting larger faces in the image. But since we are building a doorbell camera that only recognizes people near the camera, that shouldn’t be a problem.
ビデオのフレームを取得するたびに、1/4サイズに縮小します。 これにより、画像内のより大きな顔のみを検出する代わりに、顔認識プロセスの実行が高速化されます。 ただし、カメラの近くにいる人だけを認識するドアベルカメラを構築しているので、問題はありません。
We also have to deal with the fact that OpenCV pulls images from the camera with each pixel stored as a Blue-Green-Red value instead of the standard order of Red-Green-Blue. Before we can run face recognition on the image, we need to convert the image format.
また、OpenCVがカメラから画像を取得し、各ピクセルが標準の赤-緑-青の順序ではなく青-緑-赤の値として保存されるという事実にも対処する必要があります。 画像に対して顔認識を実行する前に、画像形式を変換する必要があります。
Now we can detect all the faces in the image and convert each face into a face encoding. That only takes two lines of code:
これで、画像内のすべての顔を検出し、各顔を顔エンコーディングに変換できます。 これには2行のコードしか必要ありません。
|
1 2 3 4 5 |
face_locations = face_recognition.face_locations(rgb_small_frame) face_encodings = face_recognition.face_encodings( rgb_small_frame, face_locations ) |
Next, we’ll loop through each detected face and decide if it is someone we have seen in the past or a brand new visitor:
次に、検出された各顔をループして、それが過去に見た人なのか、まったく新しい訪問者なのかを判断します。
|
1 2 3 4 5 6 7 8 9 10 11 12 13 14 15 16 17 18 19 20 |
for face_location, face_encoding in zip( face_locations, face_encodings): metadata = lookup_known_face(face_encoding) if metadata is not None: time_at_door = datetime.now() - metadata['first_seen_this_interaction'] face_label = f"At door {int(time_at_door.total_seconds())}s" else: face_label = "New visitor!" # Grab the image of the the face top, right, bottom, left = face_location face_image = small_frame[top:bottom, left:right] face_image = cv2.resize(face_image, (150, 150)) # Add the new face to our known face data register_new_face(face_encoding, face_image) |
If we have seen the person before, we’ll retrieve the metadata we’ve stored about their previous visits. If not, we’ll add them to our face database and grab the picture of their face from the video image to add to our database.
以前にその人に会ったことがある場合は、以前の訪問で保存したメタデータを取得します。 そうでない場合は、顔データベースに追加し、ビデオ画像から顔の写真を取得してデータベースに追加します。
Now that we have found all the people and figured out their identities, we can loop over the detected faces again just to draw boxes around each face and add a label to each face:
すべての人を見つけて身元を把握したので、検出された顔をもう一度ループして、各顔の周りにボックスを描画し、各顔にラベルを追加できます。
|
1 2 3 4 5 6 7 8 9 10 11 12 13 14 15 16 17 18 19 20 21 22 23 24 25 |
for (top, right, bottom, left), face_label in zip(face_locations, face_labels): # Scale back up face location # since the frame we detected in was 1/4 size top *= 4 right *= 4 bottom *= 4 left *= 4 # Draw a box around the face cv2.rectangle( frame, (left, top), (right, bottom), (0, 0, 255), 2 ) # Draw a label with a description below the face cv2.rectangle( frame, (left, bottom - 35), (right, bottom), (0, 0, 255), cv2.FILLED ) cv2.putText( frame, face_label, (left + 6, bottom - 6), cv2.FONT_HERSHEY_DUPLEX, 0.8, (255, 255, 255), 1 ) |
I also wanted a running list of recent visitors drawn across the top of the screen with the number of times they have visited your house:
また、最近の訪問者のリストを画面の上部に描画し、彼らがあなたの家を訪問した回数を示したいと思いました。
To draw that, we need to loop over all known faces and see which ones have been in front of the camera recently. For each recent visitor, we’ll draw their face image on the screen and draw a visit count:
それを描くには、すべての既知の顔をループして、直近のカメラの前にある顔を確認する必要があります。 直近の訪問者ごとに、画面に顔の画像を描画し、訪問数を描画します。
|
1 2 3 4 5 6 7 8 9 10 11 12 13 14 15 16 17 18 19 20 21 22 |
number_of_recent_visitors = 0 for metadata in known_face_metadata: # If we have seen this person in the last minute if datetime.now() - metadata["last_seen"] < timedelta(seconds=10): # Draw the known face image x_position = number_of_recent_visitors * 150 frame[30:180, x_position:x_position + 150] = metadata["face_image"] number_of_recent_visitors += 1 # Label the image with how many times they have visited visits = metadata['seen_count'] visit_label = f"{visits} visits" if visits == 1: visit_label = "First visit" cv2.putText( frame, visit_label, (x_position + 10, 170), cv2.FONT_HERSHEY_DUPLEX, 0.6, (255, 255, 255), 1 ) |
Finally, we can display the current frame of video on the screen with all of our annotations drawn on top of it:
最後に、ビデオの現在のフレームを画面に表示し、その上にすべての注釈を描画します。
|
1 |
cv2.imshow('Video', frame) |
And to make sure we don’t lose data if the program crashes, we’ll save our list of known faces to disk every 100 frames:
また、プログラムがクラッシュしてもデータが失われないようにするために、既知の顔のリストを100フレームごとにディスクに保存します。
|
1 2 3 4 5 |
if len(face_locations) > 0 and number_of_frames_since_save > 100: save_known_faces() number_of_faces_since_save = 0 else: number_of_faces_since_save += 1 |
And that’s it aside from a line or two of clean up code to turn off the camera when the program exits.
プログラムが終了したときにカメラをオフにするためのクリーンアップコードの行を書いて、これで終わりです。
The start-up code for the program is at the very bottom of the program:
プログラムの起動コードは、プログラムの一番下にあります。
|
1 2 3 |
if __name__ == "__main__": load_known_faces() main_loop() |
All we are doing is loading the known faces (if any) and then starting the main loop that reads from the camera forever and displays the results on the screen.
私たちがやることは、既知の顔(もしあれば)をロードして、カメラから永続的に読み取って結果を画面に表示するメインループを開始することだけです。
The whole program is only about 200 lines, but it does something pretty interesting — it detects visitors, identifies them and tracks every single time they have come back to your door. It’s a fun demo, but it could also be really creepy if you abuse it.
プログラム全体は約200行ですが、非常に興味深いことを実行します。訪問者を検出し、識別し、ドアに戻るたびに追跡します。 楽しいデモですが、悪用すると本当に不快なことになる可能性もあります。
Fun fact: This kind of face tracking code is running inside many street and bus station advertisements to track who is looking at ads and for how long. That might have sounded far fetched to you before, but you just build the same thing for $150!
おもしろい事実:この種の顔追跡コードは、多くの街路やバス停の広告内で実行されており、誰がどのくらいの時間広告を見ているかを追跡します。 それは以前にははるかに空想的に聞こえていたかもしれませんが、150ドルで同じことが構築できるのです!
face_recognitionで顔識別
さて、これでラズベリーパイ3で顔認識 でやってた顔識別コードをJetsonでも実行できるようになりました。
こういうのです。
コードのどこをいじればいいか分かります。
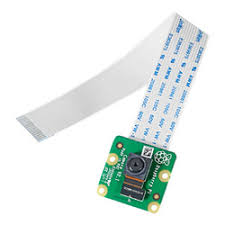
ラズベリーパイ3で顔認識 ではWebカメラを使っていましたが、ここではラズパイ用のカメラモジュールV2を使います。
こういうのです。
まずは、face recognitionコードをクローンして、examplesフォルダーに移動します。
|
1 2 |
git clone --single-branch https://github.com/ageitgey/face_recognition.git cd ./face_recognition/examples |
examplesフォルダーの中のfacerec_from_webcam_faster.pyをコピーして新しいPythonファイルを作っておきます。
|
1 |
sudo cp facerec_from_webcam_faster.py facerec_from_camv2_faster.py |
新しいファイルをエディターで開いてコードを編集します。
facerec_from_camv2_faster.pyにはmain_loop()はありません。
上記の説明にあるようにJetsonでカメラモジュールを使う場合はgstreamerのお世話になるのでそれへの対応です。
まず、プラットフォーム識別用に以下をインポートしておきます。
|
1 |
import platform |
この直下に関数を2つ定義しておきます。
|
1 2 3 4 5 6 7 8 9 10 11 12 13 14 15 16 17 18 19 |
def running_on_jetson_nano(): # To make the same code work on a laptop or on a Jetson Nano, we'll detect when we are running on the Nano # so that we can access the camera correctly in that case. # On a normal Intel laptop, platform.machine() will be "x86_64" instead of "aarch64" return platform.machine() == "aarch64" def get_jetson_gstreamer_source(capture_width=1280, capture_height=720, display_width=1280, display_height=720, framerate=60, flip_method=0): """ Return an OpenCV-compatible video source description that uses gstreamer to capture video from the camera on a Jetson Nano """ return ( f'nvarguscamerasrc ! video/x-raw(memory:NVMM), ' + f'width=(int){capture_width}, height=(int){capture_height}, ' + f'format=(string)NV12, framerate=(fraction){framerate}/1 ! ' + f'nvvidconv flip-method={flip_method} ! ' + f'video/x-raw, width=(int){display_width}, height=(int){display_height}, format=(string)BGRx ! ' + 'videoconvert ! video/x-raw, format=(string)BGR ! appsink' ) |
で、video_capture = cv2.VideoCapture(0)を探して、これに代えて以下を使います。
|
1 2 3 4 5 6 7 |
if running_on_jetson_nano(): # Accessing the camera with OpenCV on a Jetson Nano requires gstreamer with a custom gstreamer source string video_capture = cv2.VideoCapture(get_jetson_gstreamer_source(), cv2.CAP_GSTREAMER) else: # Accessing the camera with OpenCV on a laptop just requires passing in the number of the webcam (usually 0) # Note: You can pass in a filename instead if you want to process a video file instead of a live camera stream video_capture = cv2.VideoCapture(0) |
以上、これだけです。
注:この方法は現時点(2021/04/02)ではコンテナでは使えません。コンテナからCSIカメラに接続する方法はないようです。NVIDIA公式でもUSBカメラを使えということのようですのでご注意ください。
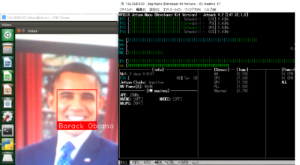
エディタを閉じて以下を実行すれ ばラズベリーパイ3で顔認識 でやったような顔識別コードがJetson Nanoでも走ります。
|
1 |
python3 facerec_from_camv2_faster.py |
examples内のデータを使うとこういう感じになります。GPUも機嫌よく働いています。
Next
Windows用の実行ファイル(exe)やDockerfileにしてみます。

Leave a Reply