
注:
以下の記述には問題があります。
Colab のPythonバージョンを落として新しく1.4.0のPytorch を使っていますが、重みデータをtorch.saveで保存した場合、pthファイルがバイナリではなくアーカイブファイルになってしまいます。対処方法が分かるまでペンディングします。
【物体検出】
元ネタはTellus ですが、ここではTellus OS は使わずにGoogle のColab でやってみます。
衛星画像から航空機を検出
教師データはAWS のS3 から取ってきますが、Colab で使いたいのでGoogle Drive にダウンロードしておきます。
ダウンロードするにはAWSのコマンドラインツール(awscli)を使います。
Colab もGoogle Drive も無償で使えます。無償枠でもGoogleDrive は15GBの容量があります、十分です。
Colab も無償枠で行けると思います。検証ではColab Pro (P100) を使ってEpoch数100 で3時間くらい稼働させました。
無償枠ならTesla T4 で12時間制限ありですが、Epoch 100 くらいなら大丈夫だと思います。
やってみましょう。
注 : 最後にEpoch 200 で実行した結果も追加しておきました、ご参考までに。
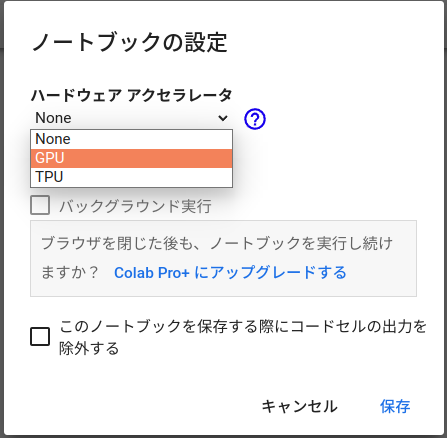
GPU が使えるようにします。
編集ー>ノートブックの設定
Colab インスタンスに接続。
|
1 |
!nvidia-smi |
注:現Colab のPythonバージョンは3.9.16ですが、これだとリポジトリにあるPytorchのバージョンが1.7.0以上です。ここでは都合上1.5より下のPytorch を使う必要があるので、ColabのPythonを3.8系にダウングレードしてPytorchの1.4.0が見えるようにしておきます。
|
1 |
!sudo update-alternatives --config python3 |
3.9系と3.8系を番号で選択するよう促してくるので、3.8系の番号を入力して選択。
Google Drive をマウントします。
|
1 2 |
from google.colab import drive drive.mount('/content/drive') |
「 このノートブックに Google ドライブのファイルへのアクセスを許可しますか?」と出るので、GoogleDrive に接続します。
次に出るWindowでご自身のアカウントでログインを許可すればマウントが完了します。
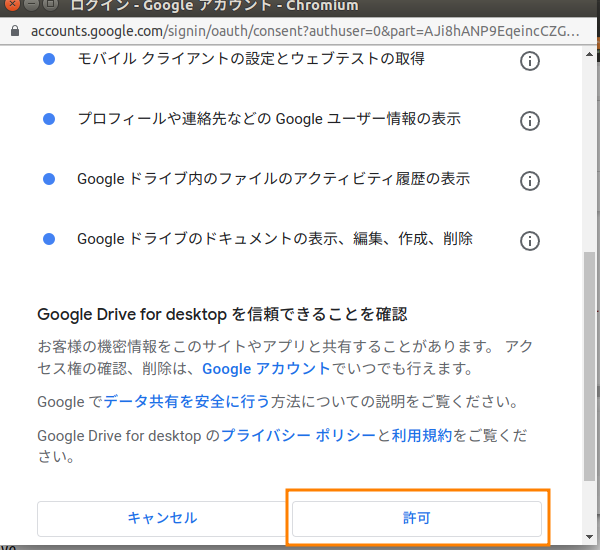
Mounted at /content/drive と表示されます。
自分のドライブに移動します。
|
1 |
%cd /content/drive/MyDrive |
awscli をインストールします。
|
1 2 3 4 5 6 7 8 |
!sudo apt install curl #Colab のCPU はX86_64なので以下を実行 !curl "https://awscli.amazonaws.com/awscli-exe-linux-x86_64.zip" -o "awscliv2.zip" !unzip awscliv2.zip !sudo ./aws/install |
確認
|
1 |
!aws --version |
AWSの認証情報を確認。
|
1 |
!aws configure list |
まだ無いはずなので以下のようになります。
Name Value Type Location
—- —– —- ——–
profile <not set> None None
access_key <not set> None None
secret_key <not set> None None
region <not set> None None
AWSにログインして認証情報を取得します。
アカウントをお持ちの場合はIAMユーザー(B)としてログイン(C)します。
まだアカウントを持っていない場合は、新規に作成(A)してからログイン。
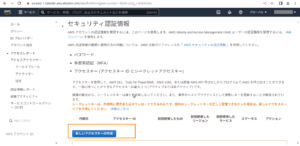
認証情報を取得します。
アクセスキーを取得
新規に取得する余地が無い場合は、既存のものを1個削除すればいいです。
rootkey.csvというファイルがダウンロードされます。ここには以下のような2種類の情報が記述されています。
AWSAccessKeyId=*************************
AWSSecretKey=****************************
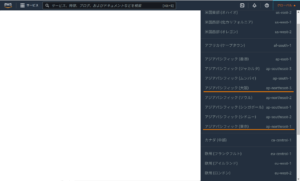
region情報を取得します、どこのサーバーを使うかという話なので、大阪とか東京とか。
情報を収集できたら、認証情報を設定します。
|
1 |
!aws configure |
以下の4つの情報を入力するように順番に聞いてきますので、上で取得したものを順次入力
Notebook の場合は右側をクリックして白いフィールドを表示させて入力します。
region が大阪の場合はap-northeast-3
最後のoutput formatはjsonにします。
AWS Access Key ID [None]:**************
AWS Secret Access Key [None]:***************
Default region name [None]: ap-northeast-3
Default output format [None]: json
終了したら確認してしてみます。
|
1 |
!aws configure list |
作業フォルダーを作って、教師データをダウンロード
大体4.2GBほどのファイルがダウンロードされます。
|
1 2 3 4 5 6 7 8 9 10 11 12 13 14 15 |
!mkdir rareplanes %cd rareplanes #学習用データのダウンロード !aws s3 cp --recursive s3://rareplanes-public/synthetic/train/images ./Data_rareplanes/train/images/ --exclude "*.png" --include "*10.png" !aws s3 cp --recursive s3://rareplanes-public/synthetic/train/xmls ./Data_rareplanes/train/labels/ --exclude "*.xml" --include "*10.xml" #検証用データのダウンロード !aws s3 cp --recursive s3://rareplanes-public/synthetic/train/images ./Data_rareplanes/val/images/ --exclude "*.png" --include "*20.png" !aws s3 cp --recursive s3://rareplanes-public/synthetic/train/xmls ./Data_rareplanes/val/labels/ --exclude "*.xml" --include "*20.xml" #評価用データのダウンロード !aws s3 cp --recursive s3://rareplanes-public/synthetic/train/images ./Data_rareplanes/test/images/ --exclude "*.png" --include "*30.png" !aws s3 cp --recursive s3://rareplanes-public/synthetic/train/xmls ./Data_rareplanes/test/labels/ --exclude "*.xml" --include "*30.xml" |
utils Python ライブラリをGoogleDrive のrareplanesフォルダーにアップロードしておく
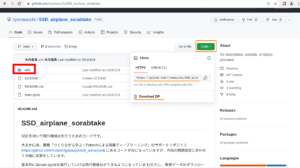
こちらのサイトのutilsを使いたいので、クローンするかZip をダウンロード
クローンする場合
|
1 |
git clone https://github.com/ryomaouchi/SSD_airplane_sorabtake.git |
Zipをダウンロードする場合
GoogleDriveで右クリクして、解凍フォルダー内のutilsフォルダーごとアップロードしておきます。
SSDを用いて飛行機の物体検出にチャレンジ
Colab のJupyter Notebook にコードを記述して実行しましょう。
まず、
Colab のデフォルトのPyTorch,Torchvision では推論実行時、以下のようなエラーが出ます。
Legacy autograd function with non-static forward method is deprecated. Please use new-style autograd function with static forward method.
どうもPyTorchのバージョンが1.5以上の場合に出るそうです(2022/09/17現在、Colab のPyTorchバージョンは1.12.1)。
PyTorch,Torchvision をダウングレードしておきます。
新しいPython3.8系のColab にはpip が無いので入れて起きます。
|
1 |
!sudo apt install python3-pip |
以下のPytorch とTorchvision を入れます。
|
1 |
!pip install torch==1.4.0 torchvision==0.5.0 |
以下を実行
必要なライブラリをインストール
|
1 2 3 4 5 6 7 8 9 10 11 12 13 14 15 16 17 |
import numpy as np import matplotlib.pyplot as plt %matplotlib inline import os import sys import time import pandas as pd import urllib.request import zipfile import tarfile import cv2 import random import xml.etree.ElementTree as ET from math import sqrt from glob import glob from itertools import product |
|
1 2 3 4 5 6 7 8 |
import torch import torch.utils.data as data import torchvision import torch.nn as nn import torch.nn.functional as F import torch.nn.init as init import torch.optim as optim from torch.autograd import Function |
|
1 2 3 |
from utils.augmentations import Compose, ConvertFromInts, ToAbsoluteCoords, PhotometricDistort, Expand, RandomSampleCrop, RandomMirror, ToPercentCoords, Resize, SubtractMeans from utils.dataloader import RareplanesDataset, DataTransform, xml_to_list, od_collate_fn, get_color_mean |
乱数のシードを設定
|
1 2 3 |
torch.manual_seed(0) np.random.seed(0) random.seed(0) |
Training画像とそのアノテーション、またValidation画像とそのアノテーションをそれぞれリストにする
|
1 2 3 4 5 6 7 8 9 10 |
train_image_dir = './Data_rareplanes/train/images/' train_img_paths = glob(os.path.join(train_image_dir, '*.png')) val_image_dir = './Data_rareplanes/val/images/' val_img_paths = glob(os.path.join(val_image_dir, '*.png')) train_label_paths = [train_img_paths[i].replace('png', 'xml',1).replace('images','labels',1) for i in range(len(train_img_paths))] val_label_paths = [val_img_paths[i].replace('png', 'xml',1).replace('images','labels',1) for i in range(len(val_img_paths))] my_classes = ["airplane"] |
色情報の規格化のためにチャンネルごとの平均値を計算(1分半くらい時間かかりました)
|
1 2 |
color_mean = get_color_mean(train_img_paths) print(color_mean) |
(143.1487009512939, 136.12215208212658, 134.96655592553213)
モデルを再利用する場合、このcolor_meanデータが必要になるので保存しておく
|
1 2 3 |
import pickle with open('color_mean.pickle', mode='wb') as fo: pickle.dump(color_mean, fo) |
前処理
Dataset の作成
|
1 2 3 4 5 6 7 8 9 10 11 |
input_size = 300 #入力画像は300×300にリサイズする。 train_dataset = RareplanesDataset(train_img_paths, train_label_paths, phase = 'train', transform = DataTransform(input_size, color_mean), transform_anno = xml_to_list(my_classes) ) val_dataset = RareplanesDataset(val_img_paths, val_label_paths, phase = 'val', transform = DataTransform(input_size, color_mean), transform_anno = xml_to_list(my_classes) ) |
Dataloader の作成
|
1 2 3 4 5 6 7 8 9 10 11 |
batch_size = 32 train_dataloader = data.DataLoader( train_dataset, batch_size = batch_size, shuffle = True, collate_fn = od_collate_fn ) val_dataloader = data.DataLoader( val_dataset, batch_size = batch_size, shuffle = True, collate_fn = od_collate_fn ) dataloaders_dict = {"train": train_dataloader, "val": val_dataloader} |
重みデータ
|
1 2 3 4 5 6 7 8 9 10 11 12 13 14 15 |
weights_dir = "./weights/" if not os.path.exists(weights_dir): os.mkdir(weights_dir) # 学習済みのSSD用のVGGのパラメータをフォルダ「weights」にダウンロード # MIT License # Copyright (c) 2017 Max deGroot, Ellis Brown # https://github.com/amdegroot/ssd.pytorch #手動でダウンロード url = "https://s3.amazonaws.com/amdegroot-models/vgg16_reducedfc.pth" target_path = os.path.join(weights_dir, "vgg16_reducedfc.pth") if not os.path.exists(target_path): urllib.request.urlretrieve(url, target_path) |
SSDモデルの作成
|
1 2 3 4 5 6 7 8 9 10 11 12 13 14 15 16 17 18 19 20 21 22 23 24 25 26 27 28 29 30 |
from utils.ssd_model import SSD ssd_cfg = { 'num_classes': 2, # 背景を含む 'input_size': 300, 'bbox_aspect_num': [4,6,6,6,4,4], 'feature_maps': [38,19,10,5,3,1], 'steps': [8,16,32,64,100,300], # DBoxの大きさ (なぜ) 'min_sizes': [30,60,111,162,213,264], 'max_sizes': [60,111,162,213,264,315], 'aspect_ratios': [[2],[2,3],[2,3],[2,3],[2],[2]] } net = SSD(phase='train', cfg = ssd_cfg) vgg_weights = torch.load('./weights/vgg16_reducedfc.pth') net.vgg.load_state_dict(vgg_weights) def weights_init(m): if isinstance(m, nn.Conv2d): init.kaiming_normal_(m.weight.data) if m.bias is not None: nn.init.constant_(m.bias,0.0) net.extras.apply(weights_init) net.loc.apply(weights_init) net.conf.apply(weights_init) device = torch.device("cuda:0" if torch.cuda.is_available() else "cpu") #print("使用Device:", device) |
|
1 2 3 4 5 6 |
from utils.loss import MultiBoxLoss criterion = MultiBoxLoss(jaccard_thresh=0.5, neg_pos = 3, device=device) optimizer = optim.Adam(net.parameters(), lr=0.001, betas=(0.9, 0.999), eps=1e-08, weight_decay=0, amsgrad=False) #optim.SGD(net.parameters(), lr=1e-3,momentum=0.9, weight_decay = 5e-4) |
モデル学習用関数定義
|
1 2 3 4 5 6 7 8 9 10 11 12 13 14 15 16 17 18 19 20 21 22 23 24 25 26 27 28 29 30 31 32 33 34 35 36 37 38 39 40 41 42 43 44 45 46 47 48 49 50 51 52 53 54 55 56 57 58 59 60 61 62 63 64 65 66 67 68 69 70 71 72 73 74 75 76 77 78 79 80 81 82 83 84 85 86 87 88 89 90 91 92 |
def train_model(net,dataloaders_dict, criterion, optimizer, num_epochs): device = torch.device("cuda:0" if torch.cuda.is_available() else "cpu") print("使用Device:", device) net.to(device) torch.backends.cudnn.benchmark = True iteration = 1 epoch_train_loss = 0.0 epoch_val_loss = 0.0 logs = [] #学習開始 for epoch in range(num_epochs+1): t_epoch_start = time.time() t_iter_start = time.time() print('------------') print('Epoch {}/{}'.format(epoch+1, num_epochs)) print('------------') for phase in ['train', 'val']: if phase == 'train': net.train() print(' (train) ') else: if ((epoch+1) % 10 == 0): net.eval() print('----------') print(' (val) ') else: continue for images, targets in dataloaders_dict[phase]: images = images.to(device) targets = [ann.to(device) for ann in targets] optimizer.zero_grad() with torch.set_grad_enabled(phase=='train'): outputs = net(images) #損失関数は、バウンディングボックスの位置の予測に関するもの(=loss_l)と分類予測に関するもの(=loss_c)の和になる。 loss_l, loss_c = criterion(outputs, targets) loss = loss_l + loss_c if phase == 'train': loss.backward() nn.utils.clip_grad_value_( net.parameters(), clip_value = 2.0 ) optimizer.step() if (iteration % 2 ==0): t_iter_finish = time.time() duration = t_iter_finish - t_iter_start print('イテレーション {} || Loss: {:.4f} || 10iter:{:.4f} sec.'.format( iteration, loss.item(), duration)) t_iter_start = time.time() epoch_train_loss += loss.item() iteration += 1 else: epoch_val_loss += loss.item() t_epoch_finish = time.time() print('------------') print('epoch {} || Epoch_TRAIN_Loss:{:.4f} || Epoch_VAL_Loss:{:.4f}'.format( epoch+1, epoch_train_loss, epoch_val_loss)) print('timer: {:.4f} sec.'.format(t_epoch_finish - t_epoch_start)) t_epoch_start = time.time() log_epoch = {'epoch': epoch+1, 'train_loss': epoch_train_loss, 'val_loss': epoch_val_loss} logs.append(log_epoch) df = pd.DataFrame(logs) df.to_csv("log_output.csv") epoch_train_loss = 0.0 epoch_val_loss = 0.0 #10エポックごとに重みを保存する。 if ((epoch+1)%10 ==0): torch.save(net.state_dict(),'weights/SSD300_'+str(epoch+1)+'.pth') |
オリジナルのエポック数は200ですが、100でも大丈夫らしいので、時間節約で100に変更。
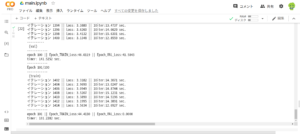
学習実行
|
1 2 3 |
num_epochs = 100 train_model(net, dataloaders_dict, criterion, optimizer, num_epochs = num_epochs) |
だいたいTesla P100 では3時間くらいで終了
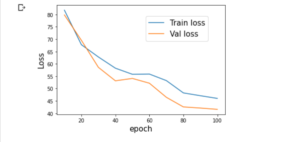
エポックに伴う損失関数の変化をプロット
|
1 2 3 4 5 6 7 8 9 10 11 12 |
log_data = pd.read_csv("log_output.csv") #エポック10ごとに切り出す log_data_10 = log_data[log_data["epoch"] % 10 == 0] plt.xlabel("epoch", fontsize= 15) plt.ylabel("Loss", fontsize= 15) plt.plot(log_data_10["epoch"],log_data_10["train_loss"], label="Train loss") plt.plot(log_data_10["epoch"],log_data_10["val_loss"], label="Val loss") plt.legend(bbox_to_anchor=(0.9, 0.9), loc='upper right', borderaxespad=0, fontsize=15) plt.show() |
エポック数は100ですが、
損失が学習用画像と検証用画像のどちらにおいてもきちんと減少しています。また、学習用画像と検証用画像の損失関数に大きな差はないので、過学習もさほど起こしていないと考えられます。
….ということのようです。
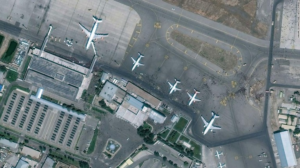
では、適当に用意した画像で推論を実行してみます。
Tellusオリジナルにある画像はトークンが必要です。持っていないので、適当な衛星画像を使ってみます。
GoogleDrive のrareplanesフォルダーへアップロードしておきます。
【airport2.png】
重みファイルはSSD300_100.pthを使用
|
1 2 3 4 5 6 |
# ネットワークを推論用に切り替える net = SSD(phase='inference', cfg = ssd_cfg) # 上で学習した重みを読み込む net_weights = torch.load('./weights/SSD300_100.pth', map_location={'cuda:0': 'cpu'}) net.load_state_dict(net_weights) |
|
1 2 3 4 5 6 7 8 9 10 |
# 推論結果を表示するためのクラスSSDPredictShowをutils下のssd_predict_show.pyから読み込む from utils.ssd_predict_show import SSDPredictShow test_image_dir = './Data_rareplanes/test/images/' test_img_paths = glob(os.path.join(test_image_dir, '*.png')) # 評価用画像を一枚読み込む img_file_path = test_img_paths[1] ssd = SSDPredictShow(color_mean, eval_categories = my_classes, net = net) ssd.show(img_file_path, data_confidence_level=0.3) |
画像を読み込んで推論実行
|
1 2 3 4 5 |
from utils.ssd_predict_show import SSDPredictShow img_file_path = "./airport2.png" ssd = SSDPredictShow(color_mean, eval_categories = my_classes, net = net) ssd.show(img_file_path, data_confidence_level=0.3) |
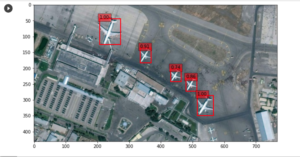
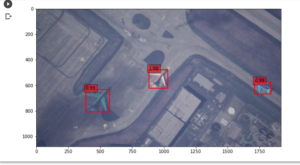
こんな感じ
余計なものもPlaneだと推論していますが、推論すべきものはすべてカバーしています。
真面目にエポック数200でやってみた場合
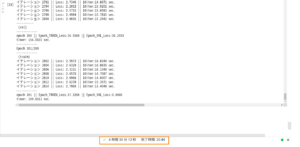
Colab P100 の環境で6時間30分かかっています。
エポックに伴う損失関数の変化はこんな感じ
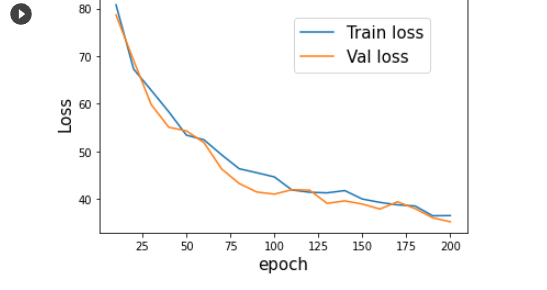
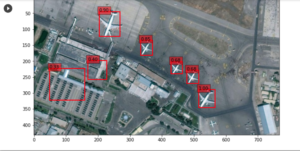
上記と同様にairport2.pngを読んで推論してみます。
重みファイルはSSD300_200.pthを使用します。
結果、今回は余計なものは検出せずに、飛行機のみをすべてカバーしています。
他の画像でやってみましたが、若干の誤検出をやらかすものの漏れはほぼありませんでした。
推論画像は「空港 衛星画像」で検索すれば結構出てきます。リサイズの必要はありません。
Appendix
【画像分類】
Jetson Nano + Pytorchでゴルフ場が衛星画像に写っているかを識別してみる
Appendix2
修正中
作成したモデルなどで推論のみ実行してみる
Colab を開いて新規にノートブックを作成、GPUを設定する
GoogleDrive に接続
Driveの構造はこんな感じです。
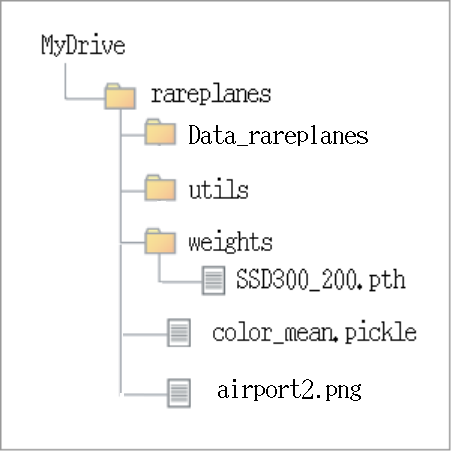
|
1 2 3 4 5 |
!nvidia-smi from google.colab import drive drive.mount('/content/drive') |
データのあるディレクトリに移動
|
1 |
%cd /content/drive/MyDrive/rareplanes |
実行可能なPytorchにダウングレード
|
1 2 |
!pip install torch==1.0.1 !pip install torchvision==0.2.1 |
ライブラリをインポート
|
1 |
import torch |
保存済みのcolor_mean読み込み
|
1 2 3 4 5 |
import pickle with open('color_mean.pickle', mode='rb') as fi: color_mean = pickle.load(fi) color_mean |
推論用にSSD 設定
|
1 2 3 4 5 6 7 8 9 10 11 12 13 14 15 |
from utils.ssd_model import SSD ssd_cfg = { 'num_classes': 2, # 背景を含む 'input_size': 300, 'bbox_aspect_num': [4,6,6,6,4,4], 'feature_maps': [38,19,10,5,3,1], 'steps': [8,16,32,64,100,300], # DBoxの大きさ (なぜ) 'min_sizes': [30,60,111,162,213,264], 'max_sizes': [60,111,162,213,264,315], 'aspect_ratios': [[2],[2,3],[2,3],[2,3],[2],[2]] } net = SSD(phase='inference', cfg = ssd_cfg) |
学習した重みを読み込む
|
1 2 |
net_weights = torch.load('./weights/SSD300_200.pth', map_location={'cuda:0': 'cpu'}) net.load_state_dict(net_weights) |
推論実行
|
1 2 3 |
from utils.ssd_predict_show import SSDPredictShow my_classes = ["airplane"] ssd = SSDPredictShow(color_mean, eval_categories = my_classes, net = net) |
|
1 2 |
img_file_path = "./airport2.png" ssd.show(img_file_path, data_confidence_level=0.3) |
Appendix3
教師データはこんな感じ。
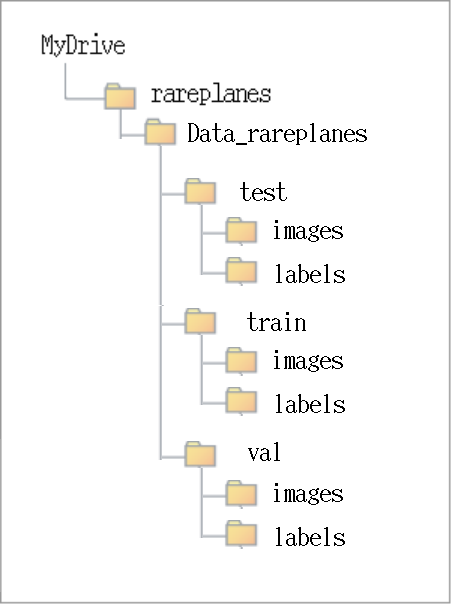
AWS のS3 からダウンロードしたもの。
train、test、valの3パターンあります。
それぞれのパターンにimage、xmlの2種類のデータが440以上用意されています。
例えば、Atlanta_Airport_0_0_126_30の場合
image
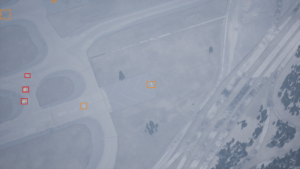
Atlanta_Airport_0_0_126_30.png
航空機(朱色枠)は4機
label
Atlanta_Airport_0_0_126_30.xml
|
1 2 3 4 5 6 7 8 9 10 11 12 13 14 15 16 17 18 19 20 21 22 23 24 25 26 27 28 29 30 31 32 33 34 35 36 37 38 39 40 41 42 43 44 45 46 47 48 49 50 51 52 53 54 55 56 57 58 59 60 61 62 63 64 65 66 67 68 69 70 71 72 73 74 75 76 77 78 79 80 81 82 83 84 85 86 87 88 89 90 91 92 93 94 95 96 97 98 99 100 101 102 103 104 105 106 107 108 109 110 111 112 113 114 115 116 117 118 119 120 121 122 123 124 125 126 127 128 129 130 131 132 133 134 135 136 137 138 139 140 141 142 143 144 145 146 147 148 149 150 151 152 153 154 155 156 157 158 159 160 161 162 163 164 165 166 167 168 169 170 171 172 173 174 175 176 177 178 179 180 181 182 183 184 185 186 187 188 189 190 191 192 193 194 195 196 197 198 199 200 201 202 203 204 205 206 207 208 209 210 211 212 213 214 215 216 217 218 219 220 221 222 223 224 225 226 227 228 229 230 231 232 233 234 235 236 237 238 239 240 241 242 243 244 245 246 247 248 249 250 251 252 253 254 255 |
<?xml version="1.0" encoding="UTF-8"?> <image> <annotation vendor="AIReverie" /> <filename>Atlanta_Airport_0_0_126.png</filename> <time_stamp>2020.05.21-14.30.24</time_stamp> <image_resolution> <width>1920</width> <height>1080</height> </image_resolution> <camera> <location> <x>-119321.804688</x> <y>-168823.75</y> <z>94000.0</z> </location> <rotation> <pitch>-60.101025</pitch> <roll>0.000017</roll> <yaw>110.926239</yaw> </rotation> <intrinsics> <f_x>239.601089</f_x> <f_y>239.601089</f_y> <x_0>960.0</x_0> <y_0>540.0</y_0> <s>0.0</s> </intrinsics> <focal_length>2350.0</focal_length> <focus_distance>100000.0</focus_distance> <horizontal_field_of_view>34.068344</horizontal_field_of_view> </camera> <platform> <top_middle_horz_dist>73664.742188</top_middle_horz_dist> <center_horz_dist>65551.335938</center_horz_dist> <bottm_middle_horz_dist>59722.914063</bottm_middle_horz_dist> <center_horz_dist>65551.335938</center_horz_dist> <left_vert_dist>43990.078125</left_vert_dist> <ctr_vert_dist>43524.738281</ctr_vert_dist> <right_vert_dist>44948.839844</right_vert_dist> <bottm_middle_horz_dist>59722.914063</bottm_middle_horz_dist> <top_middle_dist>119520.90625</top_middle_dist> <ctr_dist>105441.351563</ctr_dist> <bottom_middle_dist>97415.398438</bottom_middle_dist> <top_middle_elevation_angle>50.118694</top_middle_elevation_angle> <center_elevation_angle>60.100731</center_elevation_angle> <bottom_mid_elevation_angle>70.128838</bottom_mid_elevation_angle> <altitude>91615.226563</altitude> <forward>X=-0.357 Y=0.934 Z=0.000</forward> <topv>X=-0.229 Y=0.599 Z=-0.767</topv> <ctrv>X=-0.178 Y=0.466 Z=-0.867</ctrv> <botv>X=-0.121 Y=0.317 Z=-0.940</botv> </platform> <num_object_mask_objects>7</num_object_mask_objects> <object id="2D780848461A9DC998A516B247BB20A7" persistent_id="BP_Manager_Airplanes_2NODE_AddStaticMeshComponent-1_38"> <category0>decal</category0> <category1>plane</category1> <object_mask_color_rgba>1,1,4,255</object_mask_color_rgba> <bndbox2D> <xmin>158</xmin> <ymin>462</ymin> <xmax>196</xmax> <ymax>495</ymax> <ratio_visible>0.0</ratio_visible> <focus_blur>1.271016</focus_blur> </bndbox2D> </object> <object id="6030F020407948CB547627BA0CECA52C" persistent_id="BP_Manager_Airplanes_2NODE_AddStaticMeshComponent-1_99"> <category0>decal</category0> <category1>plane</category1> <object_mask_color_rgba>241,133,205,255</object_mask_color_rgba> <bndbox2D> <xmin>140</xmin> <ymin>630</ymin> <xmax>173</xmax> <ymax>662</ymax> <ratio_visible>0.0</ratio_visible> <focus_blur>1.271016</focus_blur> </bndbox2D> </object> <object id="1F3303414C614D10F56254954A0252DE" persistent_id="BP_Manager_Airplanes_2NODE_AddStaticMeshComponent-1_100"> <category0>decal</category0> <category1>plane</category1> <object_mask_color_rgba>16,43,232,255</object_mask_color_rgba> <bndbox2D> <xmin>147</xmin> <ymin>559</ymin> <xmax>184</xmax> <ymax>589</ymax> <ratio_visible>0.0</ratio_visible> <focus_blur>1.271016</focus_blur> </bndbox2D> </object> <object id="FC32735E48D59A7A62E0E986D320BC37" persistent_id="SM_Airplane_Civil_Private_Bombardier_Learjet_35-A_BPC_C_632StaticMeshComponent"> <category0>Airplane</category0> <category1>Civil</category1> <category2>Private</category2> <category3>Bombardier</category3> <category4>Learjet</category4> <category5>35-A</category5> <object_mask_color_rgba>220,112,217,255</object_mask_color_rgba> <Sockets> <Bone_PlaneAnnotation_Nose> <world>X=-139739.703 Y=-118569.656 Z=229.031</world> <screen>X=992.458 Y=532.139</screen> </Bone_PlaneAnnotation_Nose> <Bone_PlaneAnnotation_RightWing> <world>X=-138899.172 Y=-119134.070 Z=262.182</world> <screen>X=975.644 Y=552.459</screen> </Bone_PlaneAnnotation_RightWing> <Bone_PlaneAnnotation_Tail> <world>X=-138315.906 Y=-118564.078 Z=352.091</world> <screen>X=953.913 Y=542.995</screen> </Bone_PlaneAnnotation_Tail> <Bone_PlaneAnnotation_LeftWing> <world>X=-138903.609 Y=-117998.672 Z=262.182</world> <screen>X=963.966 Y=525.787</screen> </Bone_PlaneAnnotation_LeftWing> </Sockets> <bndbox2D> <xmin>950</xmin> <ymin>523</ymin> <xmax>991</xmax> <ymax>554</ymax> <ratio_visible>0.0</ratio_visible> <focus_blur>0.081992</focus_blur> </bndbox2D> </object> <object id="6632FC314864CFF8CB5CE8929189D9CA" persistent_id="SM_Airplane_Civil_Transport_ATR_ATR-72_BPC_C_648StaticMeshComponent"> <category0>Airplane</category0> <category1>Civil</category1> <category2>Transport</category2> <category3>ATR</category3> <category4>ATR-72</category4> <object_mask_color_rgba>55,133,178,255</object_mask_color_rgba> <Sockets> <Bone_PlaneAnnotation_Nose> <world>X=-114084.445 Y=-87633.266 Z=312.844</world> <screen>X=60.751 Y=77.779</screen> </Bone_PlaneAnnotation_Nose> <Bone_PlaneAnnotation_RightWing> <world>X=-113246.406 Y=-89286.234 Z=544.491</world> <screen>X=46.990 Y=113.067</screen> </Bone_PlaneAnnotation_RightWing> <Bone_PlaneAnnotation_Tail> <world>X=-111495.734 Y=-88389.711 Z=466.024</world> <screen>X=-3.960 Y=109.828</screen> </Bone_PlaneAnnotation_Tail> <Bone_PlaneAnnotation_LeftWing> <world>X=-112488.234 Y=-86691.617 Z=544.491</world> <screen>X=11.893 Y=67.412</screen> </Bone_PlaneAnnotation_LeftWing> </Sockets> <bndbox2D> <xmin>0</xmin> <ymin>67</ymin> <xmax>60</xmax> <ymax>112</ymax> <ratio_visible>0.0</ratio_visible> <focus_blur>0.239683</focus_blur> </bndbox2D> </object> <object id="EB706C7B4AD55961F18C68B5E54C36F0" persistent_id="SM_Airplane_Civil_Sport_Cessna_310_BPC_C_632StaticMeshComponent"> <category0>Airplane</category0> <category1>Civil</category1> <category2>Sport</category2> <category3>Cessna</category3> <category4>310</category4> <object_mask_color_rgba>52,124,64,255</object_mask_color_rgba> <Sockets> <Bone_PlaneAnnotation_Nose> <world>X=-125474.086 Y=-88082.023 Z=321.280</world> <screen>X=356.541 Y=1.989</screen> </Bone_PlaneAnnotation_Nose> <Bone_PlaneAnnotation_RightWing> <world>X=-125174.250 Y=-88566.625 Z=325.586</world> <screen>X=352.312 Y=13.371</screen> </Bone_PlaneAnnotation_RightWing> <Bone_PlaneAnnotation_Tail> <world>X=-124636.484 Y=-88096.297 Z=285.122</world> <screen>X=335.581 Y=8.988</screen> </Bone_PlaneAnnotation_Tail> <Bone_PlaneAnnotation_LeftWing> <world>X=-125168.180 Y=-87601.234 Z=325.586</world> <screen>X=345.435 Y=-5.013</screen> </Bone_PlaneAnnotation_LeftWing> </Sockets> <bndbox2D> <xmin>336</xmin> <ymin>0</ymin> <xmax>355</xmax> <ymax>13</ymax> <ratio_visible>0.0</ratio_visible> <focus_blur>0.238827</focus_blur> </bndbox2D> </object> <object id="98A22388440BBAB5C7FB4BAFB2C12D77" persistent_id="SM_Airplane_Civil_Sport_Cessna_172_BPC_C_636StaticMeshComponent"> <category0>Airplane</category0> <category1>Civil</category1> <category2>Sport</category2> <category3>Cessna</category3> <category4>172</category4> <object_mask_color_rgba>214,49,25,255</object_mask_color_rgba> <Sockets> <Bone_PlaneAnnotation_Nose> <world>X=-123666.430 Y=-118516.539 Z=350.267</world> <screen>X=546.413 Y=676.819</screen> </Bone_PlaneAnnotation_Nose> <Bone_PlaneAnnotation_RightWing> <world>X=-123408.609 Y=-119094.352 Z=438.181</world> <screen>X=543.844 Y=692.366</screen> </Bone_PlaneAnnotation_RightWing> <Bone_PlaneAnnotation_Tail> <world>X=-122888.930 Y=-118513.844 Z=364.712</world> <screen>X=524.173 Y=683.902</screen> </Bone_PlaneAnnotation_Tail> <Bone_PlaneAnnotation_LeftWing> <world>X=-123412.617 Y=-117936.953 Z=438.181</world> <screen>X=533.809 Y=663.724</screen> </Bone_PlaneAnnotation_LeftWing> </Sockets> <bndbox2D> <xmin>522</xmin> <ymin>663</ymin> <xmax>547</xmax> <ymax>692</ymax> <ratio_visible>0.0</ratio_visible> <focus_blur>0.064972</focus_blur> </bndbox2D> </object> <num_box2D_objects>7</num_box2D_objects> <num_posed_objects>0</num_posed_objects> <JSON_Variation_Parameters> <parameter name="Temperature" value="5500" /> <parameter name="Time of Day" value="12" /> <parameter name="Global Gamma" value="1" /> <parameter name="WeatherIntensity" value="0.9" /> <parameter name="GroundSampleDistance" value="30" /> <parameter name="bBox2D" value="True" /> <parameter name="MaxFocusActorOffset" value="5000" /> <parameter name="bPoseData" value="True" /> <parameter name="bIncludeCharacterActors" value="True" /> <parameter name="bInternalAirplanePoints" value="True" /> <parameter name="bAbortIfWorldEdgesAreShowing" value="True" /> <parameter name="SunLightIntensity" value="0.7" /> <parameter name="OffNadirAngle" value="30" /> <parameter name="DaySkylight" value="0.3" /> <parameter name="CurrentWeather" value="Snow" /> <parameter name="Primary Biome" value="Alpine" /> <parameter name="bIncludeStaticMeshActors" value="True" /> <parameter name="MaxImagesToCapture" value="917" /> <parameter name="bObjectMask" value="True" /> <parameter name="bIRes" value="True" /> <parameter name="bCollectXMLMetadata" value="True" /> </JSON_Variation_Parameters> </image> |
詳細なデータですがアノテーション として利用されるのは一部です。
画像の朱色枠の航空機のアノテーション データは、persistent_idにSM_Airplaneを含むobject内の<bndbox2D>タグ情報で4つあります。
persistent_idにBP_Managerを含むobject内の<bndbox2D>タグ情報は画像の赤枠のもので、航空機のデータではありません。
データはRarePlanes/utils/detaloader.pyを使ってdatasetにまとめられています。
衛星画像を使って航空機以外のものを検出しようとする場合、教師データの作成はこれを参考にするればよいと思います。





Leave a Reply