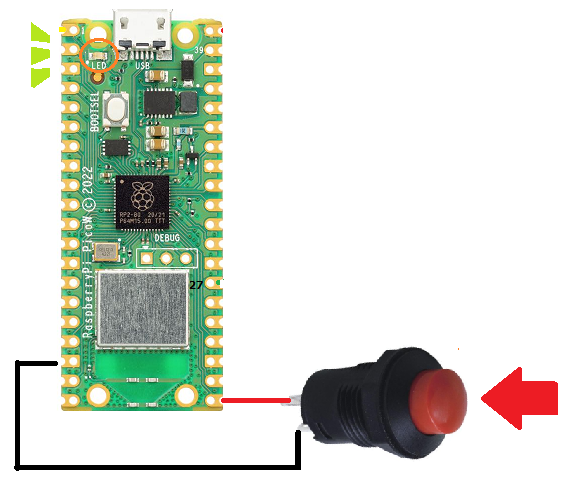
こういうことをします。
ボタンはなんでもいいです、とりあえずこんなもの。
結線する場合、ボタン側の端子の区別はありません。
やることはすごくシンプルです。
ボタン/スイッチを押すと内臓LEDが点灯、離すと消灯。
が、引っかかったことがいくつかあったので備忘録とします。
Arduino IDE
非常にベーシックな機能を使うのでボードはなんでもいいだろうと思いきや、例えばArducamPico4ML では動作しませんでした。
ボードを選択します。
ボード ー> Raspberry Pi RP2040 Board(3.3.1)ー> Raspberry Pi Pico W
ボードが無ければボードマネージャーで検索してインストールしておきます。
ボタンを接続したピンから取得する信号は、何もしなければ 1、押したら 0です。
|
1 2 3 4 5 6 7 8 9 10 11 12 13 14 15 16 17 18 19 20 21 22 23 |
const int buttonPin = 16; int buttonState = 0; void setup() { // put your setup code here, to run once: Serial.begin(115200); pinMode(buttonPin, INPUT_PULLUP); pinMode(LED_BUILTIN, OUTPUT); } void loop() { // put your main code here, to run repeatedly: buttonState = digitalRead(buttonPin); Serial.println(buttonState); if (buttonState == 1){ digitalWrite(LED_BUILTIN, LOW); } else if (buttonState == 0){ digitalWrite(LED_BUILTIN, HIGH); } } |
MicroPython
MicroPythonのuf2をセットしてThonny でコーディング環境設定
以下を参照
Pi PicoにMicroPythonをセットアップして実行してみる(メモ)
uf2で環境をセットすれば、後でUSBケーブルの接続でBOOTSELボタンを押す必要はありません。
|
1 2 3 4 5 6 7 8 9 10 11 12 13 14 15 16 17 18 19 20 21 22 23 24 25 26 27 28 29 30 31 32 33 34 35 36 |
import machine import time #プッシュボタン button = machine.Pin(16, machine.Pin.IN, machine.Pin.PULL_UP) # LED led = machine.Pin("LED", machine.Pin.OUT) # ボタン1回だけ反応するためのフラグ B = 0 while True: try: b1 = button.value() #print(b1) if not b1: if B == 0: #print('Button pressed!') led.value(1) B = 1 else: if B == 1: #print('Button released!') led.value(0) B = 0 time.sleep(0.2)# wait except KeyboardInterrupt: break |

Leave a Reply