修正(2023/02/21 )
実行時エラーが出ていたので修正しました。
●Diffusers のバージョン 0.2.4ー>0.8.0
●Keyを変更 sampleー>images
Stability AI のStable Diffusion をGoogle のColaboratory で使ってみます。
Stable Diffusion は現時点でtxt2img(Text-To-Image)とimg2img(Image-To-Image)の2つのモードが扱えます。
将来的には使えるメディアはaudioやvideoにも拡張されるそうです(そうだろうなぁ、という気はします)。
ここでは、Colab でStable Diffusion を扱うための要件をクリアしたあとで、txt2img(Text-To-Image)とimg2img(Image-To-Image)の2つのモードをやってみます。
参照するのはHugging Face が公開しているコード、Diffusers です。
ColabでStable Diffusionを使うにはGoogle のアカウントとHugging Face のアカウントとアクセストークンの3つが必要です。
1/3〜3/3でこの3つの要件をクリアした後で、Stable Diffusionの2つのモードを試してみます。
1/3 Google アカウント作成
以下にアクセスしてください(GMail アドレスをお持ちの場合は不要)
このアカウントでColab を開きます。
2/3 Hugging Face アカウント作成
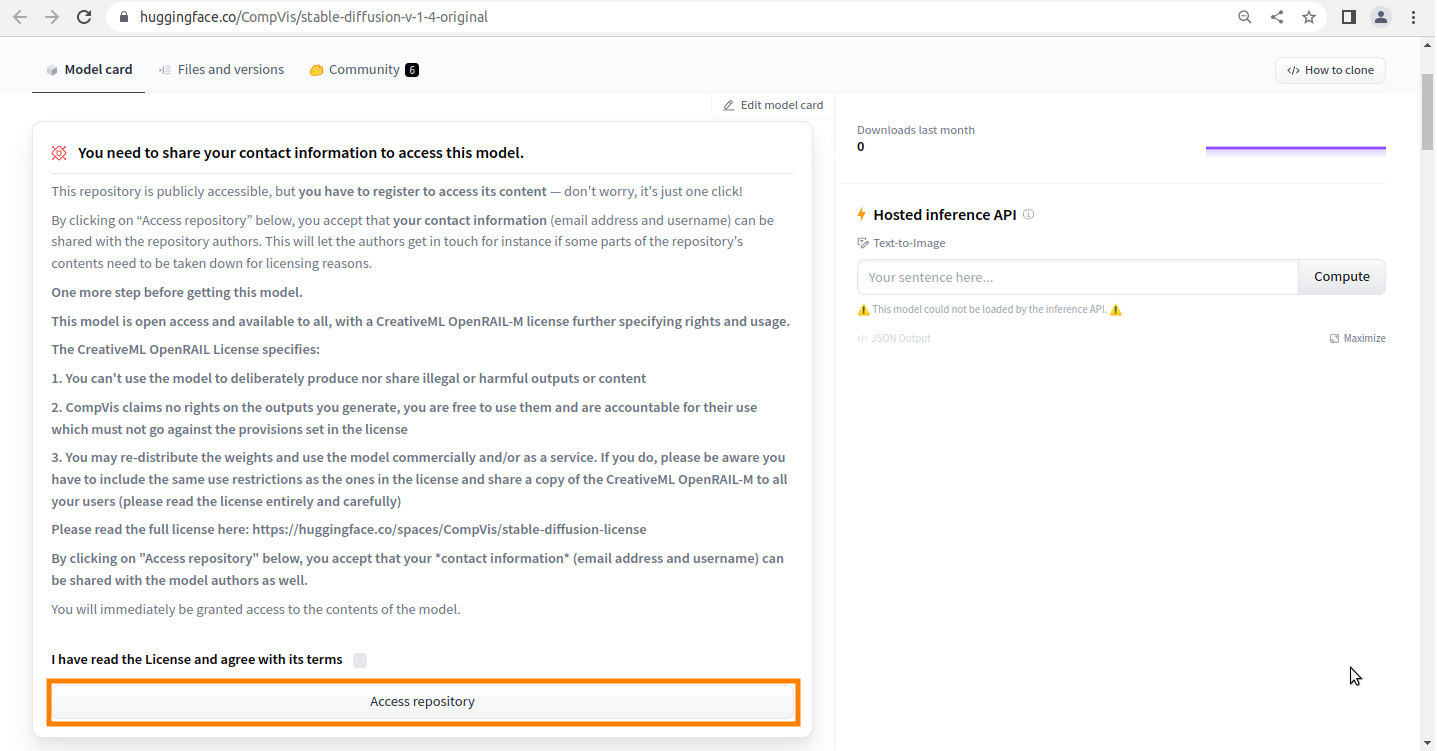
Hugging Faceで公開されているStable Diffusionのページにアクセス
stable-diffusion-v-1-4-original
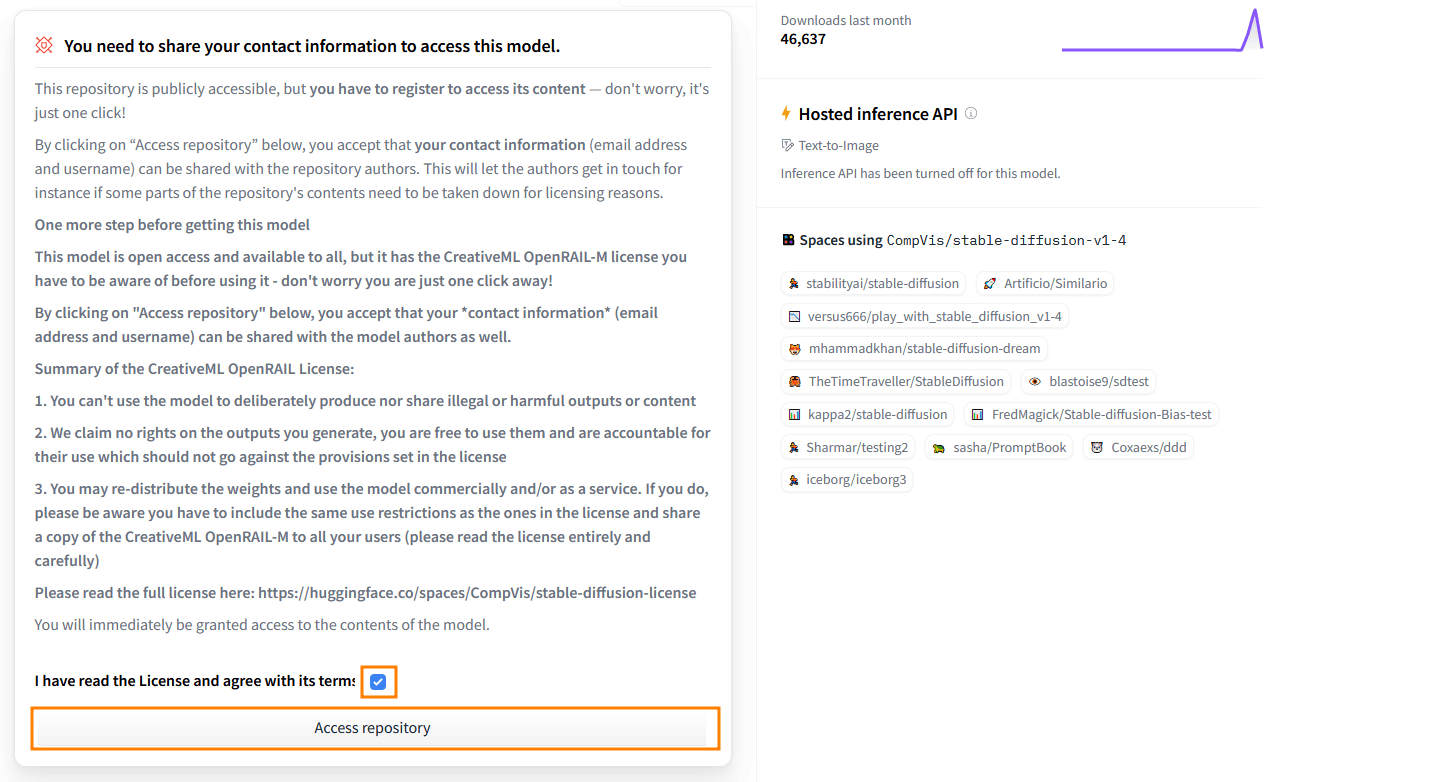
Stable Diffusionのライセンスに関する確認事項です。
まぁ適当に読んで「Access repository」をクリック。
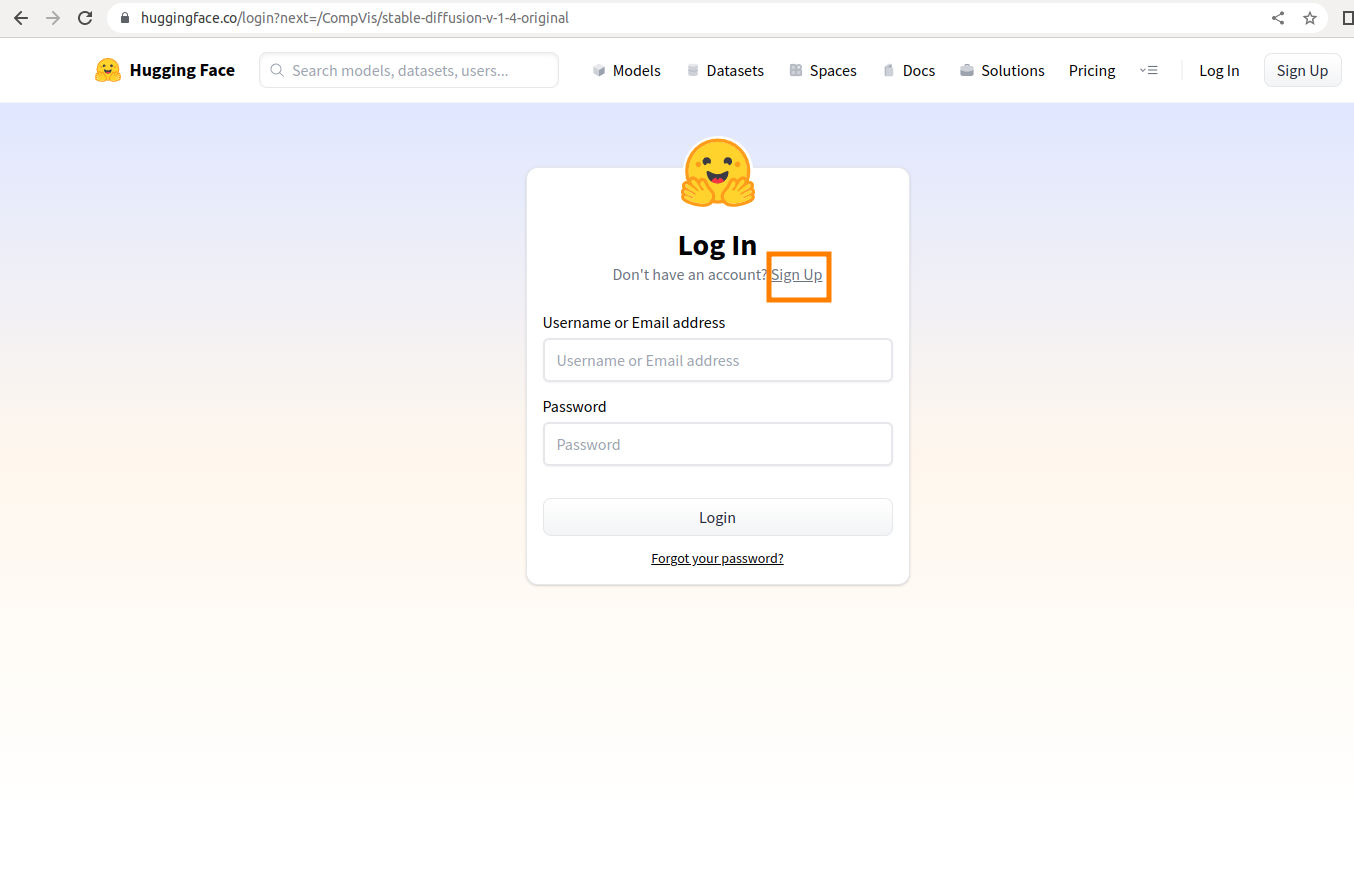
Hugging Faceのログイン画面が表示されます、初回の場合は「Sign UP」をクリック
登録したいメールアドレスとパスワードを入力して「Next」をクリック

ユーザー名とフルネームを入力してからチェックを入れ、「Create Account」をクリック

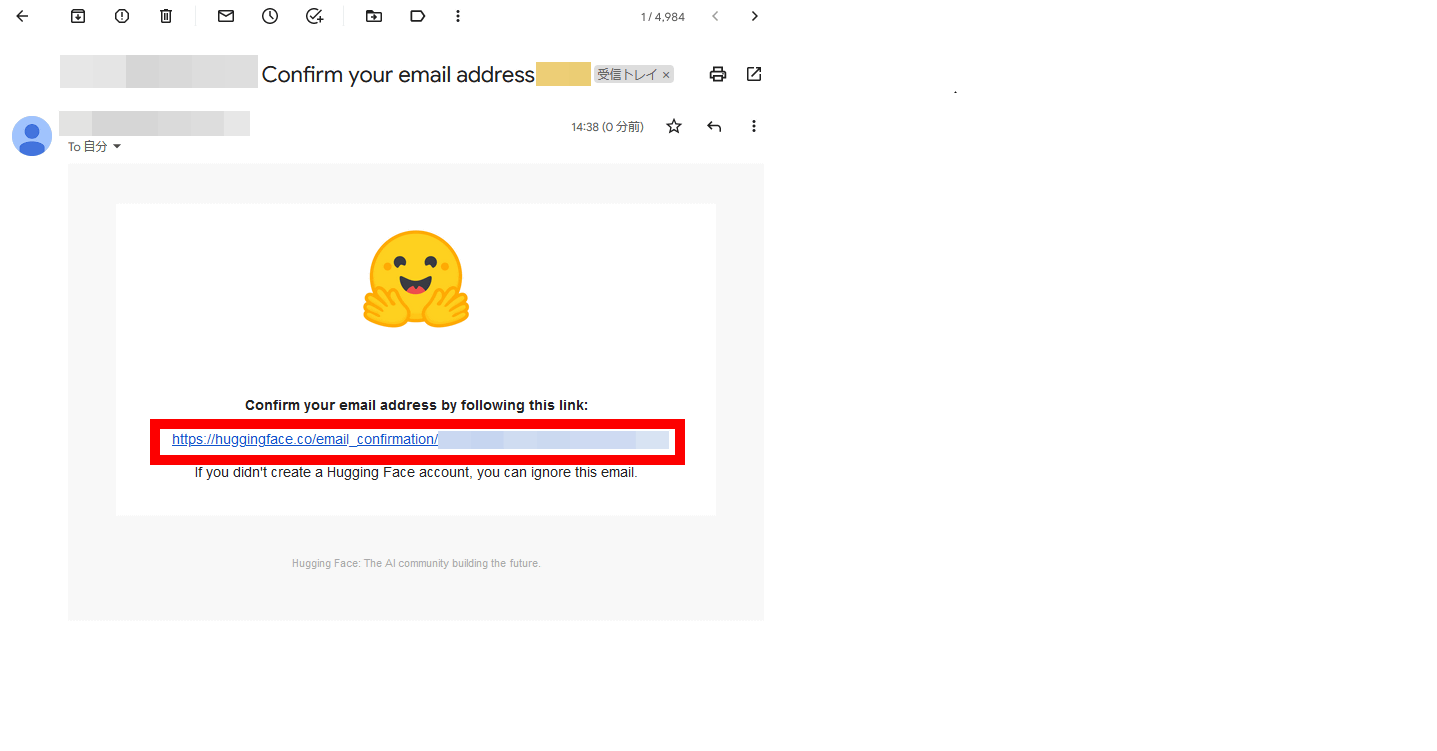
登録したメールアドレス宛てに確認メールが届くので、本文内のURLをクリック
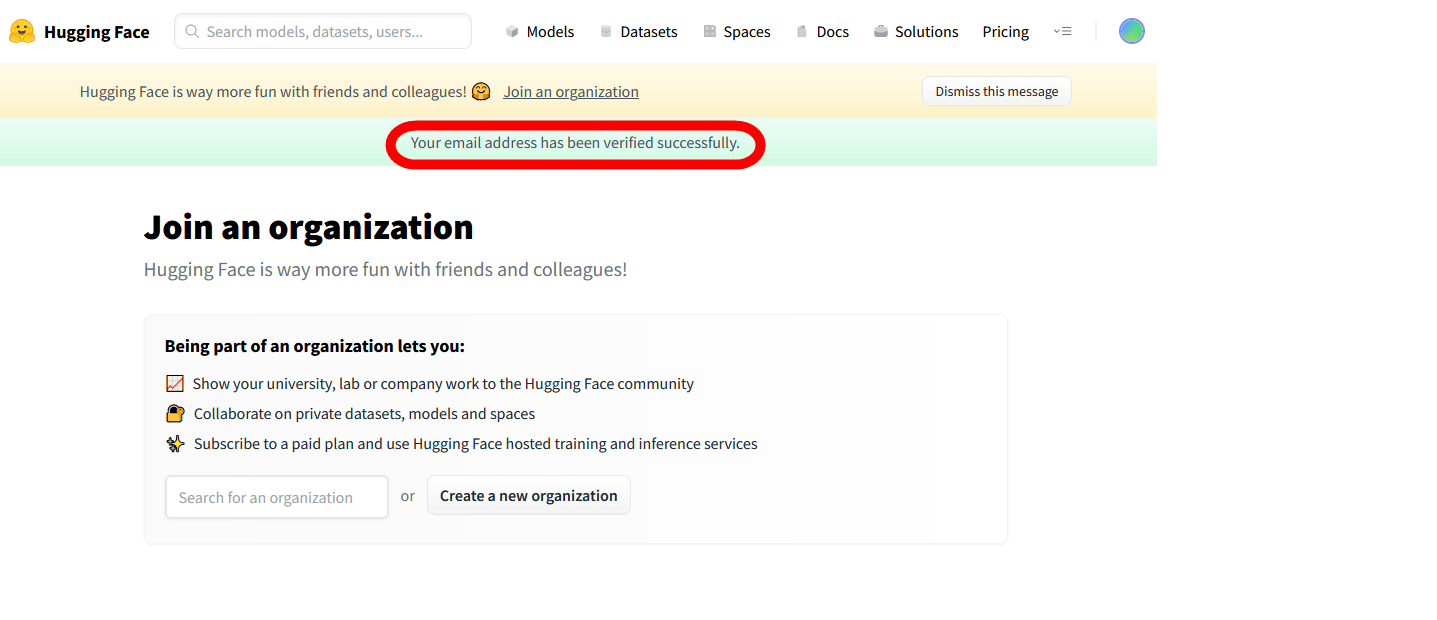
「Your email address has been verified successfully」と表示されれば、Hugging Faceのアカウント作成は完了
再度Stable Diffusionのページにアクセスして、ライセンスに同意するチェックを入れてから「Access repository」をクリック
3/3 アクセストークン取得
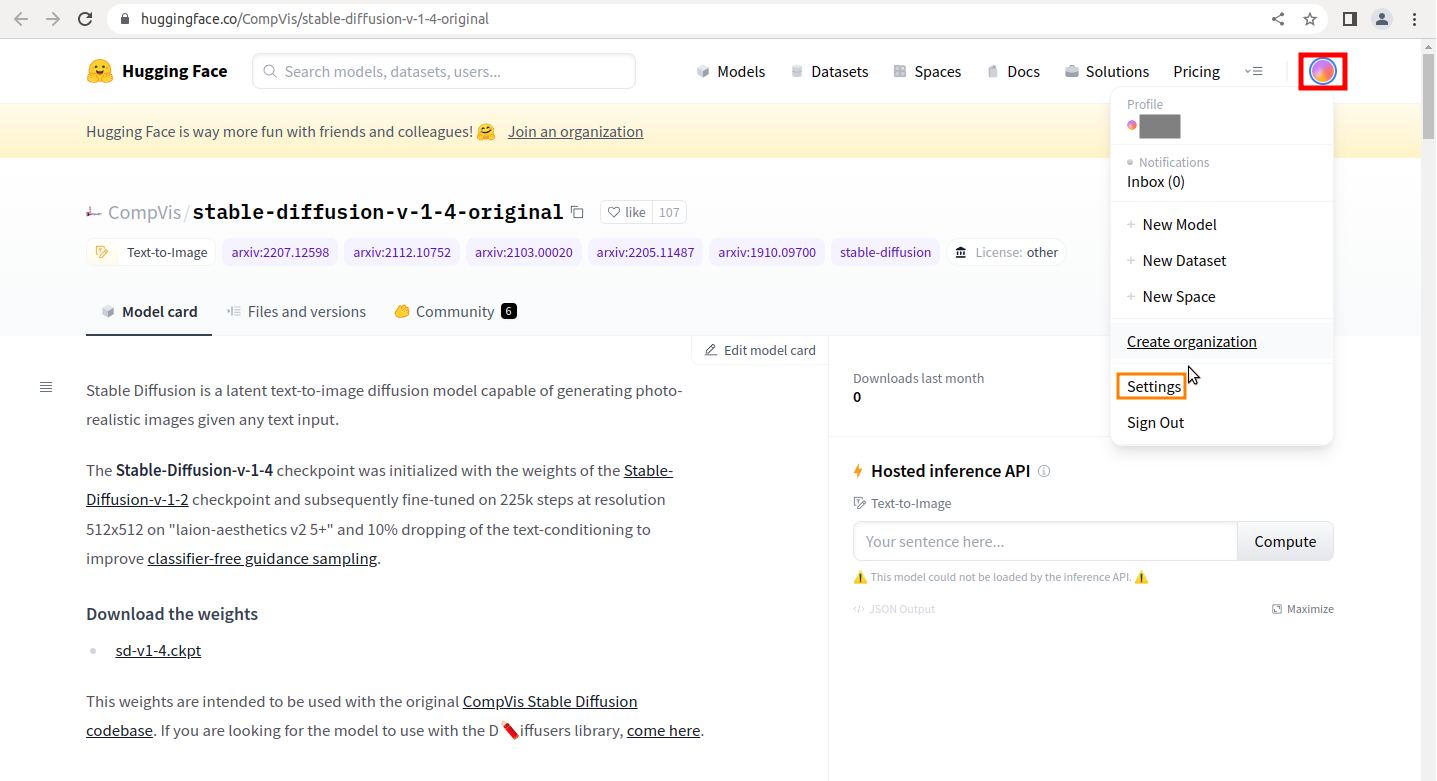
Stable Diffusionのページにアクセス
stable-diffusion-v-1-4-original
画面右上の円形のアイコンをクリックしてから「Settings」をクリック
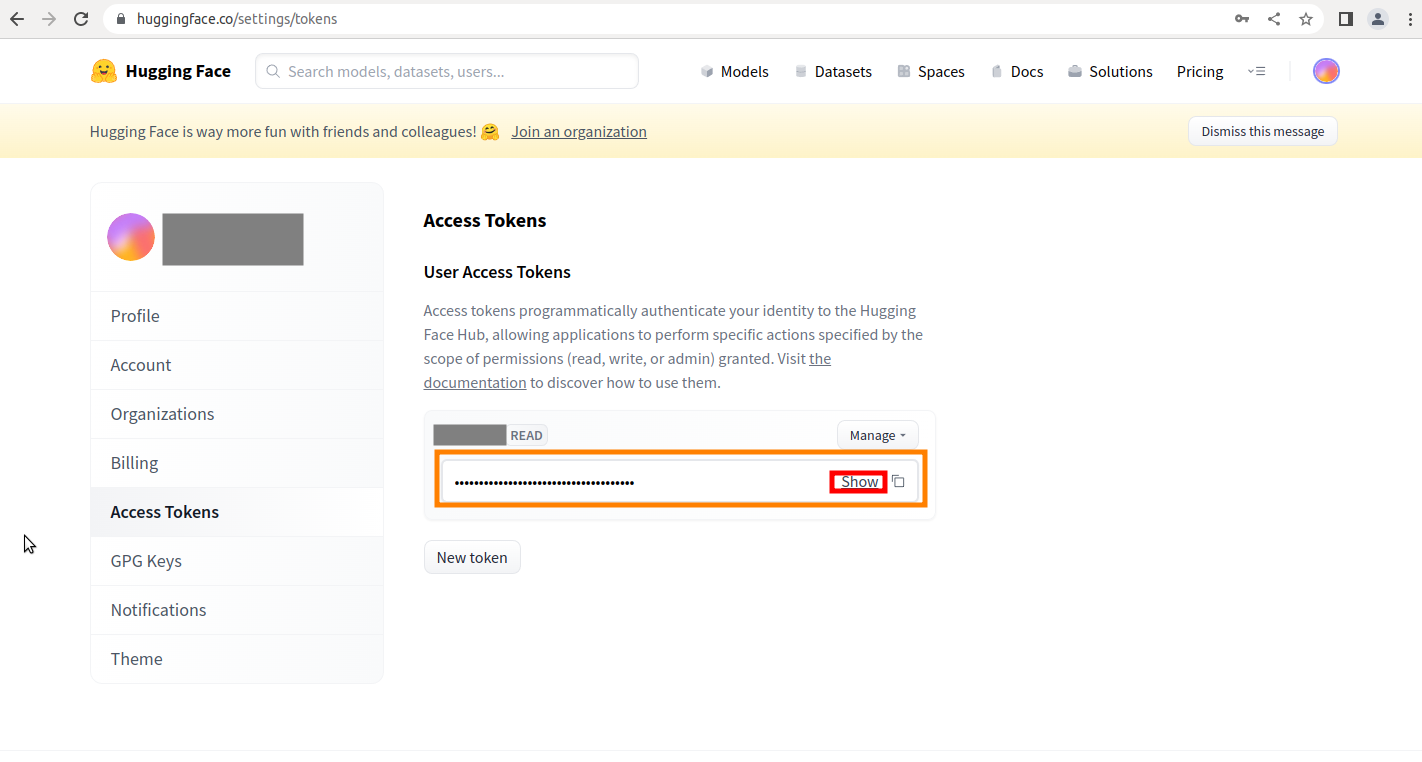
アカウントの設定画面が開いたら「Access Tokens」を選択

トークンの発行画面が表示されたら覚えやすい名前を入力して「Generate a token」をクリック
トークンが発行されたら、showをクリックして伏せられた文字を表示してコピーしておきます。
Colab を開いてText-To-Image をやってみる
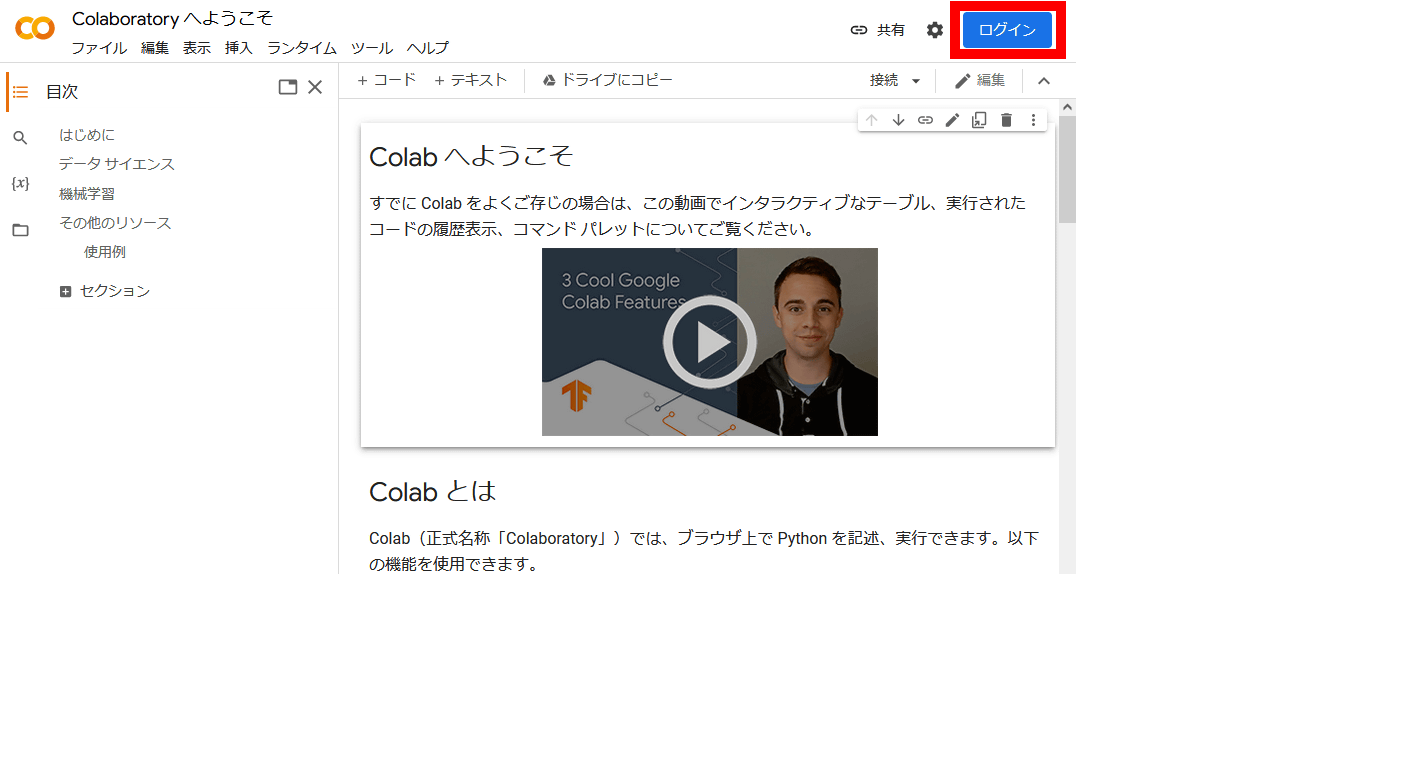
Colab にアクセス
Google アカウントでログイン
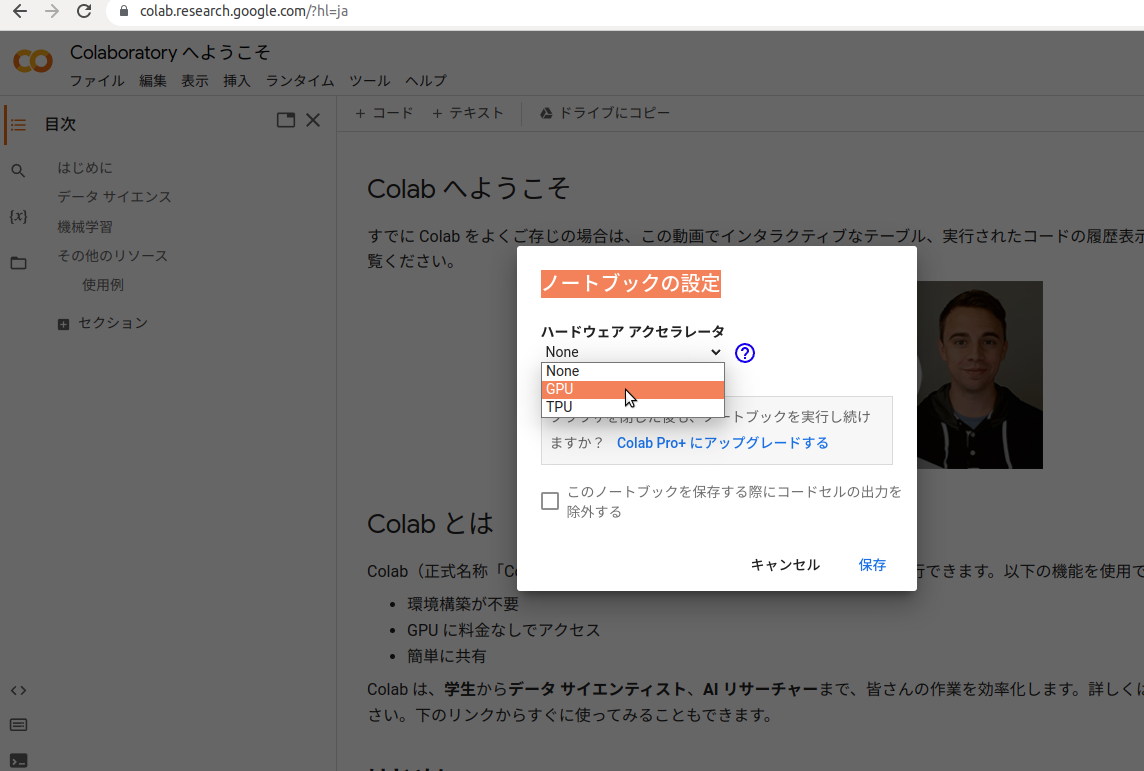
「編集」をクリックしてから「ノートブックの設定」をクリック
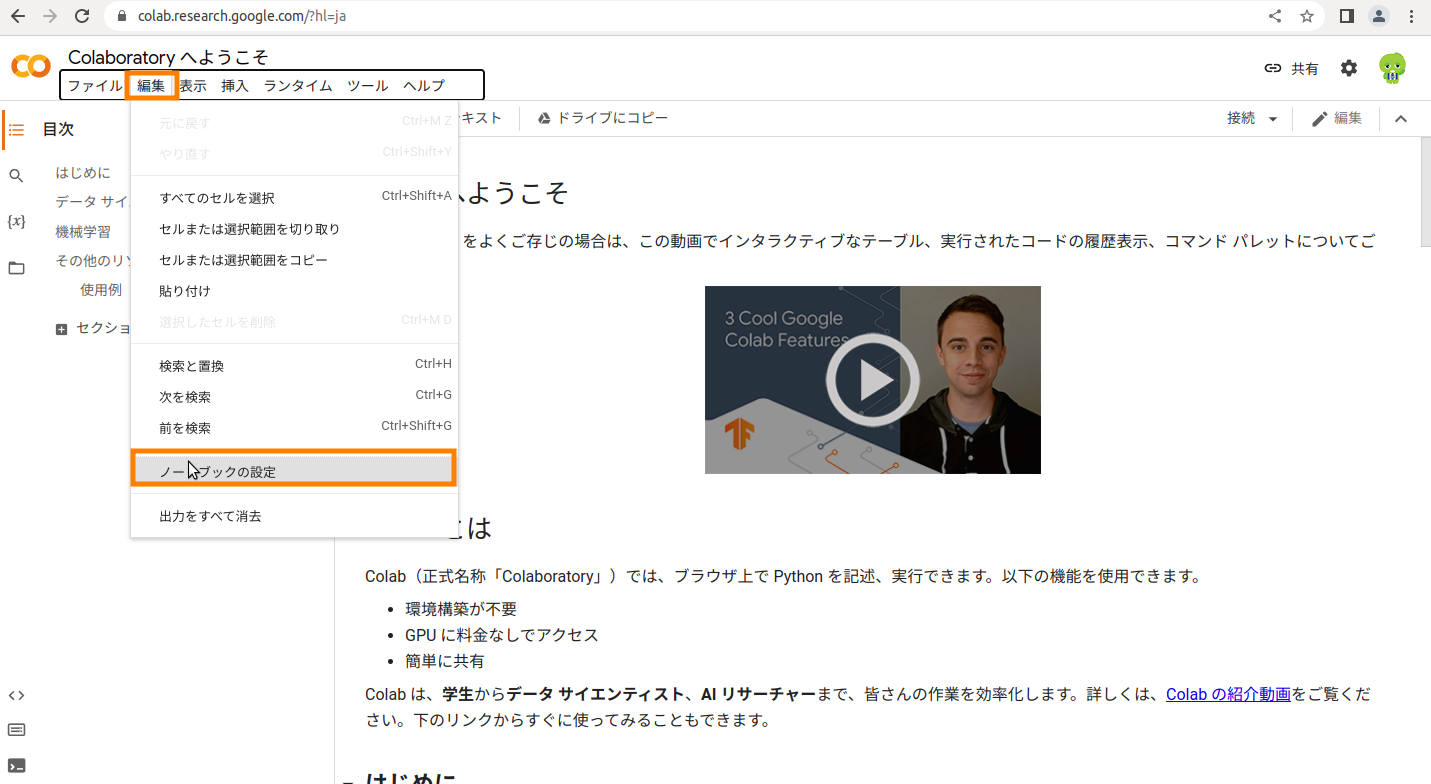
GPU を選択して保存
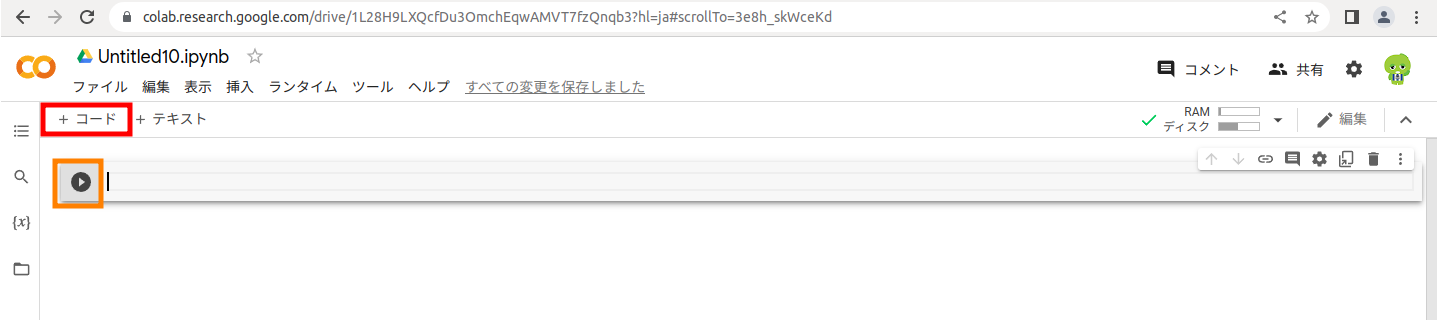
ファイルー>ノートブックを新規作成
コードは「セル」に記述して実行しますが、セルは自動では表示されません。いちいち「+ コード」をクリックして追加表示し、実行はセルの左端のアイコンをクリックします。
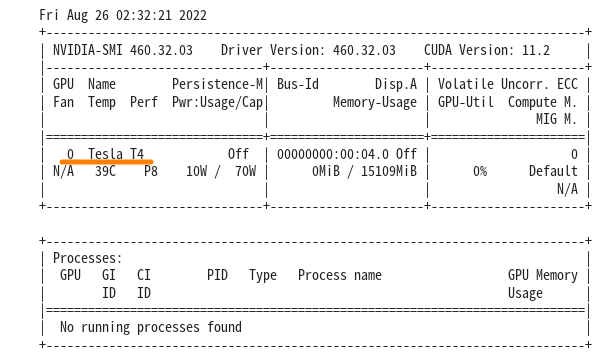
例えば、以下を実行すれば、現在のスタッツやどんなGPUが割当てられているのか確認できます。
|
1 |
!nvidia-smi |
ここでは、Tesla T4 がアサインされていますが、運がよければA100が割当てられるかも…..。
Stable Diffusionをインストール
|
1 2 3 |
!pip install diffusers==0.8.0 !pip install transformers scipy ftfy !pip install "ipywidgets>=7,<8" |
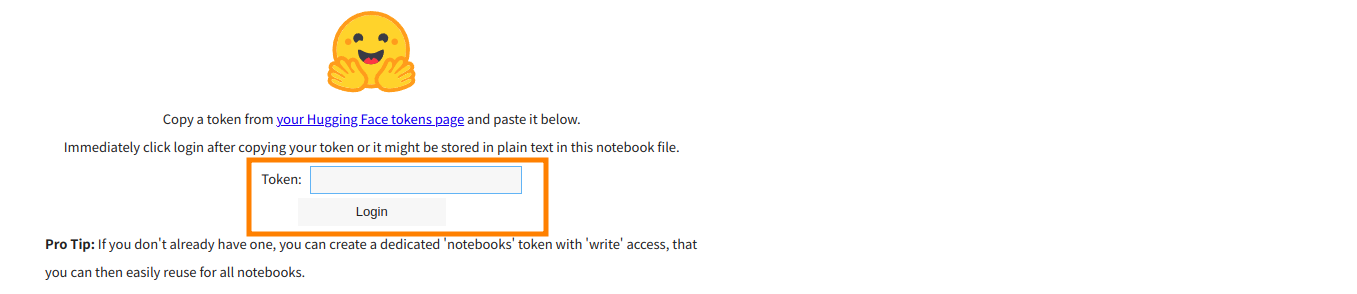
Hugging Face にログインします。
|
1 2 3 4 5 6 7 |
from google.colab import output output.enable_custom_widget_manager() from huggingface_hub import notebook_login notebook_login() |
Token を聞いてくるので、上記(3/4)でコピーしておいたものをペーストしてlogin
以下のようなメッセージが出ればログイン完了

以下のコマンドを実行
StableDiffusionPipeline は、わずか数行のコードでテキストから画像を生成するために使用できるエンド ツー エンドの推論パイプラインです。
以下ではGoogle Colab で Stable Diffusion をfloat16 精度で実行するようにしています。
可能な限り最高の精度を確保したい場合は、メモリ使用量が高くなりますが、 revision="fp16" と torch_dtype=torch.float16 を削除してください。
|
1 2 3 4 5 |
import torch from diffusers import StableDiffusionPipeline # make sure you're logged in with `huggingface-cli login` pipe = StableDiffusionPipeline.from_pretrained("CompVis/stable-diffusion-v1-4", revision="fp16", torch_dtype=torch.float16, use_auth_token=True) |
各種ファイルがダウンロードされます。
終了後以下を実行
パイプラインをGPU に移動して、推論を高速化します。
|
1 |
pipe = pipe.to("cuda") |
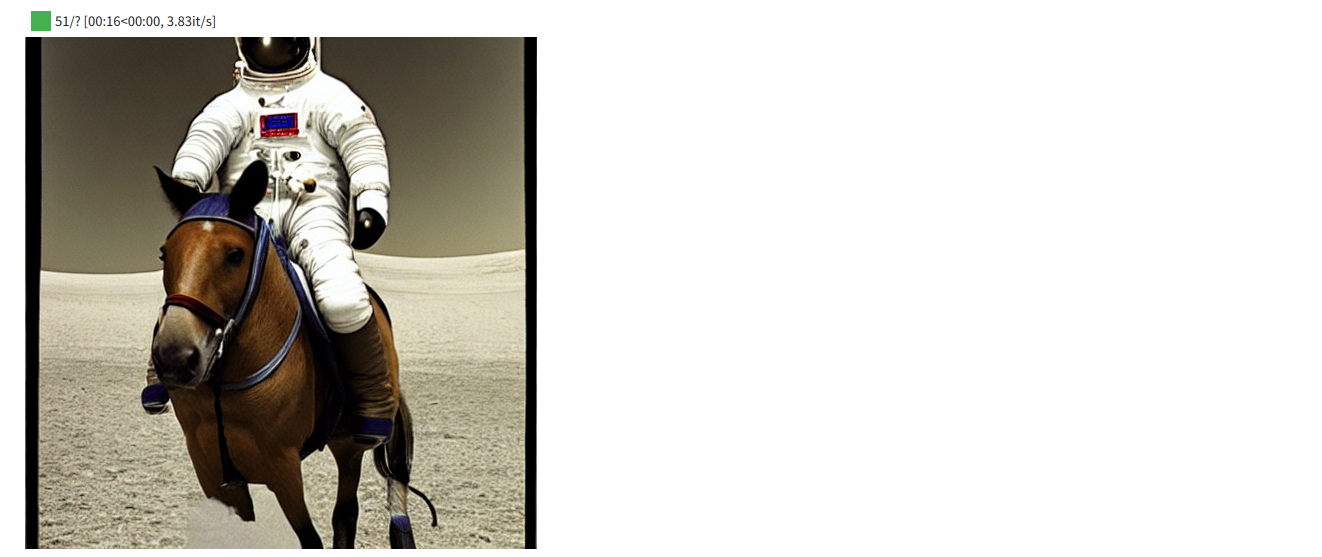
プロンプトで画像生成用テキストを発行して画像生成
autocastを使用すると、半精度を使用するため、推論がより高速に実行されます。
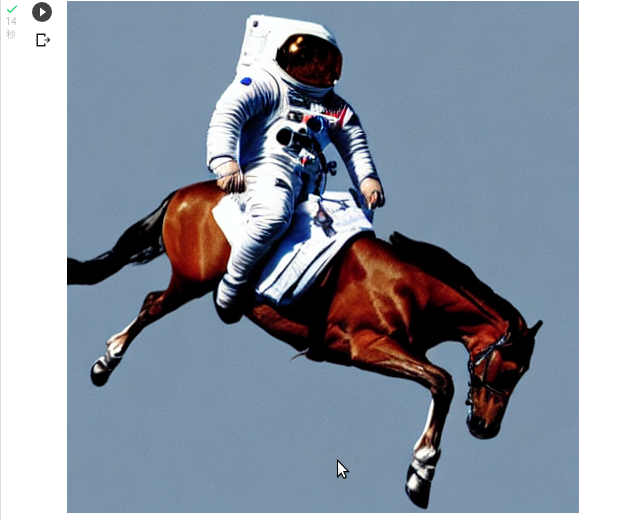
「a photograph of an astronaut riding a horse (馬にまたがった宇宙飛行士の写真)」という要求です。
|
1 2 3 4 5 6 7 8 9 10 11 |
from torch import autocast prompt = "a photograph of an astronaut riding a horse" with autocast("cuda"): image = pipe(prompt)["images"][0] # image here is in [PIL format](https://pillow.readthedocs.io/en/stable/) # Now to display an image you can do either save it such as: image.save(f"astronaut_rides_horse.png") # or if you're in a google colab you can directly display it with image |
こんな画像が生成されました。
Appendix1
Text-To-Image でパラメータををいじってみる
以下のmanual_seed値で画像を生成
|
1 2 3 4 5 6 7 8 |
import torch generator = torch.Generator("cuda").manual_seed(1024) with autocast("cuda"): image = pipe(prompt, generator=generator)["images"][0] image |
num_inference_stepsは50がデフォですが15に落としてみます。
これで、画像生成の速度があがりますが、描画のための情報量が減るので、描画精度は落ちます。
|
1 2 3 4 5 6 7 8 |
import torch generator = torch.Generator("cuda").manual_seed(1024) with autocast("cuda"): image = pipe(prompt, num_inference_steps=15, generator=generator)["images"][0] image |

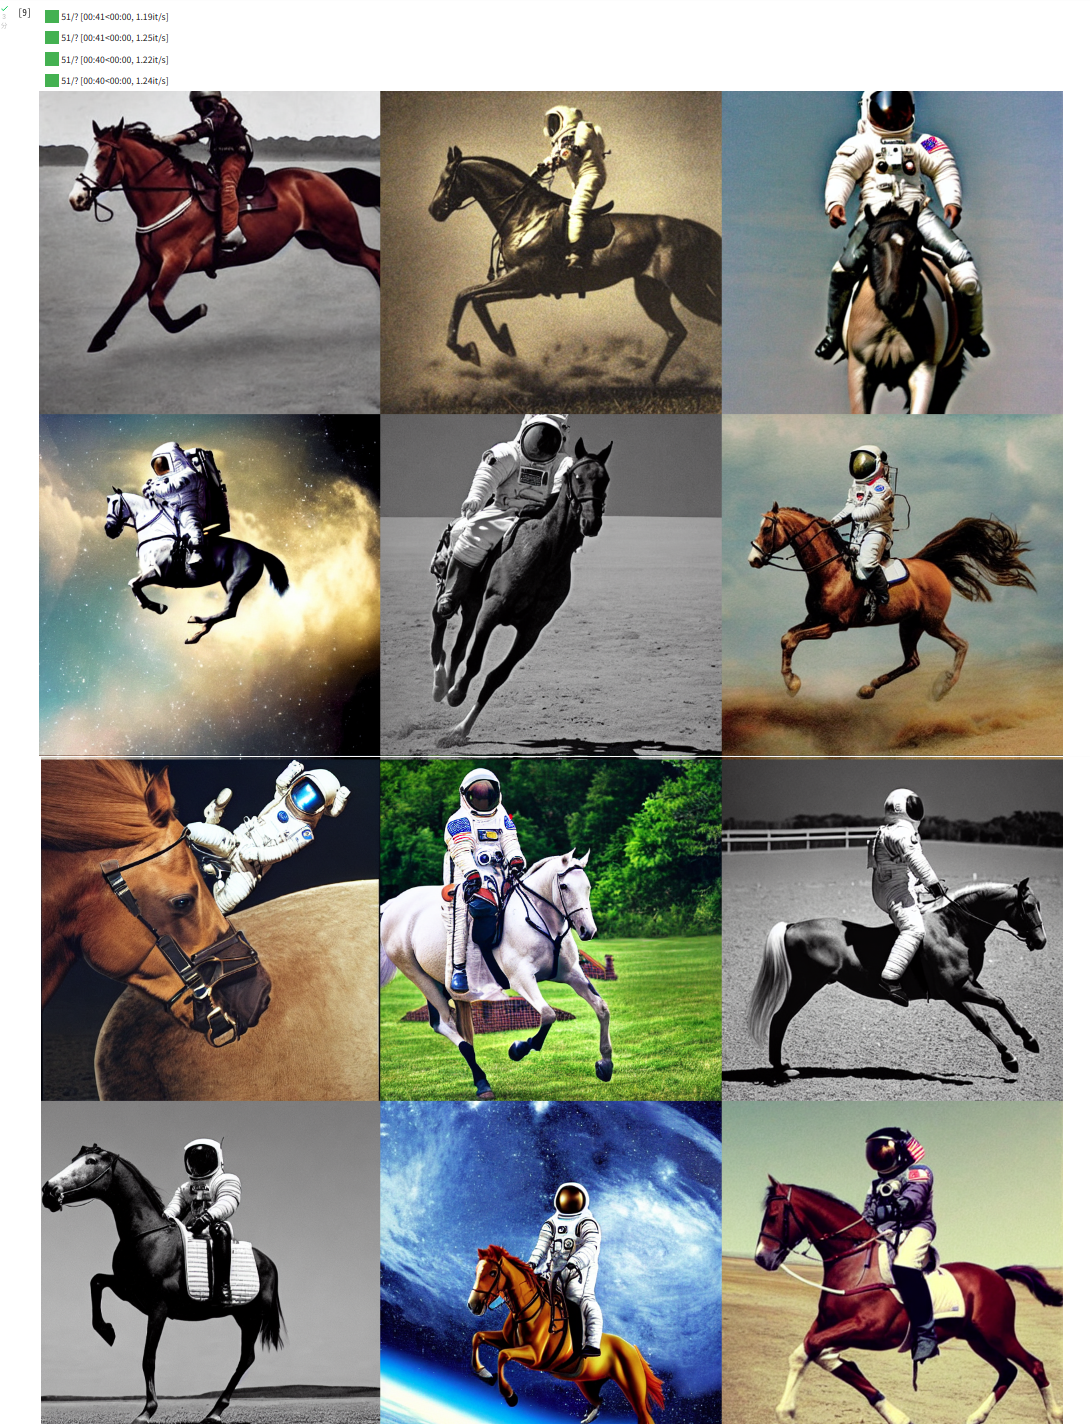
複数画像生成
|
1 2 3 4 5 6 7 8 9 10 11 12 13 14 15 16 17 18 19 20 21 22 |
from PIL import Image def image_grid(imgs, rows, cols): assert len(imgs) == rows*cols w, h = imgs[0].size grid = Image.new('RGB', size=(cols*w, rows*h)) grid_w, grid_h = grid.size for i, img in enumerate(imgs): grid.paste(img, box=(i%cols*w, i//cols*h)) return grid num_images = 3 prompt = ["a photograph of an astronaut riding a horse"] * num_images with autocast("cuda"): images = pipe(prompt)["images"] grid = image_grid(images, rows=1, cols=3) grid |

複数画像生成−2
|
1 2 3 4 5 6 7 8 9 10 11 12 13 |
num_cols = 3 num_rows = 4 prompt = ["a photograph of an astronaut riding a horse"] * num_cols all_images = [] for i in range(num_rows): with autocast("cuda"): images = pipe(prompt)["images"] all_images.extend(images) grid = image_grid(all_images, rows=num_rows, cols=num_cols) grid |
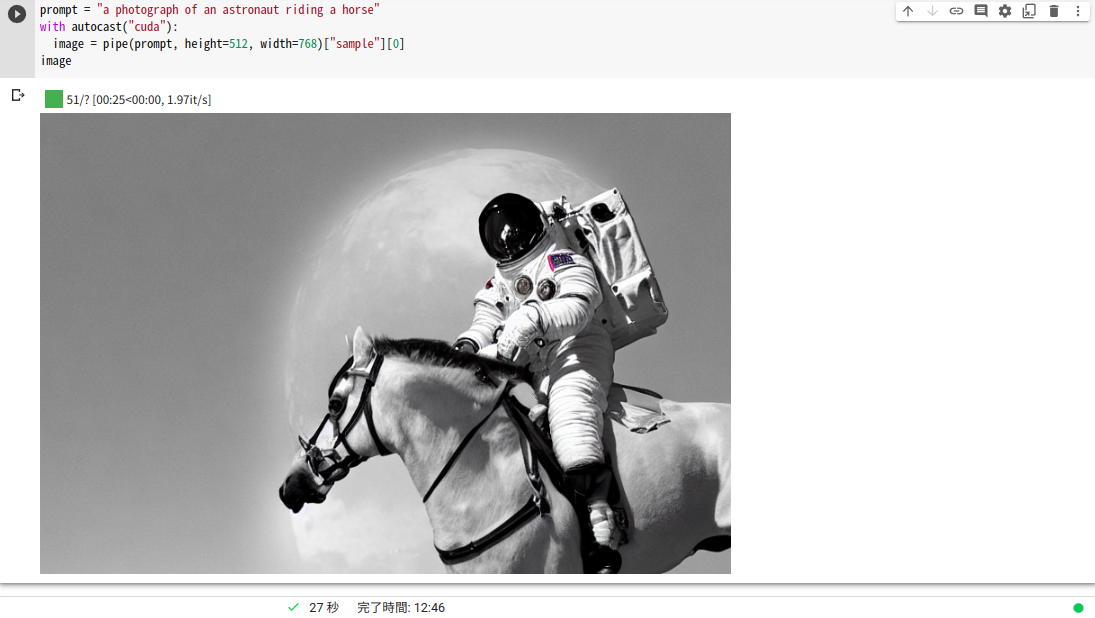
正方形じゃない画像を生成
Stable Diffusion の生成する画像はデフォルトでは512×512の正方画像です。
これをheight および width 引数を使用してデフォルトをオーバーライドして横長な画像を生成してみます。
ただし適切な画像サイズを選択するための推奨事項が3つあります。
1: 「高さ」と「幅」が両方とも「8」の倍数であること
2 : 512 を下回ると、画質が低下する可能性があること
3: 両方向に 512 を超えると、イメージ領域が繰り返されること (グローバル コヒーレンスが失われる)
したがって、正方形でない画像を作成する最善の方法は、一方の次元で「512」を使用し、もう一方の次元でそれより大きい値を使用すること…だそうです。
|
1 2 3 4 |
prompt = "a photograph of an astronaut riding a horse" with autocast("cuda"): image = pipe(prompt, height=512, width=768)["images"][0] image |
以下のパラメータを使った場合はセッションが変わっても同じ画像が生成されました。
パイプラインにランダム シードを渡すことができます。 同じシードを使用するたびに、同じ画像結果が得られます。
seed値を変えれば、また別の画像が生成されます。
|
1 2 3 4 5 6 7 8 |
import torch generator = torch.Generator("cuda").manual_seed(1024) with autocast("cuda"): image = pipe(prompt, generator=generator)["images"][0] image |
Colab を開いてImage-To-Image をやってみる
Image-To-Image もText-To-Image 同様にプロンプト・テキストを使うのですが違いは何かというと、Text-To-Imageのプロンプト・テキストは画像生成を直接指示するものなのに対して、Image-To-Imageのプロンプト・テキストはImage の変性を指示する、あるいはImageが新しい生成イメージを誘導するということです。
やってみましょう。
Colab にアクセス
Google アカウントでログイン
GPUなどをチェック
|
1 |
!nvidia-smi |
ライブラリなどをインストール
diffusersは後のパイプラインで使うファイルでエラーが起きないように、最新かそれに近いバージョンを使用
|
1 2 3 |
!pip install diffusers==0.8.0 !pip install transformers scipy ftfy !pip install "ipywidgets>=7,<8" |
Hugging Faceにログインせずに、変数にアクセストークンをセット
|
1 |
ACCESS_TOKEN="xxxxxxxx" |
パイプラインを作成
|
1 2 3 4 5 6 7 8 9 |
import torch from diffusers import StableDiffusionImg2ImgPipeline pipe = StableDiffusionImg2ImgPipeline.from_pretrained( "CompVis/stable-diffusion-v1-4", revision="fp16", torch_dtype=torch.float16, use_auth_token=ACCESS_TOKEN ).to("cuda") |
ImageTo-ImageではプロンプトのテキストでImage をどう処理するか指示します。
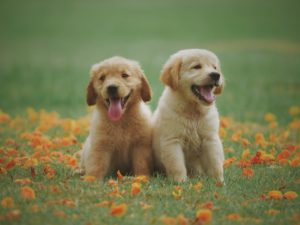
こんなimage を使ってみます。
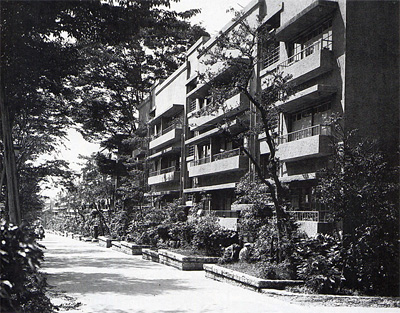
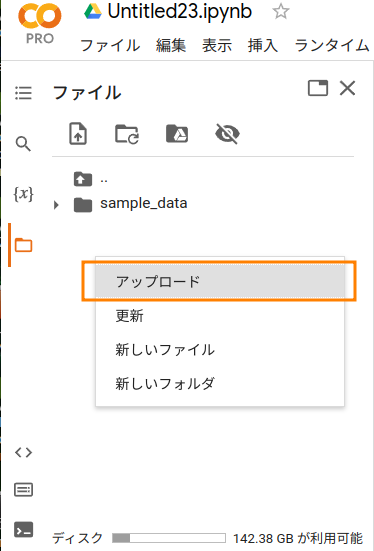
画像アップロードしておきます。
空白部分で右クリックすればアップロードメニュが現れます。
ファイル名の上で右クリックすれば、逆にダウンロードメニュが出てきます。
このImageを以下のテキストを使って加工します。
プロンプト
a lady by apartment house
画像生成
|
1 2 3 4 5 6 7 8 9 10 11 12 13 14 15 |
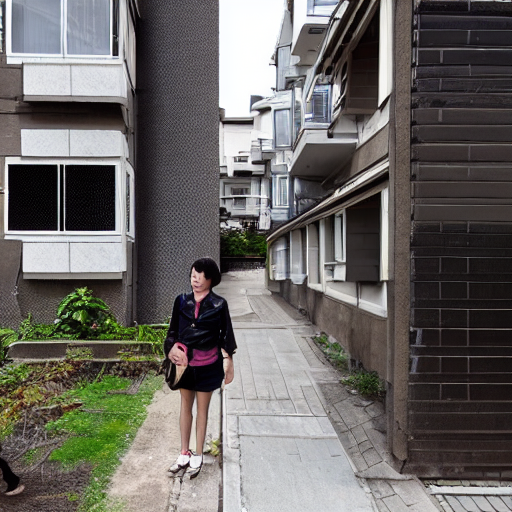
from PIL import Image from torch import autocast prompt = "a lady by apartment house." init_image = Image.open("doujyunkai_01.jpg").convert("RGB") init_image = init_image.resize((512, 512)) # 512x512にリサイズしないとエラーになります with autocast("cuda"): images = pipe( prompt=prompt, init_image=init_image, strength=0.85 )["images"] images[0].save("output.png") |
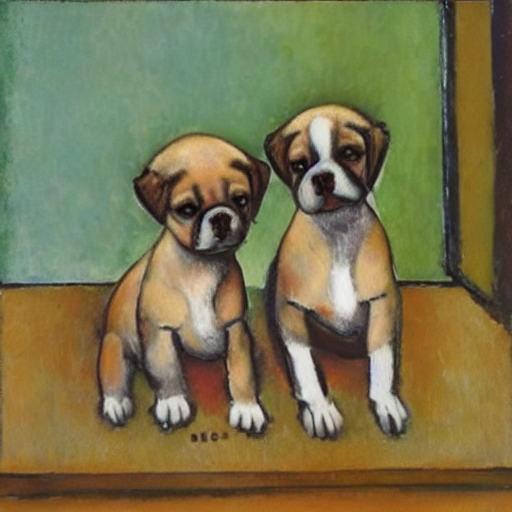
こんな感じ
雰囲気のみ残して、別の場面になっています。そして、この写真のすごいところはよく見ると細部は破綻しているのに、全体の整合性はとれているというところです。
ポートレートを使って、スタイルを変えてみます。
モジリアニ風に描かれたラブラドールに加工。
プロンプト
|
1 2 3 4 5 6 7 8 9 10 11 |
prompt = "Puppies in Modigliani style." init_image = Image.open("puppies.jpg").convert("RGB") init_image = init_image.resize((512, 512)) # 512x512にリサイズしないとエラーになります with autocast("cuda"): images = pipe( prompt=prompt, init_image=init_image, strength=0.85 )["images"] images[0].save("output.png") |
また、このimg2imgを使えば簡単なラフ画像から、詳細なグラフィックを生成することもできるそうです。
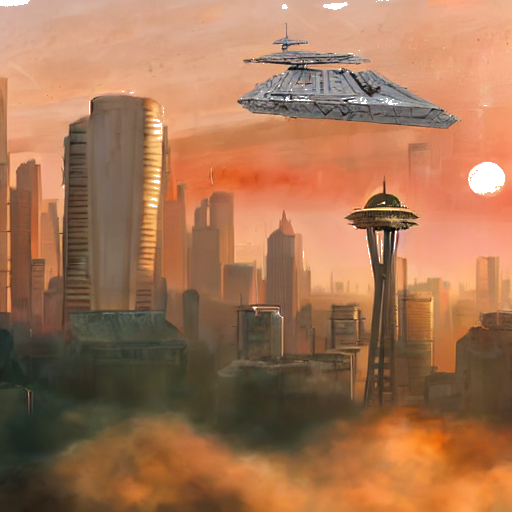
手順を参考にするとこういうことが可能でした。
こんな画像をベースにします。
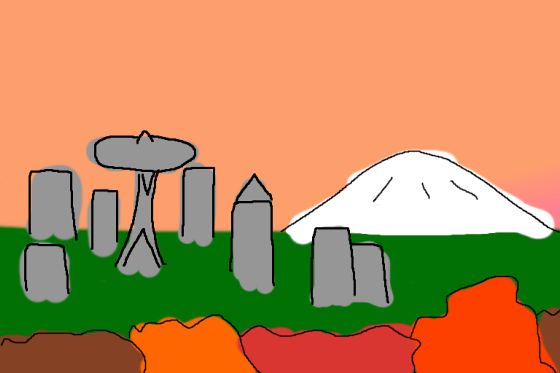
img2imgで画像の加工を2〜3回繰り返します。
こんな画像が生成できました。少々驚きです。
Appendix2
Image-To-Image ではIn-Painting も実行できます。
In-Painting というのは画像内のある領域を修正・修復するものです。
例えばこんな感じ。
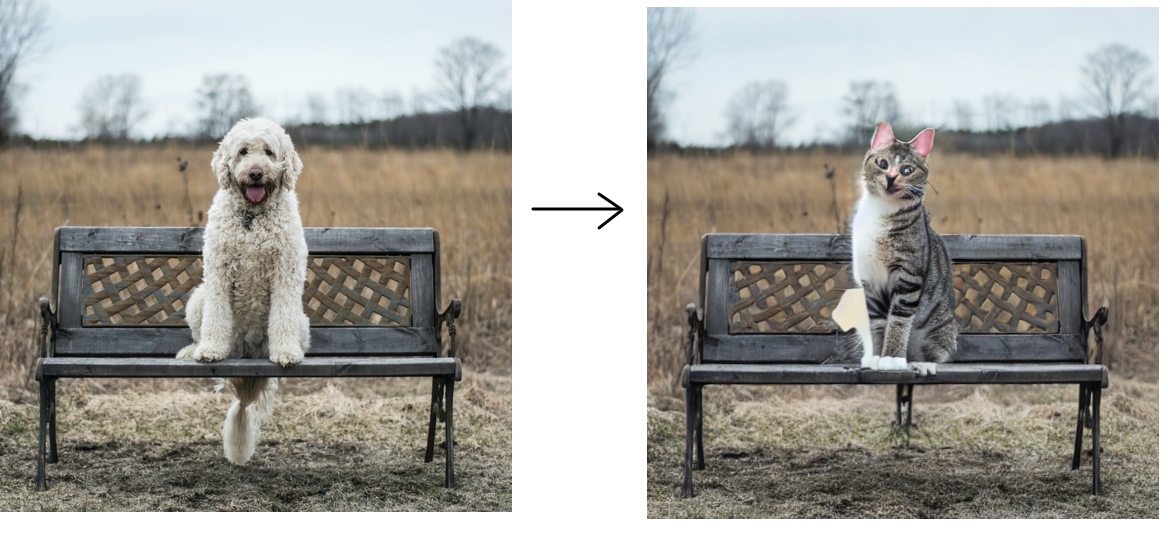
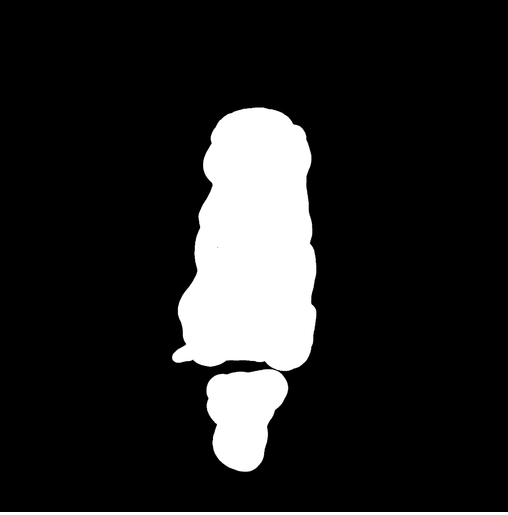
これは、わんちゃんの領域のマスク画像を作っておいて、プロンプトでそこに猫を座らせています。
マスク画像はこんな感じですが、矩形で切り取ってもいいようです。
OR

Hugging Face へログイン
|
1 2 3 4 5 6 7 |
from google.colab import output output.enable_custom_widget_manager() from huggingface_hub import notebook_login notebook_login() |
実行コード
|
1 2 3 4 5 6 7 8 9 10 11 12 13 14 15 16 17 18 19 20 21 22 23 24 25 26 27 28 29 30 31 32 33 34 35 36 37 |
from io import BytesIO from torch import autocast import torch import requests import PIL from diffusers import StableDiffusionInpaintPipeline def download_image(url): response = requests.get(url) return PIL.Image.open(BytesIO(response.content)).convert("RGB") img_url = "https://raw.githubusercontent.com/CompVis/latent-diffusion/main/data/inpainting_examples/overture-creations-5sI6fQgYIuo.png" mask_url = "https://raw.githubusercontent.com/CompVis/latent-diffusion/main/data/inpainting_examples/overture-creations-5sI6fQgYIuo_mask.png" init_image = download_image(img_url).resize((512, 512)) mask_image = download_image(mask_url).resize((512, 512)) device = "cuda" model_id_or_path = "CompVis/stable-diffusion-v1-4" pipe = StableDiffusionInpaintPipeline.from_pretrained( model_id_or_path, revision="fp16", torch_dtype=torch.float16, use_auth_token=True ) # or download via git clone https://huggingface.co/CompVis/stable-diffusion-v1-4 # and pass `model_id_or_path="./stable-diffusion-v1-4"` without having to use `use_auth_token=True`. pipe = pipe.to(device) prompt = "a cat sitting on a bench" with autocast("cuda"): images = pipe(prompt=prompt, init_image=init_image, mask_image=mask_image, strength=0.75)["images"] images[0] |
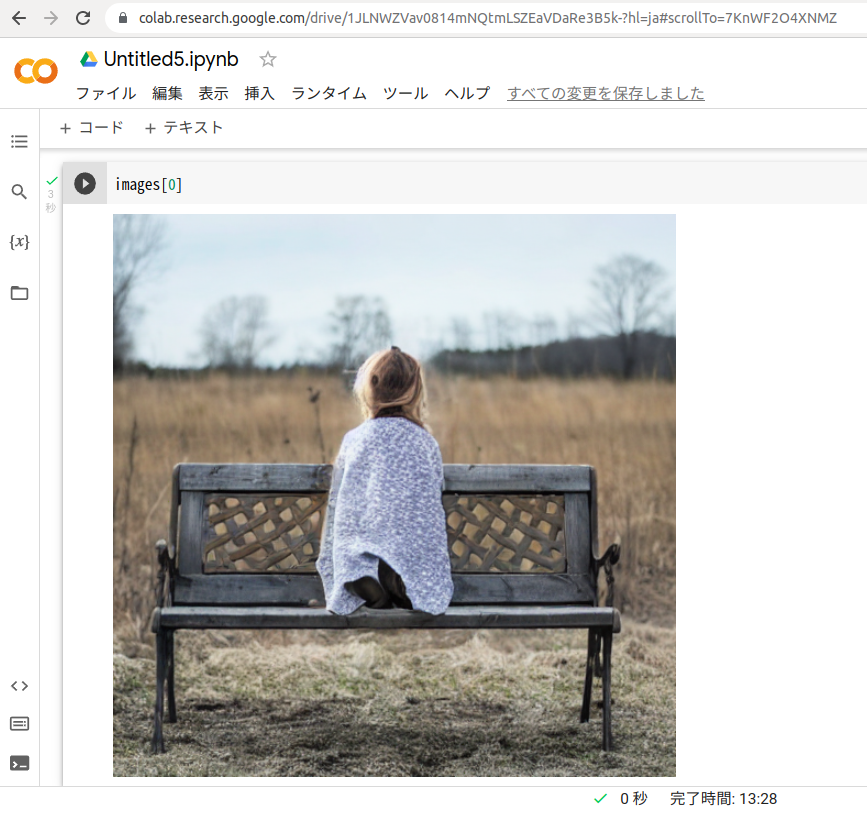
わんちゃんの代わりに少女を座らせてみます。
|
1 2 3 4 5 6 |
prompt = "a girl sitting on a bench" with autocast("cuda"): images = pipe(prompt=prompt, init_image=init_image, mask_image=mask_image, strength=0.75)["images"] images[0] |
後ろ向いてますね。
Leave a Reply