テキストと画像1枚で高精細な画像編集を実現する「Imagic」とは!?
●テキストと入力画像1枚のみ、テキストに沿った高精細な画像編集を実現
●2つのテキストのEmbeddingを線形補間し、2つの情報を合成することでDiffusion Modelによる高精細な編集を実現
●様々な種類の画像編集(ポーズの変更、複数のオブジェクトの編集など)に適用可能、高い品質と汎用性を実現
拡散モデルを使って、画像をプロンプトで編集してくれます。
Google のColab 環境とHugging Faceでお試しできます。Colab Pro の場合、GPU はTesla T4 (16GB)を標準で使えます。
Colab とHugging Face のアカウントやアクセストークンについてはこのページ参照
ベースになるコードはImagic_Stable_Diffusion.ipynb、ほぼそのまんまです。
Colab でGPUをアサインして、割当・接続・初期化を実行します。
|
1 |
!nvidia-smi --query-gpu=name,memory.total,memory.free --format=csv,noheader |
必要な要件をインストール
|
1 2 3 4 5 6 |
!wget -q https://github.com/ShivamShrirao/diffusers/raw/main/examples/imagic/train_imagic.py %pip install -qq git+https://github.com/ShivamShrirao/diffusers %pip install -q -U --pre triton %pip install -q accelerate==0.12.0 transformers ftfy bitsandbytes gradio |
トークンを使ってHugging Face へログイン
|
1 2 3 |
from huggingface_hub import notebook_login !git config --global credential.helper store notebook_login() |
事前にコンパイルされたWheelでxformers をインストール
%pip install -q https://github.com/metrolobo/xformers_wheels/releases/download/1d31a3ac_various_6/xformers-0.0.14.dev0-cp37-cp37m-linux_x86_64.whl
Google Drive へ接続してセッティング実行
プロンプトは「走る人(A running man.)」にします。
|
1 2 3 4 5 6 7 8 9 10 11 12 13 14 15 16 17 |
MODEL_NAME = "CompVis/stable-diffusion-v1-4" TARGET_TEXT = "A running man." save_to_gdrive = True if save_to_gdrive: from google.colab import drive drive.mount('/content/drive') OUTPUT_DIR = "stable_diffusion_weights/imagic" if save_to_gdrive: OUTPUT_DIR = "/content/drive/MyDrive/" + OUTPUT_DIR else: OUTPUT_DIR = "/content/" + OUTPUT_DIR print(f"[*] Weights will be saved at {OUTPUT_DIR}") !mkdir -p $OUTPUT_DIR |
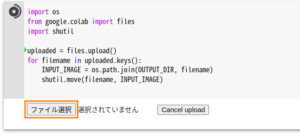
Fine Tuning 用に人の画像をアップロード、この人を走らせてみます。
|
1 2 3 4 5 6 7 8 |
import os from google.colab import files import shutil uploaded = files.upload() for filename in uploaded.keys(): INPUT_IMAGE = os.path.join(OUTPUT_DIR, filename) shutil.move(filename, INPUT_IMAGE) |
train_Imagic.pyでFine Tuning 実行(そこそこ時間がかかります)
|
1 2 3 4 5 6 7 8 9 10 11 12 13 14 |
!accelerate launch train_imagic.py \ --pretrained_model_name_or_path=$MODEL_NAME \ --output_dir=$OUTPUT_DIR \ --input_image=$INPUT_IMAGE \ --target_text="{TARGET_TEXT}" \ --seed=3434554 \ --resolution=512 \ --mixed_precision="fp16" \ --use_8bit_adam \ --gradient_accumulation_steps=1 \ --emb_learning_rate=1e-3 \ --learning_rate=1e-6 \ --emb_train_steps=500 \ --max_train_steps=1000 |
AUTOMATIC1111みたいなWebインターフェースで使うために、重みをチェックポイントへ変換
!wget -q https://github.com/ShivamShrirao/diffusers/raw/main/scripts/convert_diffusers_to_original_stable_diffusion.py
変換実行
|
1 2 3 4 5 6 7 8 9 |
ckpt_path = OUTPUT_DIR + "/model.ckpt" half_arg = "" fp16 = False #@param {type: "boolean"} if fp16: half_arg = "--half" !python convert_diffusers_to_original_stable_diffusion.py --model_path $OUTPUT_DIR --checkpoint_path $ckpt_path $half_arg print(f"[*] Converted ckpt saved at {ckpt_path}") |
推論実行
|
1 2 3 4 5 6 7 8 9 10 11 12 13 |
import os import torch from torch import autocast from diffusers import StableDiffusionPipeline, DDIMScheduler from IPython.display import display model_path = OUTPUT_DIR scheduler = DDIMScheduler(beta_start=0.00085, beta_end=0.012, beta_schedule="scaled_linear", clip_sample=False, set_alpha_to_one=False) pipe = StableDiffusionPipeline.from_pretrained(model_path, scheduler=scheduler, torch_dtype=torch.float16).to("cuda") target_embeddings = torch.load(os.path.join(model_path, "target_embeddings.pt")).to("cuda") optimized_embeddings = torch.load(os.path.join(model_path, "optimized_embeddings.pt")).to("cuda") g_cuda = None |
再現性のためにここにランダム シードを設定
|
1 2 3 |
g_cuda = torch.Generator(device='cuda') seed = 4324 #@param {type:"number"} g_cuda.manual_seed(seed) |
イメージ作成を実行
|
1 2 3 4 5 6 7 8 9 10 11 12 13 14 15 16 17 18 19 20 21 22 |
alpha = 0.9 #@param {type:"number"} num_samples = 4 #@param {type:"number"} guidance_scale = 3 #@param {type:"number"} num_inference_steps = 50 #@param {type:"number"} height = 512 #@param {type:"number"} width = 512 #@param {type:"number"} edit_embeddings = alpha*target_embeddings + (1-alpha)*optimized_embeddings with autocast("cuda"), torch.inference_mode(): images = pipe( text_embeddings=edit_embeddings, height=height, width=width, num_images_per_prompt=num_samples, num_inference_steps=num_inference_steps, guidance_scale=guidance_scale, generator=g_cuda ).images for img in images: display(img) |
イメージ作成のためにGradioを使ったUIを実行
|
1 2 3 4 5 6 7 8 9 10 11 12 13 14 15 16 17 18 19 20 21 22 23 24 25 26 27 28 29 30 |
import gradio as gr def inference(alpha, num_samples, height=512, width=512, num_inference_steps=50, guidance_scale=7.5): with torch.autocast("cuda"), torch.inference_mode(): edit_embeddings = alpha*target_embeddings + (1-alpha)*optimized_embeddings return pipe( text_embeddings=edit_embeddings, height=int(height), width=int(width), num_images_per_prompt=int(num_samples), num_inference_steps=int(num_inference_steps), guidance_scale=guidance_scale, generator=g_cuda ).images with gr.Blocks() as demo: with gr.Row(): with gr.Column(): alpha = gr.Number(label="Prompt", value=0.9) run = gr.Button(value="Generate") with gr.Row(): num_samples = gr.Number(label="Number of Samples", value=4) guidance_scale = gr.Number(label="Guidance Scale", value=3) with gr.Row(): height = gr.Number(label="Height", value=512) width = gr.Number(label="Width", value=512) num_inference_steps = gr.Slider(label="Steps", value=50) with gr.Column(): gallery = gr.Gallery() run.click(inference, inputs=[alpha, num_samples, height, width, num_inference_steps, guidance_scale], outputs=gallery) demo.launch(debug=True) |
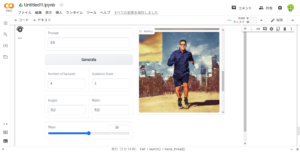
こんな感じ。なぜかショートパンツにサングラスで背景も描かれています。
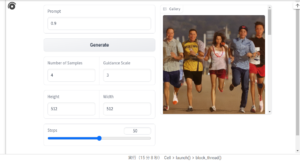
こういうイメージも生成されました、人物が複数、中には女性もいます。


Leave a Reply