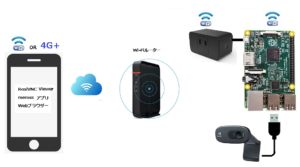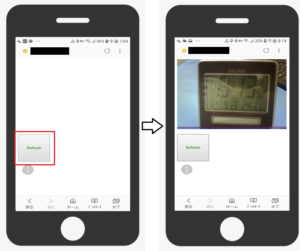
例えばsampleというディレクトリーに以下のようなファイルを準備します。
/home/pi/sample/capture.py,cam_capture.sh
/home/pi/sample/templates/index.html
/home/pi/sample/static/index.js,index.css,dummy.jpg
cam_capture.shには実行権を付与。
dummy.jpgは800x600の単に真白の画像です。
USBカメラでキャプチャー用にfswebcamをインストールしておきます。
|
1 |
sudo apt-get install fswebcam |
設定例
camera->Video番号は0-> /dev/video0
キャプチャーする画像 -> 名前->/home/pi/camera_capturedimage.jpg
LocalIP->192.168.0.31
Port番号 ->8080
画像名が同じなので更新する場合はキャッシュクリアが必要
運用する場合は画像名をタイムスタンプの数字などにします。
【capture.py】
|
1 2 3 4 5 6 7 8 9 10 11 12 13 14 15 16 17 18 19 20 21 |
from flask import Flask, render_template, request import subprocess app = Flask(__name__) @app.route('/') def index(): return render_template('index.html') @app.route('/control', methods=['POST']) def control(): sh = "./cam_capture.sh" p = subprocess.Popen(sh) p.wait() res = 'captured' return res if __name__ == '__main__': app.debug = True app.run(host='192.168.0.31', port=8080) |
【index.html】
|
1 2 3 4 5 6 7 8 9 10 11 12 13 14 15 16 17 18 19 20 21 22 |
<html> <meta name="viewport" content="width=device-width"> <head> <meta charset="utf-8"> <link rel="stylesheet" href="{{url_for('static', filename='index.css')}}"> <script src="https://code.jquery.com/jquery-3.2.1.min.js"></script> <script src="https://cdnjs.cloudflare.com/ajax/libs/jQuery-rwdImageMaps/1.6/jquery.rwdImageMaps.js"></script> <script src="{{url_for('static', filename='index.js')}}"></script> </head> <body> <img id="cam" src="{{url_for('static', filename='dummy.jpg')}}" style="width:100%;display:block;"> <form id="frm_monitor" style="display:none;"> <!-- パラメータを送る必要がない場合は以下の3行は不要--> <input id="data1" type="text" name="param1" value="dummy"> <input id="data2" type="text" name="param2" value="dummy"> <input id="data3" type="text" name="param3" value="dummy"> </form> <br/> <Button onClick="ajax_request('/control','#frm_monitor')">Refresh</Button> </body> </html> |
【index.js】
|
1 2 3 4 5 6 7 8 9 10 11 12 13 14 15 16 17 18 19 |
function ajax_request(url,id){ $(document).ready(function() { $.ajax({ url: url, data: $(id).serialize(), type: 'POST', success: function(response) { alert(response); document.getElementById("cam").src = "../static/camera_capturedimage.jpg" }, error: function(error) { //alert("ERR:" + error); } }); }); } |
【index.css】
|
1 |
Button{width:100px;height:100px;color:green;} |
【cam_capture.sh】
|
1 2 3 4 |
#!/bin/bash fswebcam --device /dev/video0 -r 800x600 /home/pi/sample/static/camera_capturedimage.jpg exit 0 |
こんな感じ。
fswebcam でキャプチャーすると反映するまでに5秒くらいかかります。
余談
USB接続のカメラキャプチャーコマンドは
fswebcam –device /dev/video0 -r 800×600 /home/pi/sample/static/camera_capturedimage.jpg
CSIカメラモジュールを使う場合は
raspistill -w 800 -h 600 -o /home/pi/sample/static/camera_capturedimage.jpg
スマートコンセントを使って外出先から家電の電源をON・OFFしてみる
ラズパイにAI推論実行用プロセッシング・ユニットを使ってみる
IoTプラットフォームをAIで賢くしてみる
ストリーミング
工事中


Leave a Reply