
NVIDIAのNGCにはセマンティック・セグメンテーションのよさげなチュートリアルがなかったので、Pytorchのチュートリアルを使ってみます。
TORCHVISION OBJECT DETECTION FINETUNING TUTORIAL
TorchVision オブジェクト検出 ファインチューニング チュートリアル
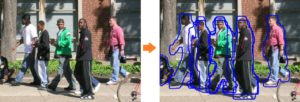
このチュートリアルでは、FasterR-CNNをベースにしたMaskR-CNNを使用します。 Faster R-CNNは、画像内の潜在的なオブジェクトのバウンディングボックスとクラススコアの両方を予測するモデルです。
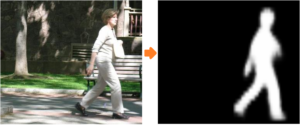
こんな感じのことをやってみます。
チュートリアルの学習は少々重いです。
いつものように、学習はGoogle Colabを使い、推論の実行はColab と Jetson Nano の2つでやってみます。
ここでは、学習したモデルを保存して再利用したかったのでチュートリアルとちょっと異なる点があります。ご了承ください
目次
1.学習用の環境をJetson Nanoで作成してGoogle Drive にアップロード
2.Google Colab で学習をして、モデルデータを保存
3.Colabで新規Notebookを作成し、モデルをロードして推論実行
4.Jetson Nano に推論実行環境を作成し、モデルをロードしてNoteBookで推論実行
以下の記述で、/home/jetson というユーザー名は適宜、ご自分の環境で置き換えてください。
1/4. 学習用の環境をJetson Nanoで作成してGoogle Drive にアップロード
使用するJetson Nano は4GBモデルで、OS image はJetpack(4.4.1)です。
Jetsonのセットアップなどはこちらのページをご参照ください。
work-maskrcnn という名前で新規にディレクトリを作成
|
1 2 |
mkdir /home/jetson/work-maskrcnn cd /home/jetson/work-maskrcnn |
データセットをダウンロードして、解凍しておきます。
|
1 2 |
wget https://www.cis.upenn.edu/~jshi/ped_html/PennFudanPed.zip unzip PennFudanPed.zip |
モジュールを追加しておきます。
|
1 2 3 4 5 6 7 8 |
git clone https://github.com/pytorch/vision.git cd vision sudo cp references/detection/utils.py ../ sudo cp references/detection/transforms.py ../ sudo cp references/detection/coco_eval.py ../ sudo cp references/detection/engine.py ../ sudo cp references/detection/coco_utils.py ../ |
終了後、不要ファイル削除
|
1 2 3 |
cd ../ sudo rm PennFudanPed.zip sudo rm -rf vision |
ブラウザーでGoogle Driveにアクセスして、work-maskrcnnをアップロード
work-maskrcnnフォルダーはColabの学習で使います。
2/4. Google Colab で学習をして、モデルデータを保存
ブラウザーでGoogle Colabを開きます。
最初にNotebookを作成する際にGPUも使えるようにします。
ファイルー>ノートブックを新規作成
ランタイムをクリックー>ランタイムのタイプを変更
GPUを選んで保存します。
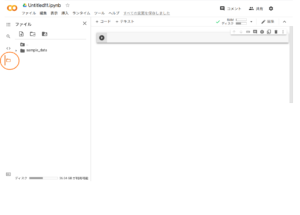
ファイルのアイコンをクリック
事前にGoogleドライブにアップしておいた環境(work-maskrcnn)が使えるようにドライブをマウントします。
マウントするとドライブが表示されるので、カレントディレクトリを変更します。
|
1 |
%cd /content/drive/MyDrive/work-maskrcnn |
ライブラリやモジュールが使えるかチェックしておきます。
|
1 2 3 4 5 6 7 8 9 10 11 12 13 14 15 |
import os import numpy as np import pandas as pd import torch from PIL import Image import torchvision from torchvision.models.detection.faster_rcnn import FastRCNNPredictor from torchvision.models.detection import FasterRCNN from torchvision.models.detection.rpn import AnchorGenerator from torchvision.models.detection.faster_rcnn import FastRCNNPredictor from torchvision.models.detection.mask_rcnn import MaskRCNNPredictor import transforms as T import utils from engine import train_one_epoch, evaluate import coco_utils |
データセットのtorch.utils.data.Datasetクラスを作成しましょう。
|
1 2 3 4 5 6 7 8 9 10 11 12 13 14 15 16 17 18 19 20 21 22 23 24 25 26 27 28 29 30 31 32 33 34 35 36 37 38 39 40 41 42 43 44 45 46 47 48 49 50 51 52 53 54 55 56 57 58 59 60 61 62 63 64 65 66 |
class PennFudanDataset(object): def __init__(self, root, transforms): self.root = root self.transforms = transforms # load all image files, sorting them to # ensure that they are aligned self.imgs = list(sorted(os.listdir(os.path.join(root, "PNGImages")))) self.masks = list(sorted(os.listdir(os.path.join(root, "PedMasks")))) def __getitem__(self, idx): # load images ad masks img_path = os.path.join(self.root, "PNGImages", self.imgs[idx]) mask_path = os.path.join(self.root, "PedMasks", self.masks[idx]) img = Image.open(img_path).convert("RGB") # note that we haven't converted the mask to RGB, # because each color corresponds to a different instance # with 0 being background mask = Image.open(mask_path) # convert the PIL Image into a numpy array mask = np.array(mask) # instances are encoded as different colors obj_ids = np.unique(mask) # first id is the background, so remove it obj_ids = obj_ids[1:] # split the color-encoded mask into a set # of binary masks masks = mask == obj_ids[:, None, None] # get bounding box coordinates for each mask num_objs = len(obj_ids) boxes = [] for i in range(num_objs): pos = np.where(masks[i]) xmin = np.min(pos[1]) xmax = np.max(pos[1]) ymin = np.min(pos[0]) ymax = np.max(pos[0]) boxes.append([xmin, ymin, xmax, ymax]) # convert everything into a torch.Tensor boxes = torch.as_tensor(boxes, dtype=torch.float32) # there is only one class labels = torch.ones((num_objs,), dtype=torch.int64) masks = torch.as_tensor(masks, dtype=torch.uint8) image_id = torch.tensor([idx]) area = (boxes[:, 3] - boxes[:, 1]) * (boxes[:, 2] - boxes[:, 0]) # suppose all instances are not crowd iscrowd = torch.zeros((num_objs,), dtype=torch.int64) target = {} target["boxes"] = boxes target["labels"] = labels target["masks"] = masks target["image_id"] = image_id target["area"] = area target["iscrowd"] = iscrowd if self.transforms is not None: img, target = self.transforms(img, target) return img, target def __len__(self): return len(self.imgs) |
There are two common situations where one might want to modify one of the available models in torchvision modelzoo. The first is when we want to start from a pre-trained model, and just finetune the last layer. The other is when we want to replace the backbone of the model with a different one (for faster predictions, for example).
torchvision modelzoo で利用可能なモデルを修正したい場合、2つの一般的なシチュエーションがあります。1つ目は、事前に訓練されたモデルから始めて、最後のレイヤーを微調整(finetune)する場合です。もう一つは、(例えば、より高速な予測のために)モデルのバックボーンを別のものに置き換えたい場合です 。
事前トレーニング済みモデルからのファインチューニング
COCOで事前にトレーニングされたモデルから始めて、特定のクラスに合わせてファインチューニングします。
注:今回はこのモデルを使います。
|
1 2 3 4 5 6 7 8 9 10 11 12 |
# 学習済みモデルをダウンロード # load a model pre-trained pre-trained on COCO model = torchvision.models.detection.fasterrcnn_resnet50_fpn(pretrained=True) # replace the classifier with a new one, that has # num_classes which is user-defined num_classes = 2 # 1 class (person) + background # get number of input features for the classifier in_features = model.roi_heads.box_predictor.cls_score.in_features # replace the pre-trained head with a new one model.roi_heads.box_predictor = FastRCNNPredictor(in_features, num_classes) |
2.Modifying the model to add a different backbone
モデルを変更して別のバックボーンを追加する
別の一般的なシチュエーションとしては、ユーザーが検出モデルのバックボーンを別のバックボーンに置き換えたい場合に発生します。 たとえば、現在のデフォルトのバックボーン(ResNet-50)は、一部のアプリケーションには大きすぎる可能性があり、より小さなモデルが必要になる場合があります。
これが、トーチビジョンによって提供される機能を活用してバックボーンを変更する方法です。
注:下記の理由によりこのモデルは使いません。
|
1 2 3 4 5 6 7 8 9 10 11 12 13 14 15 16 17 18 19 20 21 22 23 24 25 26 27 28 29 30 31 32 |
# load a pre-trained model for classification and return # only the features backbone = torchvision.models.mobilenet_v2(pretrained=True).features # FasterRCNN needs to know the number of # output channels in a backbone. For mobilenet_v2, it's 1280 # so we need to add it here backbone.out_channels = 1280 # let's make the RPN generate 5 x 3 anchors per spatial # location, with 5 different sizes and 3 different aspect # ratios. We have a Tuple[Tuple[int]] because each feature # map could potentially have different sizes and # aspect ratios anchor_generator = AnchorGenerator(sizes=((32, 64, 128, 256, 512),), aspect_ratios=((0.5, 1.0, 2.0),)) # let's define what are the feature maps that we will # use to perform the region of interest cropping, as well as # the size of the crop after rescaling. # if your backbone returns a Tensor, featmap_names is expected to # be [0]. More generally, the backbone should return an # OrderedDict[Tensor], and in featmap_names you can choose which # feature maps to use. roi_pooler = torchvision.ops.MultiScaleRoIAlign(featmap_names=[0], output_size=7, sampling_ratio=2) # put the pieces together inside a FasterRCNN model model = FasterRCNN(backbone, num_classes=2, rpn_anchor_generator=anchor_generator, box_roi_pool=roi_pooler) |
An Instance segmentation model for PennFudan Dataset
PennFudanデータセットのインスタンスセグメンテーションモデル
In our case, we want to fine-tune from a pre-trained model, given that our dataset is very small, so we will be following approach number 1.
Here we want to also compute the instance segmentation masks, so we will be using Mask R-CNN:
PennFudan Datasetの例では、データセットが非常に小さいため、事前にトレーニングされたモデルから微調整(fine-tune)する必要があるため、1のFinetuning from a pretrained modelに従います。
ここでは、インスタンスのセグメンテーションマスクも計算するため、MaskR-CNNを使用します。
|
1 2 3 4 5 6 7 8 9 10 11 12 13 14 15 16 17 18 |
def get_model_instance_segmentation(num_classes): # load an instance segmentation model pre-trained pre-trained on COCO model = torchvision.models.detection.maskrcnn_resnet50_fpn(pretrained=True) # get number of input features for the classifier in_features = model.roi_heads.box_predictor.cls_score.in_features # replace the pre-trained head with a new one model.roi_heads.box_predictor = FastRCNNPredictor(in_features, num_classes) # now get the number of input features for the mask classifier in_features_mask = model.roi_heads.mask_predictor.conv5_mask.in_channels hidden_layer = 256 # and replace the mask predictor with a new one model.roi_heads.mask_predictor = MaskRCNNPredictor(in_features_mask, hidden_layer, num_classes) return model |
Putting everything together
すべてをまとめる
In references/detection/, we have a number of helper functions to simplify training and evaluating detection models. Here, we will use references/detection/engine.py, references/detection/utils.py and references/detection/transforms.py. Just copy them to your folder and use them here.
references/detectionフォルダーには、検出モデルのトレーニングと評価を簡素化するための多数のヘルパー関数があります。 ここでは、references / detection / engine.py、references / detection / utils.py、references / detection /transforms.pyを使用します。 それらをフォルダにコピーして、ここで使用するだけです。
注:1/4でこれら3つのPythonコードはGoogle Driveにセットされ、このセクションの最初にモジュールとして読み込まれています。
|
1 2 3 4 5 6 |
def get_transform(train): transforms = [] transforms.append(T.ToTensor()) if train: transforms.append(T.RandomHorizontalFlip(0.5)) return T.Compose(transforms) |
Testing forward() method (Optional)
forward()メソッドのテスト(オプション)
Before iterating over the dataset, it’s good to see what the model expects during training and inference time on sample data.
データセットを反復処理する前に、サンプルデータのトレーニングおよび推論時間中にモデルが何を期待するかを確認することをお勧めします。
|
1 2 3 4 5 6 7 8 9 10 11 12 13 14 |
model = torchvision.models.detection.fasterrcnn_resnet50_fpn(pretrained=True) dataset = PennFudanDataset('PennFudanPed', get_transform(train=True)) data_loader = torch.utils.data.DataLoader( dataset, batch_size=2, shuffle=True, num_workers=4, collate_fn=utils.collate_fn) # For Training images,targets = next(iter(data_loader)) images = list(image for image in images) targets = [{k: v for k, v in t.items()} for t in targets] output = model(images,targets) # Returns losses and detections # For inference model.eval() x = [torch.rand(3, 300, 400), torch.rand(3, 500, 400)] predictions = model(x) # Returns predictions |
トレーニングと検証を実行します。
注:チュートリアルでは以下はmain関数として記述されていますが、ここではべた書きしています。
|
1 2 3 4 5 6 7 8 9 10 11 12 13 14 15 16 17 18 19 20 21 22 23 24 25 26 27 28 29 30 31 32 33 34 35 36 37 |
# train on the GPU or on the CPU, if a GPU is not available device = torch.device('cuda') if torch.cuda.is_available() else torch.device('cpu') # our dataset has two classes only - background and person num_classes = 2 # use our dataset and defined transformations dataset = PennFudanDataset('PennFudanPed', get_transform(train=True)) dataset_test = PennFudanDataset('PennFudanPed', get_transform(train=False)) # split the dataset in train and test set indices = torch.randperm(len(dataset)).tolist() dataset = torch.utils.data.Subset(dataset, indices[:-50]) dataset_test = torch.utils.data.Subset(dataset_test, indices[-50:]) # define training and validation data loaders data_loader = torch.utils.data.DataLoader( dataset, batch_size=2, shuffle=True, num_workers=4, collate_fn=utils.collate_fn) data_loader_test = torch.utils.data.DataLoader( dataset_test, batch_size=1, shuffle=False, num_workers=4, collate_fn=utils.collate_fn) # get the model using our helper function model = get_model_instance_segmentation(num_classes) # move model to the right device model.to(device) # construct an optimizer params = [p for p in model.parameters() if p.requires_grad] optimizer = torch.optim.SGD(params, lr=0.005, momentum=0.9, weight_decay=0.0005) # and a learning rate scheduler lr_scheduler = torch.optim.lr_scheduler.StepLR(optimizer, step_size=3, gamma=0.1) |
10エポックのモデルをトレーニングしましょう。
|
1 2 3 4 5 6 7 8 9 10 11 12 |
# let's train it for 10 epochs num_epochs = 10 for epoch in range(num_epochs): # train for one epoch, printing every 10 iterations train_one_epoch(model, optimizer, data_loader, device, epoch, print_freq=10) # update the learning rate lr_scheduler.step() # evaluate on the test dataset evaluate(model, data_loader_test, device=device) print("That's it!") |
トレーニングが終了したらモデルをpickle化して保存しておきます。
|
1 |
pd.to_pickle(model, "tutorial_model.pkl") |
注:pickleを使った方法は簡単ですが推奨されていません。推奨された方法としてはstate_dictを使います。
Appendixをご参照ください。
3/4. Colabで新規Notebookを作成し、モデルをロードして推論実行
2でやったようにColabに推論用のGPU対応の新規Notebookを作成して、Google Driveにマウントしておきます。
で、以下を実行
|
1 |
%cd /content/drive/MyDrive/work-maskrcnn |
ライブラリを読み込み
|
1 2 3 4 5 6 |
import os import numpy as np import torch from PIL import Image import transforms as T import pandas as pd |
データセットのtorch.utils.data.Datasetクラスを作成しましょう。
|
1 2 3 4 5 6 7 8 9 10 11 12 13 14 15 16 17 18 19 20 21 22 23 24 25 26 27 28 29 30 31 32 33 34 35 36 37 38 39 40 41 42 43 44 45 46 47 48 49 50 51 52 53 54 55 56 57 58 59 60 61 62 63 64 65 66 |
class PennFudanDataset(object): def __init__(self, root, transforms): self.root = root self.transforms = transforms # load all image files, sorting them to # ensure that they are aligned self.imgs = list(sorted(os.listdir(os.path.join(root, "PNGImages")))) self.masks = list(sorted(os.listdir(os.path.join(root, "PedMasks")))) def __getitem__(self, idx): # load images ad masks img_path = os.path.join(self.root, "PNGImages", self.imgs[idx]) mask_path = os.path.join(self.root, "PedMasks", self.masks[idx]) img = Image.open(img_path).convert("RGB") # note that we haven't converted the mask to RGB, # because each color corresponds to a different instance # with 0 being background mask = Image.open(mask_path) # convert the PIL Image into a numpy array mask = np.array(mask) # instances are encoded as different colors obj_ids = np.unique(mask) # first id is the background, so remove it obj_ids = obj_ids[1:] # split the color-encoded mask into a set # of binary masks masks = mask == obj_ids[:, None, None] # get bounding box coordinates for each mask num_objs = len(obj_ids) boxes = [] for i in range(num_objs): pos = np.where(masks[i]) xmin = np.min(pos[1]) xmax = np.max(pos[1]) ymin = np.min(pos[0]) ymax = np.max(pos[0]) boxes.append([xmin, ymin, xmax, ymax]) # convert everything into a torch.Tensor boxes = torch.as_tensor(boxes, dtype=torch.float32) # there is only one class labels = torch.ones((num_objs,), dtype=torch.int64) masks = torch.as_tensor(masks, dtype=torch.uint8) image_id = torch.tensor([idx]) area = (boxes[:, 3] - boxes[:, 1]) * (boxes[:, 2] - boxes[:, 0]) # suppose all instances are not crowd iscrowd = torch.zeros((num_objs,), dtype=torch.int64) target = {} target["boxes"] = boxes target["labels"] = labels target["masks"] = masks target["image_id"] = image_id target["area"] = area target["iscrowd"] = iscrowd if self.transforms is not None: img, target = self.transforms(img, target) return img, target def __len__(self): return len(self.imgs) |
テスト用画像を準備
|
1 2 3 4 5 6 7 8 9 10 11 12 13 14 15 |
def get_transform(train): transforms = [] transforms.append(T.ToTensor()) if train: transforms.append(T.RandomHorizontalFlip(0.5)) return T.Compose(transforms) dataset = PennFudanDataset('PennFudanPed', get_transform(train=True)) dataset_test = PennFudanDataset('PennFudanPed', get_transform(train=False)) indices = torch.randperm(len(dataset)).tolist() dataset_test = torch.utils.data.Subset(dataset_test, indices[-50:]) # GPU check device = torch.device('cuda') if torch.cuda.is_available() else torch.device('cpu') |
学習で作成したモデルを読み込みます。
|
1 |
model = pd.read_pickle("tutorial_model.pkl") |
テスト用画像の数
|
1 2 |
img_count = len(dataset_test) print(img_count) |
img_countより小さい番号を指定して予測用画像を準備
|
1 2 3 4 5 6 7 |
img_num = 2 # pick one image from the test set img, _ = dataset_test[img_num] # put the model in evaluation mode model.eval() with torch.no_grad(): prediction = model([img.to(device)]) |
推論実行
|
1 |
prediction |
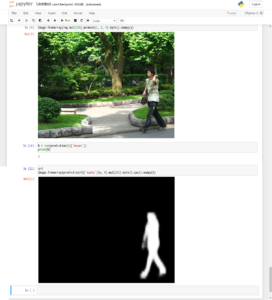
予測(prediction)の結果は、辞書のリストになっていてboxes、labels、masks、score が含まれています。
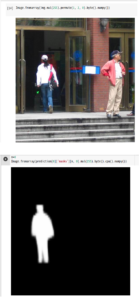
使用した画像を確認
|
1 |
Image.fromarray(img.mul(255).permute(1, 2, 0).byte().numpy()) |
画像の中のセグメーテーションの数をmasksかboxesの配列数で調べます。
|
1 2 |
N = len(prediction[0]['boxes']) print(N) |
Nより小さい番号を指定してセグメンテーション表示
|
1 2 |
n = N - 1 Image.fromarray(prediction[0]['masks'][n, 0].mul(255).byte().cpu().numpy()) |
4/4. Jetson Nano に推論実行環境を作成し、モデルをロードしてNoteBookで推論実行
使用するJetson Nano は4GBモデルで、OS image はJetpack(4.4.1)です。
SWAP領域も2GB以上確保しておく必要があります。
JetsonのセットアップやSwap設定などはこちらのページをご参照ください。

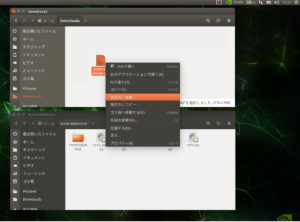
Google Driveにアクセスして保存しておいた学習モデルをダウンロードしておきます。
ダウンロードしたファイル(tutorial_model.pkl)は/home/jetson/work-maskrcnnに移動しておきます。
NVIDIAのイメージを使ってコンテナを作成します。
|
1 |
sudo docket pull nvcr.io/nvidia/l4t-pytorch:r32.4.4-pth1.6-py3 |
以下のセットアップが面倒な方向けにイメージを用意しました。
これでコンテナを作成すれば、後はJupyterNotebookを起動するだけです。
よろしければお使いください。
Appendix2
my_maskrcnnという名前でコンテナを作成
sudo docker create -it --name my_maskrcnn --gpus all --network host -v /home/jetson/work-maskrcnn:/work nvcr.io/nvidia/l4t-pytorch:r32.4.4-pth1.6-py3
コンテナ起動
|
1 |
sudo docker start -i my_maskrcnn |
アップデート&アップグレード
|
1 2 3 |
apt update apt upgrade -y python3 -m pip install --upgrade pip |
ライブラリを追加インストール
|
1 |
pip3 install pandas |
torchとtorchvisionのデフォルトでインストールされているバージョン(1.6.0と0.7.0)だとpickle化されたモデルの読み込みで失敗します。コンテナのPytorchとTorchvisionのバージョンを上げておきます(1.7.0と0.8.1)。
注:モデルの保存・読み込みにstate_dictを使った場合はこのバージョンアップは不要です。Appendix参照
まずは、削除
|
1 2 |
pip3 uninstall torch pip3 uninstall torchvision |
再インストール
Pytorch
|
1 2 3 4 |
wget https://nvidia.box.com/shared/static/cs3xn3td6sfgtene6jdvsxlr366m2dhq.whl -O torch-1.7.0-cp36-cp36m-linux_aarch64.whl apt install python3-pip libopenblas-base libopenmpi-dev pip3 install Cython pip3 install numpy torch-1.7.0-cp36-cp36m-linux_aarch64.whl |
Torchvision(だいたい30分くらいかかります、コーヒータイムです)
|
1 2 3 4 5 6 7 8 9 10 11 |
apt install libjpeg-dev zlib1g-dev libpython3-dev libavcodec-dev libavformat-dev libswscale-dev # see below for version of torchvision to download git clone --branch v0.8.1 https://github.com/pytorch/vision torchvision cd torchvision # where 0.x.0 is the torchvision version export BUILD_VERSION=0.8.1 python3 setup.py install --user # attempting to load torchvision from build dir will result in import error cd ../ # always needed for Python 2.7, not needed torchvision v0.5.0+ with Python 3.6 pip3 install 'pillow<7' |
jupyterlabをインストールしておきます。
|
1 |
pip3 install jupyterlab |
マウントしておいたworkフォルダーへ移動して、Jupyter Notebook を起動
|
1 2 |
cd /work jupyter notebook --ip=0.0.0.0 --allow-root |
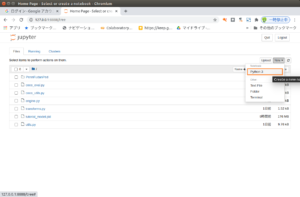
token付きでURLが表示されますので、コピーして外部ブラウザーからNotebookを開きます。
推論実行は3/4で行ったライブラリ読み込み以降と手順は同じです。
Jetson Nanoの場合、モデルの読み込みと推論モードでの実行に少々時間がかかります。
TensorRTを使うことも検討する必要あり?
また、メモリも不足気味になっています。このページでやったようにデスクトップではなくCUI環境を使い、NotebookではなくPythonコンソールで実行することを考慮してもいいかもしれません。
|
1 2 3 4 5 6 7 8 9 10 11 12 13 14 15 16 17 18 19 20 21 22 23 24 25 26 27 28 29 30 31 32 33 34 35 36 37 38 39 40 41 42 43 44 45 46 47 48 49 50 51 52 53 54 55 56 57 58 59 60 61 62 63 64 65 66 67 68 69 70 71 72 73 74 75 76 77 78 79 80 81 82 83 84 85 86 87 88 89 90 91 92 93 94 95 96 97 98 99 100 101 102 103 104 105 106 107 108 109 110 111 112 113 114 115 116 117 118 119 120 121 122 123 124 125 126 127 128 129 130 131 132 133 |
import os import numpy as np import torch from PIL import Image import transforms as T import pandas as pd #------------------------------------------------------------------------ class PennFudanDataset(object): def __init__(self, root, transforms): self.root = root self.transforms = transforms # load all image files, sorting them to # ensure that they are aligned self.imgs = list(sorted(os.listdir(os.path.join(root, "PNGImages")))) self.masks = list(sorted(os.listdir(os.path.join(root, "PedMasks")))) def __getitem__(self, idx): # load images ad masks img_path = os.path.join(self.root, "PNGImages", self.imgs[idx]) mask_path = os.path.join(self.root, "PedMasks", self.masks[idx]) img = Image.open(img_path).convert("RGB") # note that we haven't converted the mask to RGB, # because each color corresponds to a different instance # with 0 being background mask = Image.open(mask_path) # convert the PIL Image into a numpy array mask = np.array(mask) # instances are encoded as different colors obj_ids = np.unique(mask) # first id is the background, so remove it obj_ids = obj_ids[1:] # split the color-encoded mask into a set # of binary masks masks = mask == obj_ids[:, None, None] # get bounding box coordinates for each mask num_objs = len(obj_ids) boxes = [] for i in range(num_objs): pos = np.where(masks[i]) xmin = np.min(pos[1]) xmax = np.max(pos[1]) ymin = np.min(pos[0]) ymax = np.max(pos[0]) boxes.append([xmin, ymin, xmax, ymax]) # convert everything into a torch.Tensor boxes = torch.as_tensor(boxes, dtype=torch.float32) # there is only one class labels = torch.ones((num_objs,), dtype=torch.int64) masks = torch.as_tensor(masks, dtype=torch.uint8) image_id = torch.tensor([idx]) area = (boxes[:, 3] - boxes[:, 1]) * (boxes[:, 2] - boxes[:, 0]) # suppose all instances are not crowd iscrowd = torch.zeros((num_objs,), dtype=torch.int64) target = {} target["boxes"] = boxes target["labels"] = labels target["masks"] = masks target["image_id"] = image_id target["area"] = area target["iscrowd"] = iscrowd if self.transforms is not None: img, target = self.transforms(img, target) return img, target def __len__(self): return len(self.imgs) #------------------------------------------------------------------------ def get_transform(train): transforms = [] transforms.append(T.ToTensor()) if train: transforms.append(T.RandomHorizontalFlip(0.5)) return T.Compose(transforms) dataset = PennFudanDataset('PennFudanPed', get_transform(train=True)) dataset_test = PennFudanDataset('PennFudanPed', get_transform(train=False)) indices = torch.randperm(len(dataset)).tolist() dataset_test = torch.utils.data.Subset(dataset_test, indices[-50:]) # GPU check device = torch.device('cuda') if torch.cuda.is_available() else torch.device('cpu') #------------------------------------------------------------------------ model = pd.read_pickle("tutorial_model.pkl") #------------------------------------------------------------------------ img_count = len(dataset_test) print(img_count) #------------------------------------------------------------------------ #img_countより小さい値を指定 img_num = 2 # pick one image from the test set img, _ = dataset_test[img_num] # put the model in evaluation mode model.eval() with torch.no_grad(): prediction = model([img.to(device)]) #------------------------------------------------------------------------ prediction #------------------------------------------------------------------------ Image.fromarray(img.mul(255).permute(1, 2, 0).byte().numpy()) #------------------------------------------------------------------------ N = len(prediction[0]['boxes']) print(N) #------------------------------------------------------------------------ # Nより小さい値を指定 n = N - 1 Image.fromarray(prediction[0]['masks'][n, 0].mul(255).byte().cpu().numpy()) |
追加
こんな感じで、セグメンテーションマスクをまとめて表示してみます。
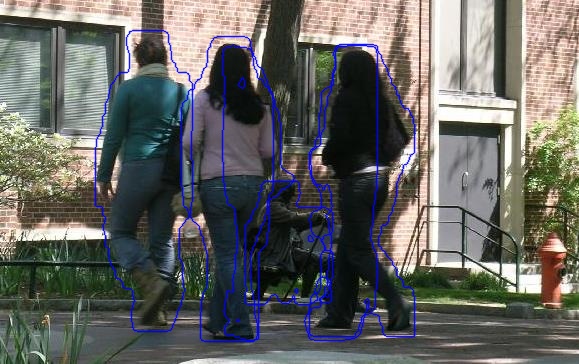
OpenCVを使ってみます。ただ、今回使ったDockerイメージにはOpenCVは実装されていません。
OpenCVの実装などはこのページをご参照ください。
以下のコード参照
Image.fromarray(img.mul(255).permute(1, 2, 0).byte().numpy())
CV用に元画像イメージ作成
image_org = img.mul(255).permute(1, 2, 0).byte().numpy()
opencvをインポートして、CV用にRGB変換。
|
1 2 |
import cv2 img_cv = cv2.cvtColor(image_org, cv2.COLOR_BGR2RGB) |
maskの輪郭を、太さ1の青線でアンチエイリアス(AA)で元画像に描き込みます。
|
1 2 3 4 5 6 |
for i in range(len(prediction[0]['masks'])): mask = prediction[0]['masks'][i, 0] mask = mask.mul(255).byte().cpu().numpy() contours, _ = cv2.findContours( mask.copy(), cv2.RETR_CCOMP, cv2.CHAIN_APPROX_SIMPLE) cv2.drawContours(img_cv, contours, -1, (255, 0, 0), 1, cv2.LINE_AA) |
保存
|
1 |
cv2.imwrite('/work/image_masks.jpg', img_cv) |
Appendix
state_dictを使ったモデルの保存と読み込み
1.学習済みモデルを保存する
保存コードは簡単です。
|
1 2 |
model_path = 'tutorial_model.pth' torch.save(model.state_dict(), model_path) |
2.モデルを読み込んで推論実行
読み込む前にmodel を定義しておく必要があります。
コード全体はこんな感じです。pickle版と比較してみてください。
今回は「Save on GPU, Load on GPU」なので以下のようになっています。
|
1 2 3 4 5 6 7 8 9 10 11 12 13 14 15 16 17 18 19 20 21 22 23 24 25 26 27 28 29 30 31 32 33 34 35 36 37 38 39 40 41 42 43 44 45 46 47 48 49 50 51 52 53 54 55 56 57 58 59 60 61 62 63 64 65 66 67 68 69 70 71 72 73 74 75 76 77 78 79 80 81 82 83 84 85 86 87 88 89 90 91 92 93 94 95 96 97 98 99 100 101 102 103 104 105 106 107 108 109 110 111 112 113 114 115 116 117 118 119 120 121 122 123 124 125 126 127 128 129 130 131 132 133 134 135 136 137 138 139 140 141 142 143 144 145 146 147 148 149 150 151 152 153 154 155 156 157 158 159 160 161 162 163 164 165 166 167 168 169 170 171 172 173 174 175 |
import os import numpy as np import torch from PIL import Image import transforms as T #import pandas as pd # new import torchvision # new from torchvision.models.detection.faster_rcnn import FastRCNNPredictor # new from torchvision.models.detection.mask_rcnn import MaskRCNNPredictor #------------------------------------------------------------------------ class PennFudanDataset(object): def __init__(self, root, transforms): self.root = root self.transforms = transforms # load all image files, sorting them to # ensure that they are aligned self.imgs = list(sorted(os.listdir(os.path.join(root, "PNGImages")))) self.masks = list(sorted(os.listdir(os.path.join(root, "PedMasks")))) def __getitem__(self, idx): # load images ad masks img_path = os.path.join(self.root, "PNGImages", self.imgs[idx]) mask_path = os.path.join(self.root, "PedMasks", self.masks[idx]) img = Image.open(img_path).convert("RGB") # note that we haven't converted the mask to RGB, # because each color corresponds to a different instance # with 0 being background mask = Image.open(mask_path) # convert the PIL Image into a numpy array mask = np.array(mask) # instances are encoded as different colors obj_ids = np.unique(mask) # first id is the background, so remove it obj_ids = obj_ids[1:] # split the color-encoded mask into a set # of binary masks masks = mask == obj_ids[:, None, None] # get bounding box coordinates for each mask num_objs = len(obj_ids) boxes = [] for i in range(num_objs): pos = np.where(masks[i]) xmin = np.min(pos[1]) xmax = np.max(pos[1]) ymin = np.min(pos[0]) ymax = np.max(pos[0]) boxes.append([xmin, ymin, xmax, ymax]) # convert everything into a torch.Tensor boxes = torch.as_tensor(boxes, dtype=torch.float32) # there is only one class labels = torch.ones((num_objs,), dtype=torch.int64) masks = torch.as_tensor(masks, dtype=torch.uint8) image_id = torch.tensor([idx]) area = (boxes[:, 3] - boxes[:, 1]) * (boxes[:, 2] - boxes[:, 0]) # suppose all instances are not crowd iscrowd = torch.zeros((num_objs,), dtype=torch.int64) target = {} target["boxes"] = boxes target["labels"] = labels target["masks"] = masks target["image_id"] = image_id target["area"] = area target["iscrowd"] = iscrowd if self.transforms is not None: img, target = self.transforms(img, target) return img, target def __len__(self): return len(self.imgs) #------------------------------------------------------------------------ def get_transform(train): transforms = [] transforms.append(T.ToTensor()) if train: transforms.append(T.RandomHorizontalFlip(0.5)) return T.Compose(transforms) dataset = PennFudanDataset('PennFudanPed', get_transform(train=True)) dataset_test = PennFudanDataset('PennFudanPed', get_transform(train=False)) indices = torch.randperm(len(dataset)).tolist() dataset_test = torch.utils.data.Subset(dataset_test, indices[-50:]) # GPU check device = torch.device('cuda') if torch.cuda.is_available() else torch.device('cpu') #------------------------------------------------------------------------ # new num_classes = 2 def get_model_instance_segmentation(num_classes): # load an instance segmentation model pre-trained pre-trained on COCO model = torchvision.models.detection.maskrcnn_resnet50_fpn(pretrained=True) # get number of input features for the classifier in_features = model.roi_heads.box_predictor.cls_score.in_features # replace the pre-trained head with a new one model.roi_heads.box_predictor = FastRCNNPredictor(in_features, num_classes) # now get the number of input features for the mask classifier in_features_mask = model.roi_heads.mask_predictor.conv5_mask.in_channels hidden_layer = 256 # and replace the mask predictor with a new one model.roi_heads.mask_predictor = MaskRCNNPredictor(in_features_mask, hidden_layer, num_classes) return model model = get_model_instance_segmentation(num_classes) #------------------------------------------------------------------------ # new # モデルの読み込み model_path = 'tutorial_model.pth' model.load_state_dict(torch.load(model_path)) model.to(device) #------------------------------------------------------------------------ img_count = len(dataset_test) print(img_count) #------------------------------------------------------------------------ #img_countより小さい値を指定 img_num = 2 # pick one image from the test set img, _ = dataset_test[img_num] # put the model in evaluation mode model.eval() with torch.no_grad(): prediction = model([img.to(device)]) #------------------------------------------------------------------------ prediction #------------------------------------------------------------------------ Image.fromarray(img.mul(255).permute(1, 2, 0).byte().numpy()) #------------------------------------------------------------------------ N = len(prediction[0]['boxes']) print(N) #------------------------------------------------------------------------ # Nより小さい値を指定 n = N - 1 Image.fromarray(prediction[0]['masks'][n, 0].mul(255).byte().cpu().numpy()) |
画像として保存する場合
|
1 2 3 4 |
n = N - 1 seg_img = Image.fromarray(prediction[0]['masks'][n, 0].mul(255).byte().cpu().numpy()) # 表示 seg_img |
保存
|
1 2 |
# 保存 seg_img.save('/work/A.jpg', quality=95) |
Appendix2
Docker Hub に wisteriahill/my-nvidia:latest というイメージをpush しています。
このイメージはNVIDIAのnvcr.io/nvidia/l4t-pytorch:r32.4.4-pth1.6-py3をベースにして
Pytorch(1.7.0)とTorchvision(0.8.1)、Jupyterlab(3.0.8)、pandas(1.1.5)がセットアップされたものです。
これをpullしておきます。
|
1 |
sudo docker pull wisteriahill/my-nvidia:latest |
これを使ってmy_maskrcnnという名前でコンテナを作成します。
sudo docker create -it --name my_maskrcnn --gpus all --network host -v /home/jetson/work-maskrcnn:/work wisteriahill/my-nvidia:latest
コンテナ起動
|
1 |
sudo docker start -i my_maskrcnn |
以降はworkに移動してJupyterを起動するだけです。





Leave a Reply